XVision IQW200DVR User Manual Download Page 13

13

10. USB Connection to PC

This section describes setting up the Receiver/DVR to a PC to enable the 
recording of up to 4 channels in the wireless system. 

1. 

InstallzthezDVRzSoftwarezprovidedzwithzthezReceiver/DVRzunit

2. 

RestartzthezPCzafterzinstallation

3. 

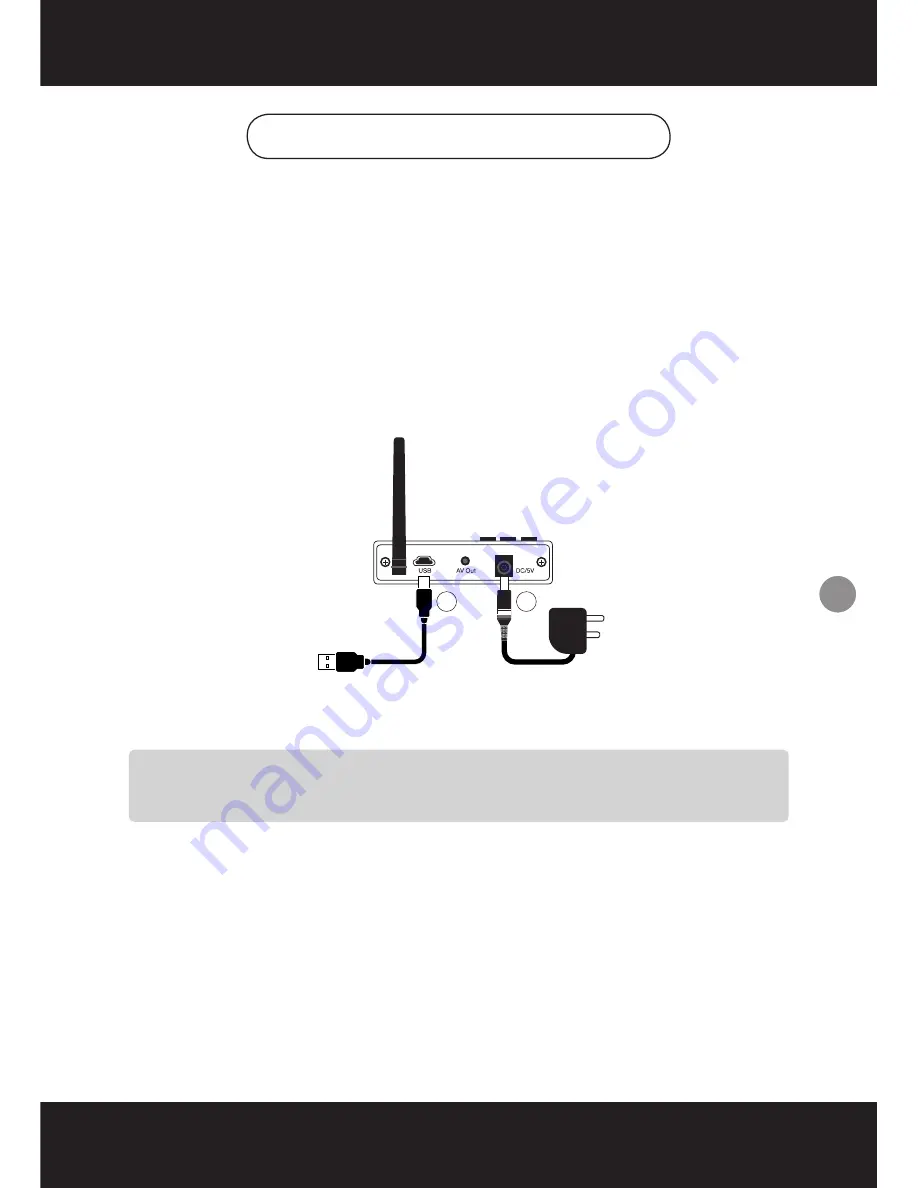
ConnectzthezReceiver/DVRztozthezPCzbyzFIRSTzconnectingzitztozthezPC’szUSBzportz
usingzthezUSBzCablezprovided

4. 

THENzplugzinzthez5VzDCzpowerzadaptor.

5. 

LaunchzthezGuardingzSoftware.zOncezconnected,zthezsystemzcontrolzwillzswitchz
fromzthezunitztozthezPC.z
z
z
z
z
z
z
z
z
z
z
z
z
z
z

NOTE:zReferztozthezDVRzSoftwarezInstructionsz(onzthezInstallationzCD)zforz
RecordingzinstructionszandzfunctionszavailablezwithzthezReceiver/DVRzunit.

4

3

TozPC

TozMainsz

Powerz

Summary of Contents for IQW200DVR

Page 1: ...ecommended power supplies Damage caused to the camera or receiver by incorrect voltage or wiring is not covered by the warranty z z Cutting any cable will void the warranty z z Do not drop pierce or dismantle the camera or receiver Before you begin IQW200C IQW200DVR IQW200C Digital Interference Free Wireless Camera IQW200DVR Digital Interference Free Receiver USB DVR UL PLEASE NOTE Camera and Rece...

Page 2: ...EATURES 3 3 CAMERA CONTENTS 4 4 CAMERA PARTS 4 5 RECEIVER DVR CONTENTS 5 6 RECEIVER DVR PARTS 5 7 INSTALLATION SETUP 6 8 BASIC OPERATION 7 9 ADVANCED MENU FUNCTIONS 9 10 USB CONNECTION TO PC 13 11 TROUBLESHOOTING 14 12 SPECIFICATIONS 15 ...

Page 3: ...ove z z 4 0mm Lens for a wide viewing angle of 64 z z Features IR LEDs for up to 10 metres Night Vision z z Includes a Microphone for Audio z z Unique Interference Free design prevents picture quality interference associated with older analogue wireless systems by reducing the picture speed fps to maintain picture quality and eliminate interference z z Designed for Wall Mounting z z Suitable for I...

Page 4: ...ontents 4 Camera Parts IQW200C Wireless Camera Bracket 5V DC Power Adaptor Antenna 3x Screws Wall Plugs Antenna Pairing Key Power Socket Camera Sunsheild Camera Lens Power LED IR LEDs Microphone Link LED REAR FRONT ...

Page 5: ...IQW200DVR Receiver DVR 5V DC Power Adaptor DVR Software z Installation CD Antenna Remote Control USB to USB Cable Headphone to Phono Cable REAR FRONT Power LED USB Output Pairing LED Remote Control Sensor Signal LED AV Output DC Power Input Antenna ...

Page 6: ...V 5 Turn on TV and switch to AV Mode 6 Connect AV cable s Audio and Video plug into the TV AV IN socket Yellow Video White Audio To connect the receiver to a Scart socket an optional Scart to Phono Socket adaptor is required 7 Connect the AV cable s Headphone plug into the Receiver DVR AV OUT socket 8 Connect the power adaptor into the Receiver DVR DC IN socket plug into the mains power supply The...

Page 7: ... camera image In Menu Mode Move between the selection z z Menu Enter Exit Menu Mode z z Zoom Zoom In Zoom Out Zoom In QVGA size 320 240 resolution Zoom Out VGA size 640 x 480 resolution z z Camera Select Pair In Zoom Mode Pan Tilt the camera image In Viewing Mode manually select amongst the available camera channels In Menu Mode assign and pair wireless cameras to the specified channel ...

Page 8: ...the Receiver DVR By pressing you can manually switch between the available cameras in the system OR set up Auto Scan in the Menu Mode z z System Message No Signal Indicates Service is out of Range Refer to Troubleshooting z z Zoom Shows the current Zoom status z z z z z z z z By pressing on the Receiver DVR you can manually switch between two resolutions In Zoom mode you can also Pan Tilt the came...

Page 9: ...F The Scan Time settings will automatically turn OFF every time the Camera Select button is pressed for manual selection of cameras Before setting the Scan Time ensure ALL available cameras within the system are paired to assigned channels See Pairing Cameras for details Use the and keys to change Scan Time interval To skip certain channels within the sequence simply set the camera as OFF in the S...

Page 10: ... and Zoom and Pair button functions will be disabled Unavailable channels will be shown as a blank screen The Quad display will default to a one camera display every time the Camera Select button is pressed for the manual selection of cameras Before setting the Scan Time ensure ALL available cameras within the system are paired to assigned channels See Pairing Cameras for details Audio Vol 5 Sec S...

Page 11: ... will appear on screen z z z z z z z z Within 60 seconds press the Pairing Key located on the power cable of the camera z z z z z Once Pairing is complete the screen will indicate the selected channel is active the Receiver DVR unit s Red Pairing LED will light up Audio Vol 10 Scan Time OFF Camera 1 ON Camera 2 ON Camera 3 ON Camera 4 ON Pair Cam 1 2 3 4 Reset Please Press Pair Key on Sensor Side ...

Page 12: ...12 z z Reset Select Reset in Menu Mode Press the Pair button to restore factory settings ...

Page 13: ...n 3 Connect the Receiver DVR to the PC by FIRST connecting it to the PC s USB port using the USB Cable provided 4 THEN plug in the 5V DC power adaptor 5 Launch the Guarding Software Once connected the system control will switch from the unit to the PC z z z z z z z z z z z z z z z NOTE Refer to the DVR Software Instructions on the Installation CD for Recording instructions and functions available ...

Page 14: ... camera antenna and receiver position Signal has been blocked If possible remove major obstacles between the camera and receiver Alternatively relocate the camera location Strong radio signal nearby Keep any WiFi routers away from the camera and receiver Strong electromagnetic interference near by Keep working motors hair dryers fan heaters air conditioners etc or microwave ovens away from the cam...

Page 15: ...n Speed 640 x 480 resolution at 5 10 fps 320 240 resolution at 15 25 fps Mounting Free Standing Remote Control Yes Operating Voltage 5V DC 300mA Max Power Requirements 5V DC 1000mA supplied Power Input DC Socket Audio Video Output AV Output Phono Plugs to TV USB Socket to PC Dimensions 85 x 81 x 27mm Minimum System Requirement for DVR Software 1GHz or faster Processor Microsoft Windows OS XP or Vi...

Page 16: ...RANTY This product is supplied with a 1 Year warranty The Warranty excludes products that have been misused including accidental damage and damage caused by normal wear and tear In the unlikely event that you encounter a problem with this product it should be returned to the place of purchase ...

Reviews: