background image

2

3

4

5

1

8

9

Use apps

Tap an app to open it.

Arrange apps

Touch and hold any app on the Home screen, then drag the app around. Drag 
an app to the edge of the screen to move it to a different Home screen. Swipe 
left or right to see other screens.

6

6

7

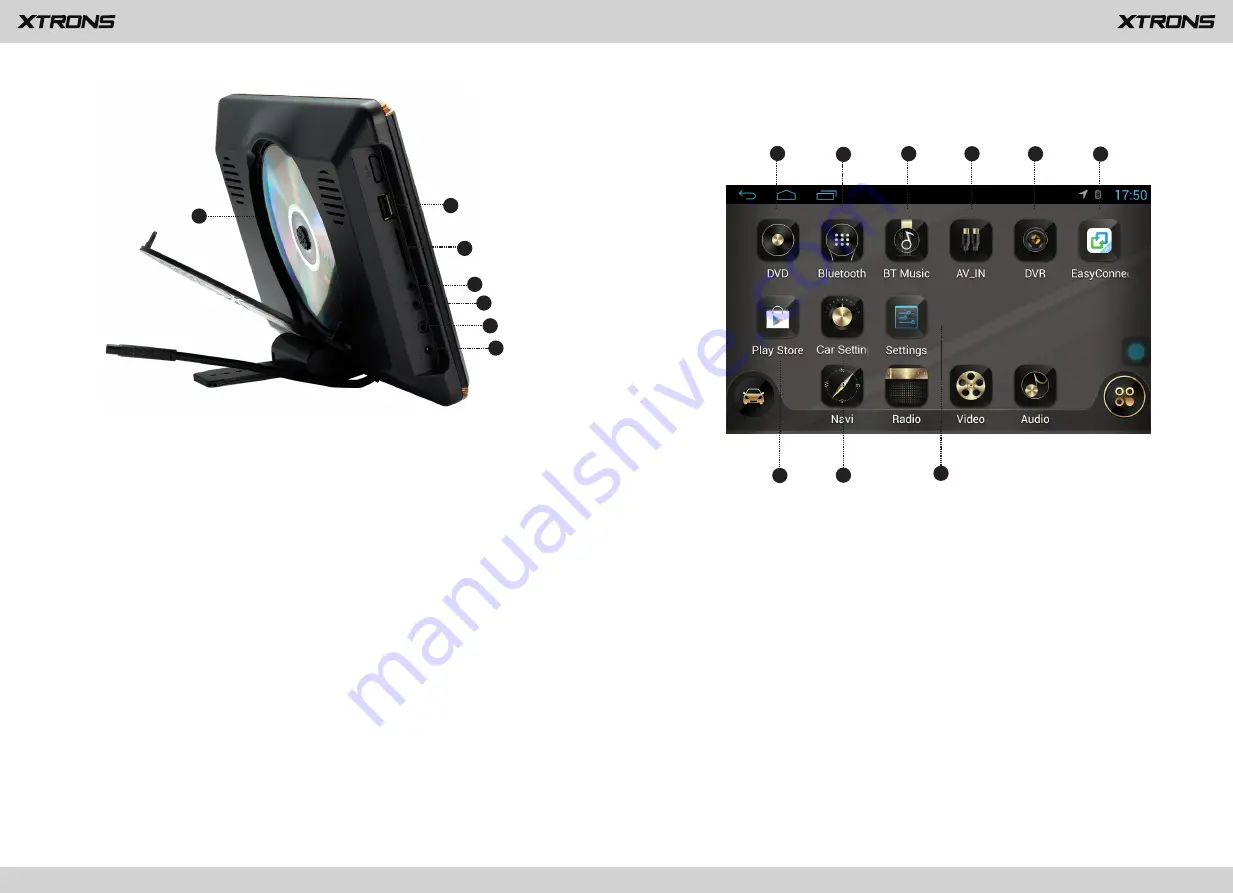
6. Screen Mirroring
7. Google Play Store
8. Car Setting
9. Settings

1. DVD
2. Bluetooth
3. Bluetooth Music
4. AV Input
5. DVR

5

9

10

11

12

13

14

8

8. Disc loading drive

Put in a disc to play.

9. USB port

Plug a USB storage device into the USB port.

10. SD card slot

Insert an SD memory card into the SD card slot.

11. AV output jack

Use to output AV signals from the product.

12. AV input jack

Use to receive AV signals from another device.

13. Headset jack

Use to connect an external headset to the product.

14. DC input jack

Use to connect DC 12V power supply.

Summary of Contents for HD1003HD

Page 1: ...ing this XTRONS product Please read through these instructions so you will know how to operate this product properly After you have finished reading the instructions keep this document in a safe place for future reference HD1003HD ...

Page 2: ...stract the driver or interfere with the driver s safe operation of the vehicle and thus result in serious injury or death Such use might also violate state or local laws Manufacturer disclaims any liability for any bodily injury or property damage that might result from any improper or unintended use NOTE Features and specifications listed in this manual are subject to change without notice NOTICE...

Page 3: ...iquids Electrical shock could result Also damage to the product smoke and overheating could result from contact with liquids If liquid or foreign matter should get inside this product park your vehicle in a safe place turn the ignition switch off ACC OFF immediately and consult your dealer Do not use this product in this condition because doing so may result in a fire electric shock or other failu...

Page 4: ...le Please comply with all applicable laws and regulations regarding the use installation and operation of this product If you want to dispose this product do not mix it with general household waste There is a separate collection system for used electronic products in accordance with legislation that requires proper treatment recovery and recycling Important safety information WARNING Do not attemp...

Page 5: ...e pedal pushed down before releasing the parking brake To avoid battery exhaustion WARNING WARNING Be sure to run the vehicle engine while using this product Using this product without running the engine can drain the battery 4 Do not install this product in a vehicle that does not have an ACC wire or circuitry available WARNING To avoid battery exhaustion Be sure to run the vehicle engine while u...

Page 6: ...dy as a reference for operating procedures and safety information Do not install this product where it may i obstruct the driver s vision ii impair the performance of any of the vehicle s operating systems or safety features including air bags or hazard lamp buttons or iii impair the driver s ability to safely operate the vehicle Please remember to fasten your seat belt at all times while operatin...

Page 7: ...Setting 9 Settings 1 DVD 2 Bluetooth 3 Bluetooth Music 4 AV Input 5 DVR 5 9 10 11 12 13 14 8 8 Disc loading drive Put in a disc to play 9 USB port Plug a USB storage device into the USB port 10 SD card slot Insert an SD memory card into the SD card slot 11 AV output jack Use to output AV signals from the product 12 AV input jack Use to receive AV signals from another device 13 Headset jack Use to ...

Page 8: ...Recent Apps 4 Display Date and Time 5 Display Time Clock Compass or Speedometer 6 Control and Playback of Currently Playing Audio 7 Display the Home Screen Apps 8 Navigation 9 Radio 10 Video 11 Audio 12 Display More Apps 4 Remote control 20 21 22 23 1 2 3 4 5 6 7 9 10 8 11 13 12 14 15 16 17 18 19 6 ...

Page 9: ... 1 6 7 8 9 10 4 5 11 12 1 POWER Press to turn on or turn off the power 2 DVD AV Press to select DVD mode or AV mode 3 AUDIO Press to choose Left Right or Stereo for the audio channel 4 MUTE Press to mute Press again to unmute 5 Press to eject a disc 6 Press to perform rewind or perform fast forward 7 BACK Press to return to the previous page 8 Arrow keys Press to move in a specified direction 9 US...

Page 10: ...r FM3 12 AM band AM1 or AM2 13 Perform seek tuning 14 Equalizer adjustment 15 Perform manual tuning forward 12 ZOOM Press to zoom in during DVD playback 13 SLOW Press to slow down the playback speed 14 REPEAT Repeat play 15 PROGRAM 16 TITLE Press to display the title during DVD playback 17 TFT MENU Press to display the menu 18 VOL VOL Press to turn the volume up or down 19 MENU Press to display th...

Page 11: ...onto the floor where it may become jammed Using the remote control under the brake or accelerator pedal 23 Number buttons Press to choose a track or a chapter by the track number or chapter number during DVD playback Playing a disc You can play a normal music CD Video CD or DVD Video using the built in drive of this product Insert a disc into the disc loading slot To eject a disc stop playback fir...

Page 12: ...headset is required for utilizing the IR transmitter function A dual channel wireless IR headset has a two position slide switch labeled A B When the switch is in the A position the headset plays audio from the source designated as IR A When the switch is in the B position the headset plays audio from the source designated as IR B To listen over your speakers 1 Make sure mute is off Select FM mode...

Page 13: ...iring No sound The disc is inserted upside down Insert the disc with the label upward The disc is dirty Clean the disc The disc is cracked or otherwise damaged Insert a normal round disc The files on the discs are in an irregular file format Check the file format The disc format cannot be played back Replace the disc The loaded disc is a type this product cannot play Check what type of disc it is ...

Page 14: ...t use cracked chipped warped or otherwise damaged discs as they may damage the built in drive Use 12 cm discs Do not use 8 cm discs or an adapter for 8 cm discs When using discs that can be printed on label surfaces check the instructions and the warnings of the discs Depending on the discs inserting the ejecting may not be possible Using such discs may result in damage to this equipment Do not at...

Page 15: ......

Page 16: ...www xtrons com ...

Reviews: