background image

18

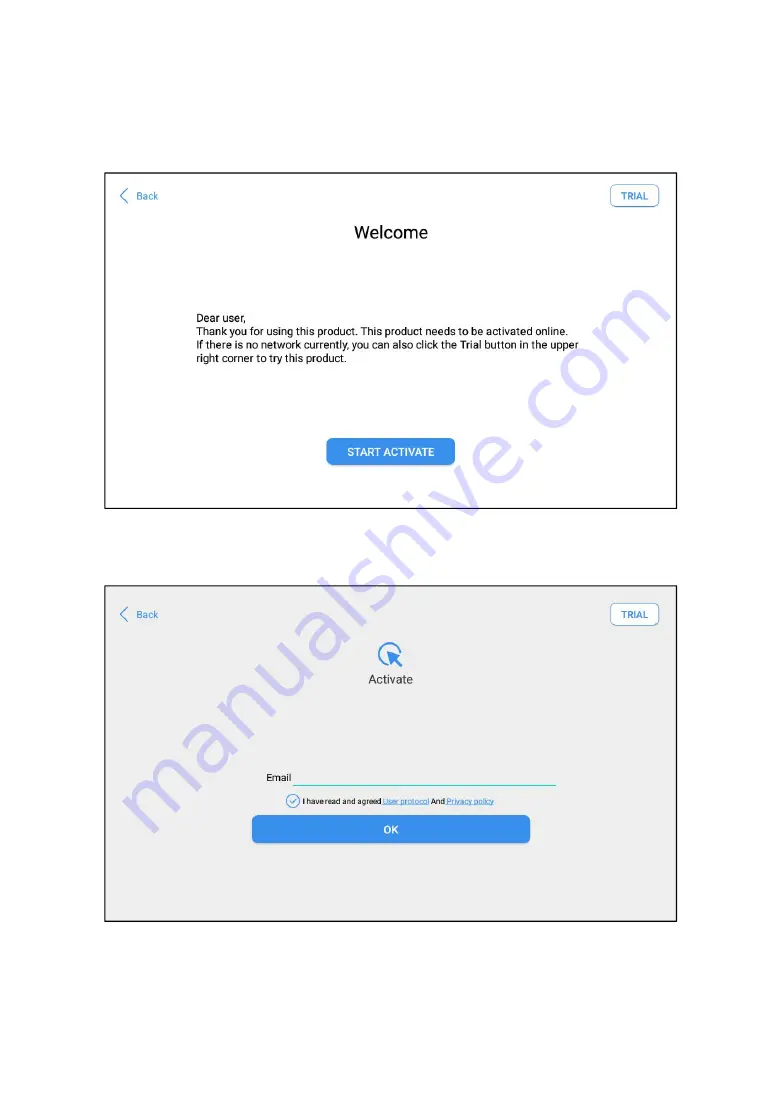
After setting the system language, you will enter the activation page,
as shown in the figure below. You can also click the "Trial" button in
the upper right corner to try it out before activation.

Fig 2-9

Click

Start Activate

to enter the activation page, as shown below:

Fig 2-10

Summary of Contents for D9 Smart

Page 1: ...Shenzhen Xtooltech Intelligent Co LTD USER MANUAL D9 Smart Diagnosis System ...

Page 2: ... trademarks service marks domain names logos and the company name All other marks for the other products and the company s name mentioned in the manual still belong to the original registered company You may not use the trademarks service marks domain names logo and company name of Xtool or other companies mentioned without written permission from the trademark holder Xtool reserves the right to t...

Page 3: ... not be liable for any incidental or consequential damages or for any economic consequential damages arising from the accidents of individual users and the third parties misuse or abuse of the device unauthorized change or repair of the device or the failure made by the user not to use the product according to the manual All information specifications and illustrations in this manual are based on ...

Page 4: ...Do not switch off the power or unplug the connectors during testing otherwise you may damage the ECU and or the Diagnostic Tablet CAUTIONS Avoid shaking or dismantling the unit as it may damage the internal components Do not use hard or sharp objects to touch the LCD screen Do not use excessive force Do not expose the screen to strong sunlight for a long period Please keep it away from water moist...

Page 5: ...pporting xtooltech com Tel 86 755 21670995 or 86 755 86267858 China Official Website www xtooltech com Please provide your device serial number VIN code vehicle model software version and other details when seeking technical support If there are screenshots or videos it will better help us locate your problem ...

Page 6: ... 1 GENERAL INTRODUCTION 1 Tablet 2 Front View of Tablet 2 Back View of Tablet 3 Host Ports 4 VCI box 5 Front Back View of VCI BOX 5 Top Bottom View of VCI BOX 6 Technical Specifications 7 Packing Kit 8 2 GETTING STARTED 9 Main Interface 9 Operation System 9 Main Menu 12 Function Buttons 13 Navigation Buttons 14 ...

Page 7: ... 23 Diagnose Functions 25 5 SPECIAL FUNCTIONS 32 Oil Reset 33 EPB 33 SAS 34 DPF 35 BMS Reset 36 Throttle 36 TPMS Reset 37 ABS Bleeding 37 Injector Coding 38 Gearbox Match 38 Suspension 39 Windows Initialization 39 Seat Calibration 40 Headlight 40 ECU Configuration 40 6 REPORT 41 Report 42 ...

Page 8: ...VII Replay 44 File Manager 44 7 SETTINGS 45 Language 46 Units 47 Bluetooth 48 My Workshop Info 48 VCI Information 49 About 50 8 REMOTE ASSISTANCE 52 ...

Page 9: ...more accurate diagnosis The D9 intelligent diagnosis system mainly includes Tablet VCI box Main test cable Connectors Power adapter Before performing the diagnosis program please make sure that the VCI box is successfully connected to your vehicle and connect the VCI box with Bluetooth on the tablet Some old cars with non OBD2 standard protocol need to be connected with our VCI box through specifi...

Page 10: ...ou to operate all diagnosis functions and it can also work as a normal Android tablet FRONT VIEW OF TABLET Fig 1 1 Tablet Front View The front of the tablet is mainly a touchable display screen you can use your fingers to operate on the screen to finish most of the diagnosis process ...

Page 11: ...ctures 2 Tablet Holder Used to support the tablet hold the tablet on the steering wheel or adjust the tablet height as needed 3 Nameplate Show the basic information about the tablet such as product name and serial number etc 4 Loudspeaker It supports external sound playback 1 ...

Page 12: ...ommunication and data transfer with VCI box when working on immobilizer reset process 3 VGA port Diagnostic communication port which can be used for OBD connection 4 DC charging port Charging port connected to the power adapter to charge the device 5 Power button Long press to turn the device on off short press to switch the device into sleep mode Hold for about 20 seconds to force shut down the d...

Page 13: ...CI box using a 12V power adapter to get access to the software FRONT BACK VIEW OF VCI BOX Front Back Fig 1 3 1 4 VCI box front back View 1 Display Screen Show status of the VCI box like battery voltage Bluetooth connection and car communication status 2 Nameplate Show basic information about the VCI box like the serial number Make sure that you re using the VCI box that is paired with the tablet o...

Page 14: ...W OF VCI BOX Top Bottom Fig 1 5 1 6 VCI box top bottom View 1 DB15 Port Used to connect the VCI box to the OBDII port on the vehicle 2 USB B Port Used to connect the VCI box to the tablet using USB B to USB3 0 cable 1 ...

Page 15: ... 768 resolution Connectivity USB Wi Fi Bluetooth Camera 8 megapixel autofocus rear camera with flash Sensor Gravity sensor Audio Input Audio Output Microphone Loudspeaker Ports USB3 0 DC charging port VGA port DOIP port Battery 10000mAh 3 7V lithium polymer battery Input Voltage 12V DC Operating Temperature 10 50 Relative Humidity 90 Dimensions 315 07 218 35 34 61 mm ...

Page 16: ...VERSAL 3 1 14 CITROEN 2 1 15 BENZ 38 1 16 BENZ 14 1 17 SELFTEST 1 18 OBD II 16 1 19 DB15 Main Cable 1 20 Battery Cable 1 21 Cigar Lighter Cable 1 Host group 1 Tablet PC 1 2 VCI Box 1 3 USB3 0 To Type_B Main Cable 1 4 Charger for Tablet 1 5 Power Cable US 1 6 Power Cable EU 1 7 USB3 0 Data Cable Connect to PC 1 Accessories 1 Color Carton 1 2 Packing List 1 3 Certificate of Quality 1 4 Tool Case 1 5...

Page 17: ...MAIN INTERFACE OPERATION SYSTEM The picture below Fig 2 8 is the home screen of the operating system of the device You can also return to this interface at any time by clicking home button the bottom navigation bar Fig 2 1 ...

Page 18: ...site of Xtool or search for other information b Gallery Click the Gallery icon to enter the album and you can quickly view the pictures or screenshots stored on the device You can select the picture you need click the share button on the upper right and send the picture to your mobile phone or PC via Bluetooth or USB connection c Application Menu Show all the apps that you have installed into the ...

Page 19: ...use the file explorer inside the D9 Smart Diagnosis System app Fig 2 2 e Android Settings This allows you to check and change the settings of the Android system including network battery status language device info and factory reset f D9 Smart Diagnosis System This app provides full system diagnostic functions and also offers a range of specialist maintenance services It will be referred to as the...

Page 20: ...osis application button on the menu the main menu will be shown as below Fig 2 3 This main menu contains Function Buttons and Navigation Buttons The touch screen navigation is made up of several menus and you can quickly access functions by clicking on the icons A detailed description of the menu structure can be found in the next section Function Buttons ...

Page 21: ...menu Enter TeamViewer for remote support Update the immobilizer diagnosis software through the Internet Select the language and unit shown in the app and check the Bluetooth status device info and workshop info View extended functions like checking reports and checking Xtool official website Check the diagnosis report that recorded on your device prints it as PDF files or share it with other devic...

Page 22: ...he table below Table 2 3 Items Descriptions Back to the previous screen Back to the main screen of the Android system Shows recently used applications Press to screenshot Increase volume Click here to return to the diagnostic vehicle models interface Decrease volume Check Bluetooth status Red disconnected Green connected ...

Page 23: ...15 NOTIFICATION BAR Slide down to open the notification bar You can adjust the brightness of the screen when you need it and you can also connect Wi Fi and so on Fig 2 4 ...

Page 24: ...ctory settings to the device the system will automatically enter the Activation Guide program This page allows you to set the language of the device operating system Fig 2 5 After selecting the system language click Next to enter the Wi Fi connection page as shown below Fig 2 6 ...

Page 25: ...ion page After successful network connection the automatic system will jump to Factory mode to download the software Fig 2 7 Once the software has been downloaded the tablet will automatically reboot and request the system language selection again Fig 2 8 ...

Page 26: ...you will enter the activation page as shown in the figure below You can also click the Trial button in the upper right corner to try it out before activation Fig 2 9 Click Start Activate to enter the activation page as shown below Fig 2 10 ...

Page 27: ...istration failed please check your network or contact Xtool aftersales services supporting xtooltech com 3 UPDATE After activating the device please update the software in Update first The device will pull all currently supported software packages from our servers and you can download them as needed To access the update application open the diagnosis application and click UPGRADE and it will show ...

Page 28: ...20 Fig 3 1 D9 Smart Diagnosis System has a three year free subscription when activated When you click update and it shows your device is now out of subscription please contact your dealer ...

Page 29: ...ous vehicle control systems including the engine transmission anti lock braking system ABS airbag system SRS and perform kinds of actuation tests VEHICLE CONNECTION To start the key programming process the VCI communication box should establish communication with the vehicle and Bluetooth should be connected between the tablet and the VCI box Please follow the steps below Fig 4 1 1 Turn on the tab...

Page 30: ...functions If necessary please connect the VCI box with the tablet using the USB 3 0 to USB B cable especially when working on some processes that needs to transfer lots of data like resetting the immobilizer ECU Some older vehicles are not using the OBD2 16 port please make sure you re using the correct connector There are some extra OBDⅠ connectors that s attached into D9 Smart Diagnosis System p...

Page 31: ...shown on the screen Select the region of your vehicle click the correct brand and start the diagnosis process Fig 4 2 For some of the vehicle brands like Volkswagen when you click on the software there are several ways to select the model or system you want to run a diagnosis including Automatic Detection Manual Selection and System Selection ...

Page 32: ...del of the vehicle in the sub menu to diagnosis the vehicle Enter System Selection you can also diagnose the vehicle according to the system according to your needs after selecting the model OBDII menu supports reading the common fault codes in the engine The DTCs may not be the same when compared with using common diagnosis software DEMO is a demonstration program You can perform basic diagnosis ...

Page 33: ...ead Clear Trouble Code Read Live Data Actuation Test Bi Directional Control Freeze Frame Fig 4 4 Read ECU Information This function is to read ECU version information which is the equivalent of System Identification or System information in some electronic control systems which means to read ECU related ...

Page 34: ...n date of diesel engine part number etc Fig 4 5 Read Trouble Code Read trouble codes that are stored in ECU For the fault code the diagnostic instrument will give specific detailed definitions and explanations to help you locate and eliminate the car fault ...

Page 35: ...at signal of the sensor may bias within limits which can be judged in Live Data Clear Trouble Code It allows clearing current and historical trouble codes memory in ECU under the premise that all the troubles are eliminated There are two types of fault codes one is permanent fault code and the other is non permanent fault code The former requires manual troubleshooting of the car before it can be ...

Page 36: ... of the system like for engine diagnosis there are parameters like oil pressure temperature engine speed fuel oil temperature coolant temperature intake air temperature etc Based on these parameters we can judge directly where the problem lies which helps to narrow the scope of maintenance For some vehicles during their actual operation the problems such as performance characteristics offset sensi...

Page 37: ...neers responsible for designing computer control systems programmed them so a scan tool could request information or command a module to perform specific tests and functions Some manufacturers refer to bidirectional controls as functional tests actuator tests inspection tests system tests or the like Reinitialization and reprogramming also can be included in the list of bidirectional controls ...

Page 38: ...h relates to data parameters the scan tool user initiates a request for information from the powertrain control module PCM and the PCM responds by sending the information back to the scan tool for display Most enhanced scan tools also can actuate relays injectors and coils perform system tests etc Users could check the individual part to see what is working properly by actuation test ...

Page 39: ...y used to analyze the reasons that may lead to car failures The living data items supported by vehicles of different brands are not exactly the same so the freeze frames displayed when diagnosing vehicle of different brands may also be different Some vehicles may not have the option of freeze frame which means that the model does not support this function ...

Page 40: ...inating the need to reset after resolving common problems The special functions interface is shown as below Fig 5 1 Due to the limitation of screenshots the special functions shown in this picture are not complete All special functions supported by the D9 Smart Diagnosis System are subject to the actual special functions displayed on the device Please make sure the vehicle you re working on suppor...

Page 41: ...his function can be performed in the following cases If the service lamp is on you must provide service for the car After service you need to reset the driving mileage or driving time so that the service lamp turns off and the system enables the new service cycle After changing engine oil or electric appliances that monitor oil life you need to reset the service lamp EPB Electronic Parking Brake E...

Page 42: ...servo motor is replaced SAS Steering Angle Sensors SAS System Calibration permanently stores the current steering wheel position as the straight ahead position in the SAS EEPROM Therefore the front wheels and the steering wheel must be set exactly to the straight ahead position before calibration In addition the VIN is also read from the instrument cluster and stored permanently in the SAS EEPROM ...

Page 43: ...f the car being driven in such a way that regeneration is not possible i e frequent short journeys a diagnostic trouble code will eventually be registered in addition to the DPF light and Check Engine indicators displaying A service regeneration can be requested in the workshop using the diagnostic tool DPF regeneration is used to clear PM Particulate Matter from the DPF filter through continuous ...

Page 44: ...owing cases The main battery is replaced Battery matching must be performed to clear original low battery information and prevent the related control module from detecting false information If the related control module detects false information it will invalidate some electric auxiliary functions such as automatic start stop function sunroof without one key trigger function power window without a...

Page 45: ...IL turns on and maintenance is performed the tire pressure resetting function must be performed to reset tire pressure and turn off the tire pressure MIL Tire pressure resetting must be performed after maintenance is performed in the following cases tire pressure is too low tire leaks tire pressure monitoring device is replaced or installed the tire is replaced the tire pressure sensor is damaged ...

Page 46: ...at the ECU can recognize and work normally Write injector actual code or rewrite code in the ECU to the injector code of the corresponding cylinder to more accurately control or correct cylinder injection quantity After the ECU or injector is replaced the injector code of each cylinder must be confirmed or re coded so that the cylinder can better identify injectors to accurately control fuel injec...

Page 47: ...n The air suspension system reset function enables the tablet ECU to match the current air suspension system information thereby ensuring the normal damping effect of the vehicle when driving Application scenarios The shock absorber is not the same height due to air leakage maintenance replacement etc After replacing the air pump assembly After replacing the electronic control module WINDOWS INITI...

Page 48: ...d to the sides pressing the button means that they remain direct and do not turn when you turn After replacing the headlights the adaptive headlight system needs to be matched ECU CONFIGURATION When a car with a high level configuration and a car with a low level configuration share the same ECU or you need to change or add some features unique to the high end vehicles you can use this function to...

Page 49: ...be re flashed multiple times 6 REPORT Diagnostic Report is used for viewing and printing the saved files such as Live Data Trouble Codes or pictures generated in the process of diagnosis users also can view a record of which cars have been previously tested It includes 3 parts Report Replay File Management Fig 6 1 ...

Page 50: ... you can view and delete the vehicle s diagnostic reports according to your needs Fig 6 2 When you open the report located in the header of the table is the studio information you filled in advance in the system setup then the information of the vehicle as shown as below ...

Page 51: ...ter and input the IP address of the printer in the APP or you can contact your dealer for help D9 Smart Diagnosis System don t provide the printer driver software please install a third part App on the tablet if you need the print your diagnosis report Step 2 Back to the Android main menu go to Settings Printing Turn printer on Step 3 Report Choose report Print PDF Report Print Fig 6 4 Step 4 Clic...

Page 52: ... living data please make sure you have record the live data during the diagnosis FILE MANAGER This function allows you to check and delete files on the device Please use this function under the guidance of professionals Ordinary users are not recommended to use it by themselves as it may cause software missing or malfunctioning ...

Page 53: ...ck the Settings button to adjust the default settings and view the information of the D9 SMART DIAGNOSIS SYSTEM There are several options available in the system settings Language Units Bluetooth My Workshop Info VCI Info About ...

Page 54: ...evice by themselves If you need to switch other languages please contact the dealer to unbind the current language configuration and rebind it to the language configuration you need to switch After the configuration is successfully changed you can switch the target language Fig 7 2 This will only change the language of the APP If you want to change the system language please go to Android Settings...

Page 55: ...d Step2 Settings Language Choose language Step3 OS Settings Language input Choose Language Step4 Back to Updates to pull all package again UNITS You can switch the unit used by the system D9 provides you with metric imperial and U S units You can directly click on the unit when you need it after the switch is successful a blue checkmark will be shown behind the unit s name Fig 7 3 ...

Page 56: ...O Click on My Workshop Information you can input your workshop information here As shown in the figure below you just need to fill in the valid information in the corresponding column and click SUBMIT And then it will show your workshop information in the report when you generate a diagnostic report including your company name address website telephone and mailbox ...

Page 57: ...I firmware name the latest firmware version the currently used firmware version and the VCI firmware type If the current firmware version is lower than the latest firmware version you can choose to update your firmware version and click Update VCI Firmware to complete the operation ...

Page 58: ...50 Fig 7 6 Before updating the VCI Firmware please ensure the tablet s connection to the Internet is stable ABOUT Tap on ABOUT you can check the serial number and APP version here ...

Page 59: ...51 Fig 7 7 ...

Page 60: ...iewer software thereby obtaining temporary remote support from the Xtool technical support center Fig 8 1 Tablets and mobile devices running TeamViewer are identified by a globally unique ID When the remote application is started for the first time the ID will be automatically generated according to the hardware characteristics and will not be changed in the future This TeamViewer ID can individua...

Page 61: ...is application The TeamViewer screen is displayed and the device ID will be generated 3 Your partner must install the remote control software on his her tablet by downloading the full version of the TeamViewer program http www teamviewer com online and then start the software on his her tablet at the same time to provide support and remote control of the tablet 4 Provide your ID to the partner or ...

Page 62: ...iuxian Avenue Nanshan District Shenzhen China Factory address 2 F Building 12 Tangtou Third Industrial Zone Shiyan Street Baoan District Shenzhen China Service Hotline 0086 755 21670995 86267858 Email marketing xtooltech com supporting xtooltech com Fax 0755 83461644 Website www Xtooltech com ...

Page 63: ...following measures Reorient or relocate the receiving antenna Increase the separation between the equipment and receiver Connect the equipment into an outlet on a circuit different from that to which the receiver is connected Consult the dealer or an experienced radio TV technician for help Specific Absorption Rate SAR information This device meets the government s requirements for exposure to rad...

Reviews: