4
Visit our website at http://xtm.globalhobby.com or for Customer Service at http://globalservices.globalhobby.com
SECTION 3: ASSEMBLING YOUR X-CELLERATOR RACER
Your X-Cellerator Racer includes three different clutch bells and two different spur gears so you can have control over the final drive ratio
of the truck. This will allow you to suit the truck to your driving style and track conditions. Listed below are the gear ratios that are
available, using the different combinations of clutch bells and spur gears:
15T Clutch Bell & 46T Spur Gear = 3.06:1
16T Clutch Bell & 46T Spur Gear = 2.87:1
17T Clutch Bell & 46T Spur Gear = 2.70:1
Basically, using the smallest clutch bell with the largest spur gear will give the truck great low-end acceleration, but top speed will be
sacrificed. Using the largest clutch bell with the smallest spur gear will give the truck enormous top speed, but low-end acceleration will
be sacrificed. So, if your track is very tight with a lot of corners, you would probably want to use a combination that will give you good
low-end acceleration versus a high top speed. If your track has a lot of straightaways, you would probably want to use a combination that
gives you higher top speeds.
15T Clutch Bell & 47T Spur Gear = 3.13:1
16T Clutch Bell & 47T Spur Gear = 2.94:1
17T Clutch Bell & 47T Spur Gear = 2.76:1
The 46T spur gear has already
been installed on the truck.
Step 1: Changing the Spur Gear
●
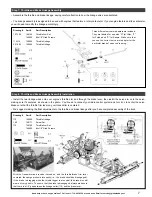
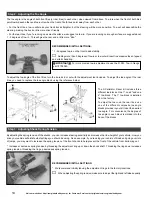
The 46T spur gear has been preinstalled from the factory. If you want to change the spur gear to the 47T option, do that now, following
the diagram below:
Drawing #
Part #
Part Description
14
149148
Ball Bearings (3/16" x 3/8")
24
149089
47T Spur Gear
25
149086
Slipper Pads
26,27
149090
Slipper Discs
28,29
149087
Slipper Spring & Washer
158
149163
Lock Nut Set
30
149141
Tool Bag
When removing the slipper pads from
the original spur gear, be careful not to
damage them. We recommend using a
small flat blade screwdriver to pry them
off of the spur gear.
When reassembling the slipper clutch,
tighten the hex nut completely then
back it off 5 turns. This is a good
starting point until you can make final
adjustments while driving the truck.
Step 2: Steering Servo Assembly
●
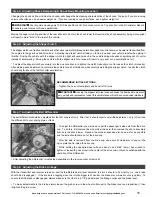
Install your steering servo onto the steering servo mounts.
●
Install the servo arm onto your servo, making sure that it's centered, as shown in the photo. You'll need to connect your radio control
system and turn it on to center the servo. Make sure that the steering trim lever on your transmitter is centered.
Drawing #
Part #
Part Description
160
149171
Screw Set
198
149179
Nylon Washers
42
149161
Bell Studs
Three different servo arms are included.
They are labeled for use with "H" for Hitec,
"F" for Futaba and "S" for Sanwa. Make
sure that you use the correct servo arm for
the particular brand of servo you're using.
Note that the ball-end is
mounted on the back of the
servo arm.


