background image

1

Need help or have any questions?  Call us at 1-714-963-0329 or send us an Email at [email protected]

Thank you for purchasing the XTM Racing X-Cellerator Racer.  This Assembly Manual is provided to help you enjoy your new X-Cellerator
Racer without any of the hassles you might expect.  Please read through all of the literature that is provided in the box.

IMPORTANT

  Before operating your new X-Cellerator Racer, please read and understand the warnings listed on the next page.  Failure to do so

could lead to bodily harm and/or injury.  The XTM Racing X-Cellerator Racer is not intended for persons under 12 years of age, unless closely
supervised by an adult.

ASSEMBLY MANUAL

Features of Your New XTM Racing X-Cellerator Racer:

Factory-Assembled Chassis and Drive-Train

Stylish Black & Blue-Streak Anodized 3mm Aluminum Chassis

Custom Receiver On/Off Switch w/Charge Cord

Aluminum Tuned Pipe

Engine Header w/Gasket and Coupler

Complete Clutch Assembly & Engine Mounts

Servo Mounts, Linkages, Hardware & Chassis Brace

Dual-Sponge Air Filter

Complete Ball-Bearing Set

Fuel Line

Clear Body w/Rear Spoiler, Body Clips & Decal Sheet

Front and Rear Sway Bars

46T & 47T Spur Gears (46T Installed)

15T, 16T & 17T Clutch Bells

1º, 2º & 4º Rear Suspension Mounts (1º Installed)

Dish Wheels

Shock Dust Boots

Threaded Shock Bodies

Center-Mounted Fuel Tank

CVA-Type Rear Drive Axles & Much, Much More

The XTM Racing X-Cellerator Racer is distributed exclusively by Global Hobby Distributors

18480 Bandilier Circle, Fountain Valley, CA  92708

All contents copyright © 2003, Global Hobby Distributors  Version V1.0  November 2003

Kit Product # 145611

Summary of Contents for X-Cellerator Racer

Page 1: ... Racing X Cellerator Racer Factory Assembled Chassis and Drive Train Stylish Black Blue Streak Anodized 3mm Aluminum Chassis Custom Receiver On Off Switch w Charge Cord Aluminum Tuned Pipe Engine Header w Gasket and Coupler Complete Clutch Assembly Engine Mounts Servo Mounts Linkages Hardware Chassis Brace Dual Sponge Air Filter Complete Ball Bearing Set Fuel Line Clear Body w Rear Spoiler Body Cl...

Page 2: ...not drive through water wet grass mud or snow Because your model is operated by radio control it is important to make sure you always are using fresh and or fully charged batteries Never allow the batteries to run low or you could lose control of the model If your model becomes stuck allow the engine to idle then retrieve your model by hand To prevent excessive r p m s from damaging the engine and...

Page 3: ...issing a parts bag a main part or even a singe part please contact us immediately using the contact information listed on the bottom of page 2 SECTION 1 PARTS IDENTIFICATION 1 Assembled Chassis w Battery Box and Switch 2 Front Wheels Tires 2 Rear Wheels Tires 1 Aluminum Tuned Pipe Bag 1 Exhaust Header Bag 1 Engine Air Filter Bag 1 Air Filter Prefilter Bag 1 47T Spur Gear Bag 1 15T Clutch Bell Bag ...

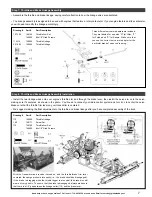
Page 4: ...e 46T spur gear has already been installed on the truck Step 1 Changing the Spur Gear The 46T spur gear has been preinstalled from the factory If you want to change the spur gear to the 47T option do that now following the diagram below Drawing Part Part Description 14 149148 Ball Bearings 3 16 x 3 8 24 149089 47T Spur Gear 25 149086 Slipper Pads 26 27 149090 Slipper Discs 28 29 149087 Slipper Spr...

Page 5: ...Screw Set 85 149139 Throttle Servo Mounts Drawing Part Part Description 160 149171 Screw Set 198 149179 Nylon Washers The battery box cover has been preinstalled You ll need to remove it first before installing the battery When reinstalling the battery box cover be careful not to pinch the battery wire Note that if you don t use a rechargeable battery pack you will need to install 4 AA cells in th...

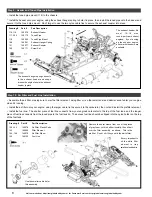
Page 6: ...ll using 600 grit sandpaper then clean it thoroughly using rubbing alcohol Doing this will allow the clutch shoes to bite better reducing clutch slipping We strongly suggest applying Thread Lock to the engine mounting screws to prevent them from loosening during use Step 6 Installing the Engine Install your engine to the chassis taking care to ensure that the engine is lined up properly and that t...

Page 7: ...e and Brake Linkage Assembly Installation Install the two linkage wires onto your engine s throttle arm and through the brake lever then install the servo arm onto the servo making sure it s centered as shown in the photo You ll need to connect your radio control system and turn it on to center the servo Make sure that the throttle trim lever on your transmitter is centered We suggest making the f...

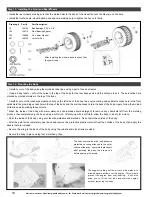
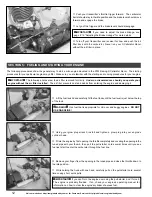
Page 8: ...ilable Step 10 Air Filter and Fuel Line Installation Assemble the air filter making sure to wet the filter element using filter oil so that small dust and debris cannot enter your engine when it s running Install the air filter onto your engine using the larger cable tie to secure it to the carburetor then cut and install the prefilter element Install the fuel line The shorter piece of fuel line c...

Page 9: ...tep 11 Installing the Front and Rear Sway Bars The rear wheels have a molded slot in them to accept the steel axle pin The front wheels don t have this slot Install the front and rear sway bar assemblies Note the longer sway bar is mounted in the rear of the chassis Drawing Part Part Description 149172 Front Sway Bar 149173 Rear Sway Bar 42 149173 Rear Sway Bar The ball ends should be threaded ont...

Page 10: ...ole in the back of the body Again follow the molded scribe lines when making these cutouts Wash the inside of the body with warm water and non abrasive liquid detergent to remove any chemicals left from the molding process then completely dry the body using a soft cloth After drying with a soft cloth allow the body to air dry for a while Paint the inside of the body using your favorite materials a...

Page 11: ...ansmitter and the receiver turned on rotate your transmitter s wheel forward to the right The front wheels on the X Cellerator Racer should turn right IMPORTANT If the wheels don t turn right flip the steering servo reversing switch on your transmitter to change the direction Rotate your transmitter s wheel backward to the left The front wheels on the X Cellerator Racer should turn left Let go of ...

Page 12: ...emoved for clarity Under no circumstances should you operate your engine without the air filter installed The air filter prevents dust and debris from entering the engine and damaging it Lift the fuel tank lid and carefully fill the fuel tank until the fuel level is just below the top of the tank WARNING Use fuel that is appropriate for nitro car and buggy engines DO NOT USE GASOLINE Using your gl...

Page 13: ...mple if you change the camber angle on the right front tire you should change the camber angle on the left front tire the same amount If you change the spring tension on the left front shock you should change the spring tension on the right front shock the same amount and so on Do not make any changes that are more than 3 degrees from the initial settings listed or the handling characteristics of ...

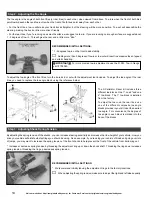
Page 14: ...tool included To adjust the toe angle of the rear tires you need to replace the toe angle block using the reference below The X Cellerator Racer kit includes three different toe blocks One 1º one 2º and one 4º toe block The 1º toe block is installed from the factory To adjust the toe in on the rear tires use one of the different composite toe angle blocks provided in your kit to set the desired to...

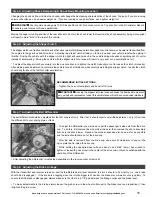
Page 15: ...slip for about the first foot after acceleration RECOMMENDED INITIAL SETTINGS Tighten the hex nut completely and back it off 5 turns IMPORTANT Running the slipper clutch too loose can cause the fiber pads to wear out very quickly and replacement under this circumstance will not be covered under warranty Step 7 Adjusting the Ball Differential The ball differential should be adjusted after the first...

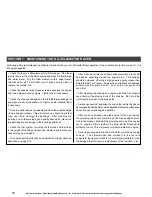
Page 16: ...ss Replace any fuel line you suspect may be damaged You should periodically check and adjust the slipper clutch as described on page 15 After a period of time the chassis will accumulate a lot of dirt and debris especially around the engine area This build up should be cleaned off using a high powered spray cleaner like Emerald Nitro Car Cleaner Some nitro car cleaners will damage anodized and or ...

Page 17: ... adjustment A Readjust brake linkage B Brake disc worn B Replace brake disc 3 Clutch does not engage A Clutch shoes damaged or worn A Replace clutch shoes B Clutch bell damaged or worn B Replace clutch bell 4 Clutch does not disengage A Clutch spring worn or damaged A Replace clutch spring 5 Truck does not go A Stripped spur gear A Replace spur gear B Stripped differential gear s B Replace differe...

Page 18: ...18 Visit our website at http xtm globalhobby com or for Customer Service at http globalservices globalhobby com ...

Page 19: ...19 Need help or have any questions Call us at 1 714 963 0329 or send us an Email at service globalhobby net ...

Page 20: ...t the time you return your vehicle for service An omission of this request implies permission for Global Services to service your vehicle at our discretion Include a method of payment for any service charges Send the unit to us by United Parcel Service Federal Express or by Insured Mail Postage is non refundable Send your package to IMPORTANT WARRANTY INFORMATION PLEASE READ Your XTM Racing X Cell...

Reviews: