


Page 14
It's very important when making changes to the settings of your Rail that you make the settings the same for each side. For
example, if you change the spring tension on the front right shock, you should change the spring tension on the front left shock
the same amount, etc.
ChASSIS TUNING GUIDE
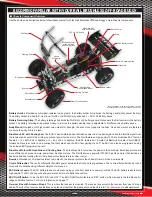
Chassis alignment and geometry are important if you want your Rail Brushless Off-Road Buggy to perform well. A good performing
buggy means a buggy that is easier to drive, too! Follow our guidelines in this section to get the most out of your Rail.
Do not make any changes that are more than 3 degrees from the initial settings or the handling characteristics of your
Rail will become very poor.
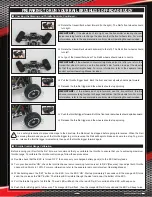
The toe angle is the angle of both front tyres (or rear tyres) to each other, when viewed from above. 'Toe-in' is when the front of both
tyres point toward each other and 'toe-out' is when the front of both tyres point away from each other.
l
For the front tyres, toe-in will make the Rail track (run) straighter, but the steering will be more sensitive. Toe-out will desensitise the
steering, making the Rail a little more driver-friendly.
l
For the rear tyres, if you're running on a smooth surface, we suggest no toe-in. If you're running on a rough surface, we suggest about
1 ~ 2 degrees of toe-in. This will give the rear end a little more 'bite' (traction).
n
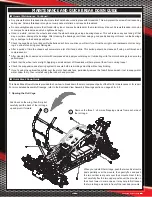
Adjusting Toe Angle - Front and Rear
Adding more than 3 degrees of toe-in or toe-out on the front will result in excessive loss of speed and erratic handling. Toe
adjustments should be measured with the Rail at its normal ride height.
recommended Initial settings
l
0 degrees toe-in on the front and 2 degrees toe-in on the rear for overall best 4WD driveability on most surfaces.
2 degrees toe-in
on the rear is stock.
q
To adjust the toe-in on the rear tyres, use one of the different suspension holders provided to set the desired toe angle, as described in the
procedures below. For convenience, the degree of toe angle is moulded into the back of each suspension holder.
q
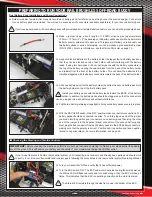
Remove the two 4 x 12mm self-tapping screws that hold the suspension holder in
place, then carefully pull out the suspension holder, being careful not to pull out the
hinge pins.
q
Install the desired suspension holder. Installation is the reverse of the disassembly
procedure.
PRO TIP:
For more precise toe angle adjustments, use a dedicated toe angle
adjustment gauge, available at most hobby retailers.
q
To adjust the toe-angle of the front tyres, turn the tie-rods in or out using an adjustable
wrench.
Straight - No Toe
Toe-In
Toe-Out
The Rail features a 14T pinion gear that provides the highest top speed. If driving on a track or in smaller areas, we recommend using
an XTM Racing 13T pinion gear. This will cut down slightly on the top speed, but acceleration will be better and you will get a little longer
run-time. It's all a matter of experimenting with different pinion gears to find the one that best suits your track and driving style. If driving
in sand, we recommend using an XTM Racing 12T pinion gear to ensure adequate low-end torque.
n
Adjusting Gearing
12T and 13T pinion gears are available as optional parts. For more information, see the Option Parts List on page 67. In addition,
most aftermarket 1/8th scale pinion gears designed for brushless motors with a 5mm shaft should work. After installing a different
pinion gear, you may need to readjust the gear mesh. For more information, see page 19.


