background image


- 9 -


 5. Initial Settings  


Initial setting through the Ethernet


1. 

Double click the Edit.exe : 


2. 

All the IPs in the same subnet  of the Ethernet 

will be found and be display in the  window by the 

software.  

The default name of IP  SENSOR ESZ-162 is IP 

TERMINAL

.  

The default IP address of ESZ-162  is  fixed at 

192.168.100.100


3. 

Click the 

equipment‘s name that you want to edit in the left of the window; it will turn fuscous, the 

equipment’s name and IP address will display in the windows, you can rename (use numbers and letters). After 
that, click the update button and the new setting will be work in 20 seconds. 


4. 

Double click the name of the equipment you want to control, the IE browser window will open and connected 

to this equipment in that Ethernet automatically. You also can type the IP address of the ESZ-162 in the IE 
browser  to open the web page of ESZ-162. We suggest you to update the IE to version 6.0 with SP1 or 
higher if your IE  notices you the security level is too low to open that web page. 


NOTICE:


1. 

IP Sensor ESZ-162 default setting is fixed IP address: 192.168.100.100. The IP address of your 
computer  should in the same subnet with that of IP Sensor ESZ-162, so that you can open the 
control web page. In 
the figure above, the IP address of ESZ-162 is 192.168.100.168. You can make sure the IP address of 
your computer first, then use the 

ipedit.exe 

to modify the IP address of ESZ-162. after that, 

your  computer can connect to the ESZ-162. 


2. 

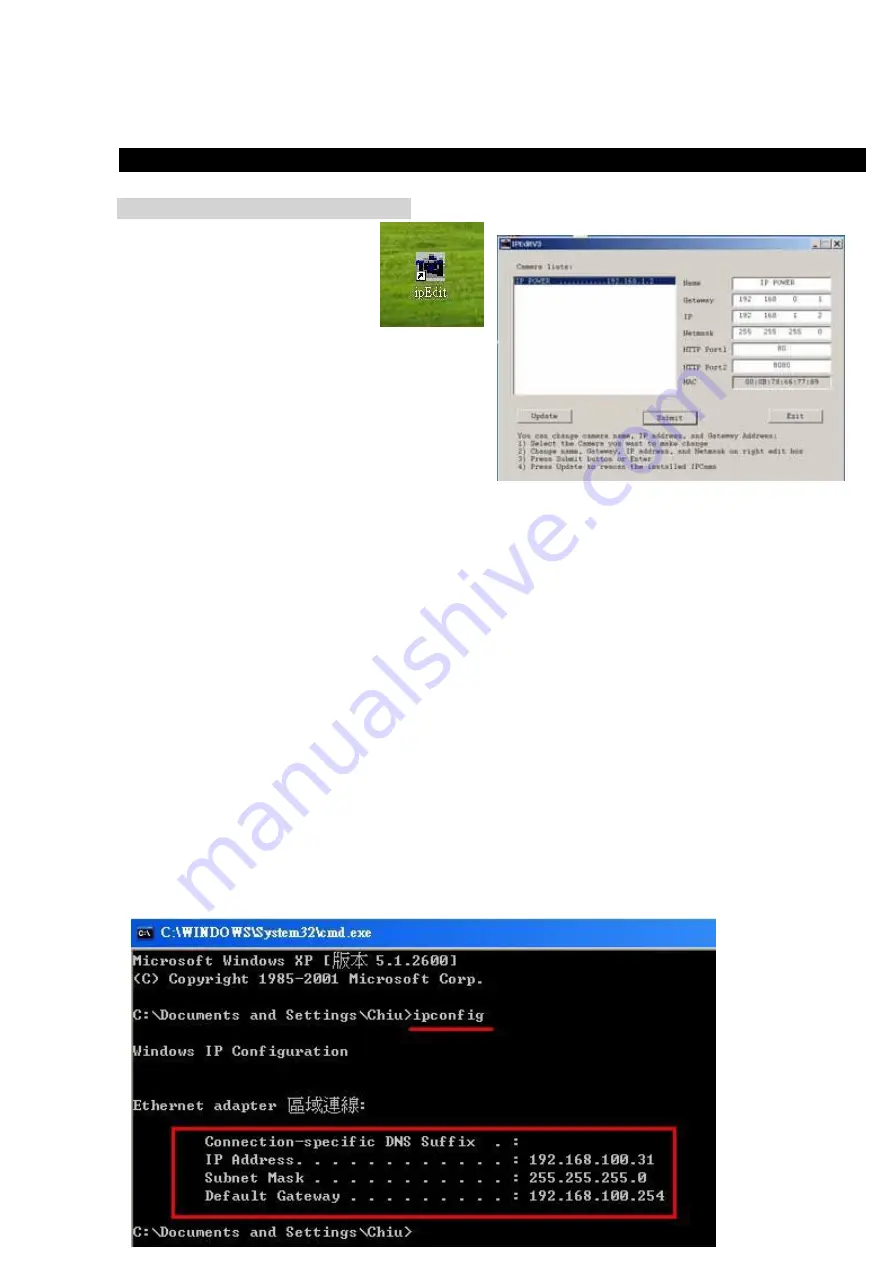
IF user can not enter the control web page, please set the IP address of IP Sensor ESZ-162 and 
your  computer in the same subnet. User can obtain the 

computer’s IP address, subnet mask, and 

default  gateway through the following method. 


start     run     type in 

“cmd”    then open the  MS –DOS window, now type in  “ipconfig” 


Summary of Contents for IP SENSOR ESZ-162

Page 1: ...ESZ 162 USER MANUAL...

Page 2: ...ease use the DC adapter provided by the dealer we have no responsibility for the possible damage caused by using other adapter 3 Do not use IP SENSOR ESZ 162 in strong shaking condition 4 Please conta...

Page 3: ...SOFTWARE INSTALLATION 5 INITIAL SETTING 9 INITIAL SETTING THROUGH ETHERNET READ MESSAGE FROM RS232 SERIAL PORT 6 CONTROL AND SETTING THROUTH THE INTERNET EXPLORE 10 STATE REPORT SETTING THE IP ADDRESS...

Page 4: ...pport multi platform and server application such as Internet Explore Netscape Mozilla Linux 4 16 route input digital signals monitoring 8 input signals can be set to dry contact or wet contact 5 3 rou...

Page 5: ...t again the alarm will stop 3 Fan monitoring of ESZ 162 ESZ 162 can monitoring 3 route fan DC fan 12V 0 5A if the working fan s rotate speed is lower than the preset value the buzzer will make an alar...

Page 6: ...dress of ESZ 162 IF following displays 192 168 10 100 50 in 5 times it means the IP address of ESZ 162 is 192 168 10 100 50 V1 V2 V3 means following will display the voltage values of 3 route monitori...

Page 7: ...nal debug purpose 18 19 SW 1 SW2 Setting the type of DI9 DI16 contact to dry or wet contact When SW2 is on the responding contact is wet contact when SW2 is off the responding contact is dry contact S...

Page 8: ...apter to the ESZ 162 4 Connect the power adapters of under control electric equipment to corresponding out port of ESZ 162 ESZ 162 HUB XDSL or ESZ 162 HUB ROUTER XDSL Turn on your computer and the pow...

Page 9: ...the IP address of the ESZ 162 in the IE browser to open the web page of ESZ 162 We suggest you to update the IE to version 6 0 with SP1 or higher if your IE notices you the security level is too low t...

Page 10: ...me admin Password 12345678 If forget password and can not log in webpage please press Reset for 10 second after few second then restart power Then the IP address and password will be back to default v...

Page 11: ...b page Input the default username admin and password 12345678 or the password set by you own click the OK and then you can enter the Web Control page State report of ESZ 162 You can enter the state re...

Page 12: ...voltage in 16 route digital input port is high level or low level DI 9 16 can be set to DRY or WET contact IP settings of ESZ 162 The IP settings of ESZ 162 can be modified through XtendLan Network As...

Page 13: ...e Internet through ADSL the IP address you gain is dynamic assigned by your ISP So the visitor maybe can not visit the ESZ 162 in local network because don t know its IP address We use DDNS method to...

Page 14: ...DNS message package through proxy server You can use the proxy server by selecting TRUE in Proxy enable column You can find the usable IP address and port of proxy server in some BBS or you can use so...

Page 15: ...o change the password of ESZ 162 The default password is admin Network wake up function User can use the network wake up function of ESZ 162 to wake up the PC than in the same subnet with ESZ 162 Clic...

Page 16: ...g the working state of ESZ 162 in these SNMP data packages for the user to manage it directly Click the SNMP setup option on the left of the webpage to enter the SNMP setup webpage Fill the IP address...

Page 17: ...17...

Page 18: ...normal range or user press the reset button on the right of ESZ 162 the alarm will stop If any other monitor items trigger the alarm the beeper will alarm again Notice if the input voltage exceeds th...

Page 19: ...between corresponding IO port is turn on or turn off SW1 is corresponding to DI9 and SW2 is corresponding to DI16 The setting of each contact needs the two switches SW1 and SW2 to work together If DI...

Page 20: ...rname ESZ 162 username factory default value is admin password ESZ 162 password factory default value is admin XXX XXX XXX XXX IP address of ESZ 162 Set cmd cmd xxxxxxxx as command format as ESZ 162 C...

Reviews: