background image

3. Funcionamiento

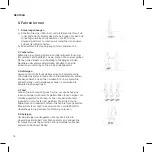
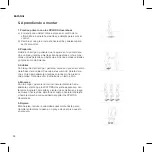
Encendido y Apagado: Presiona el botón de encendido / apagado, escucha el pitido de inicio y observa 

que la luz LED está encendida. Primero, coloca un pie en el primer XPLORA Hovershoe, activa el equilibrio 

automático, y luego pisa lentamente el segundo XPLORA Hovershoe. Mantén el centro de gravedad vertical.

Ir hacia adelante: Inclínate lentamente hacia adelante y siente el movimiento hacia adelante de los XPLORA 

Hovershoes, luego cambia lentamente el centro de gravedad, sintiendo que disminuyen la velocidad y se 

detienen. No vayas demasiado rápido.

Ir marcha atrás: inclínate lentamente hacia atrás y siente que los XPLORA Hovershoes se mueven hacia 

atrás, y luego mantente erguido y siente que la velocidad disminuye y se detiene.

Frenos: cuando vayas hacia adelante o marcha atrás, ponte derecho, con tu cuerpo perpendicular a los 

XPLORA Hovershoes, para activar los frenos. Puedes detener los XPLORA Hovershoes lentamente.

Calibración de equilibrio: Pon los XPLORA Hovershoes en posición horizontal. Mantén presionado el botón 

de encendido durante tres segundos, escucha un pitido y la luz LED lateral parpadeará. Suelta el botón y 

se completará la calibración. Ahora está listo para reiniciar y realizar una prueba de conducción. Si los 

hovershoes de XPLORA no están horizontales, debes realizar la calibración nuevamente.

Girar: Los XPLORA Hovershoes girarán en la misma dirección que tus movimientos. Gira tus pies a la 

izquierda o derecha para hacer girar los XPLORA Hovershoes en la dirección correspondiente.

Bajarse: Cuando necesites bajarte de ellos, deja que los XPLORA Hovershoes se mantengan equilibrados y 

bájate de los hovershoes uno a uno. Controla el centro de gravedad de tu cuerpo. No te muevas de un lado 

a otro.

Apagado y parar: Apaga siempre los XPLORA Hovershoes antes de levantarlos del suelo. Utiliza siempre el 

asa de agarre para sujetarlos.

Luces LED de batería: En el modo standby, cuando la luz LED está verde, los XPLORA Hovershoes tienen 

plena batería, cuando la luz LED está amarilla, la batería es inferior al 30% y cuando la luz LED está roja, la 

batería es inferior al 10%.

Cargando: En su uso diario, intenta evitar cargar los hovershoes después de agotar completamente la 

batería. Si la batería está baja, cárgala lo antes posible. Por favor, carga los XPLORA Hovershoes cada dos 

meses para conservar la batería. El cargador tiene dos luces, una roja que significa que la batería se está 

cargando y no está llena y una verde que significa que los XPLORA Hovershoes están completamente 

cargados.

ESPAÑOL

26

Summary of Contents for A10K

Page 1: ...Website www myxplora com E mail support myxplora com A10K HOVERSHOES...

Page 2: ...User Guide UK ES DE A10K HOVERSHOES...

Page 3: ...tages of a skateboard a Hoverboard and roller skates With a unique appearance dazzling LED lights colourful when running stylish and dynamic to give users unique sports fan The product uses self balan...

Page 4: ...s and prohibited use 2 Packing list and diagram 3 Operation 4 Smart alarm and automatic protection 5 Learning to ride 6 Clean maintenance and storage 7 Specifications 8 Certifications warranty and leg...

Page 5: ...hours It is recommended that children under the age of 10 and senior citizens over the age of 65 are not riding alone There must be a relative or friend who can stand next next to them and help The s...

Page 6: ...cohol abusers people with mental disabilities people with heart problems and persons with limited mobility are prohibited from riding 2 Packing list and diagram Foot mat LEDs Warning Power Level LEDs...

Page 7: ...orm a riding test If XPLORA Hovershoes are not horizontal you need to do the calibration again Turning XPLORA Hovershoes will turn in the direction of your movement Turn your feet to the left or right...

Page 8: ...vershoes remain at the same level If you continue to tilt forward to accelerate the XPLORA Hovershoes may lose balance and fall Overload or prolonged stay on the slope when the safety designed value o...

Page 9: ...With assistance from your friend relative put one foot in the middle of the unit s foot mat When comfortable stand straight and look straight ahead while stepping up with your other foot in the other...

Page 10: ...rrosive volatile chemicals or solvents to clean the XPLORA Hovershoes These substances can damage the appearance and internal structure of the XPLORA Hovershoes Maintenance and storage In daily use tr...

Page 11: ...lt angle 50 Traversable terrain Flat or hard ground free of bumps holes or obstacles Operating temperature 10 to 40 C IP Rating IP65 Battery Charging time for both units Approx 2 hours Nominal capacit...

Page 12: ...er and the buyer must present the purchase receipt to receive warranty service Maintenance costs beyond the warranty period or not covered by the scope of the warranty must be taken over by the buyer...

Page 13: ...oder Hoverboards Mit ihrem einzigartigen Aussehen blinkenden LED Lichter und ihrem stylischen und dynamischen Design sind XPLORA Hovershoes ein echter Hingucker Die Schuhe verwenden selbststabilisier...

Page 14: ...erbotene Nutzung 2 Packungsinhalt und Illustration 3 Verwendung 4 Intelligenter Alarm und Schutzvorrichtungen 5 Fahren lernen 6 Reinigung Wartung und Aufbewahrung 7 Spezifikationen 8 Zertifikate Gew h...

Page 15: ...er Verfassung sind Verwenden Sie die Hovershoes nicht unter dem Einfluss von Drogen oder von Medikamenten welche die Fahrt chtigkeit beeintr chtigen k nnen Kinder unter 10 Jahren und Senioren ber 65 J...

Page 16: ...n sein XPLORA Hovershoes d rfen nicht von zwei oder mehr Personen gleichzeitig verwendet werden Es d rfen w hrend der Verwendung keine anderen Personen insb Kinder getragen werden Schwangere Alkoholab...

Page 17: ...den Ein Ausschalter f r ca 3 Sekunden gedr ckt bis ein Piepton ert nt und das seitliche LED Licht blinkt Lassen Sie den Knopf danach los um die Kalibrierung abzuschlie en Sie k nnen die Schuhe nun du...

Page 18: ...res Vorn berbeugen zum Beschleunigen zu zwingen da Sie andernfalls das Gleichgewicht verlieren und st rzen k nnten berlastung oder zu lange Steigung Falls ein bestimmer Sicherheitswert eine gewisse Ze...

Page 19: ...en Sie mit Hilfe Ihres Helfers einen Fu zentral auf die Fu matte des ersten Schuhs Wenn Sie stabil stehen setzen Sie den anderen Fu auf den zweiten Schuh w hrend Sie aufrecht stehen und geradeaus scha...

Page 20: ...regelm ig komplett zu entleeren Laden Sie den Akku unmittelbar sobald der Akkustand niedrig ist Laden Sie Ihr XPLORA Hovershoes min einmal im Monat um die Akkukapazit t zu erhalten Lagern Sie die Hov...

Page 21: ...Max Neigungswinkel links rechts 50 Empfohlener Untergrund Eben fest und frei von Senken Huckeln und Hindernissen Betriebstemperatur 10 bis 40 C IP Klassifizierung IP65 Akku Ladezeit beide Schuhe Ca 2...

Page 22: ...eistungsfrist anfallen oder nicht unter die gesetzliche Gew hrleistungspflicht fallen m ssen vom K ufer bernommen werden Die folgenden F lle sind nicht von der Gew hrleistung abgedeckt Das Produkt ode...

Page 23: ...es que brillan cuando est en movimiento con un estilo din mico para todos los amantes de los deportes El producto utiliza una tecnolog a de detecci n de gravedad autocompensada que permite tambi n a l...

Page 24: ...ido 2 Contenido de la caja y diagrama 3 Funcionamiento 4 Alarma inteligente y protecci n autom tica 5 Aprendiendo a montar 6 Limpieza mantenimiento y almacenamiento 7 Especificaciones 8 Certificacione...

Page 25: ...menores de 10 a os y las personas mayores de 65 a os no monten solos Debe haber un pariente o amigo con ellos que pueda ayudar La seguridad de aquellos que no tengan experiencia previa es tu responsa...

Page 26: ...n del alcohol con discapacidades mentales con problemas card acos y con movilidad reducida tienen prohibido montar 2 Contenido de la caja y diagrama LEDs Advertencia Nivel de bater a LEDs Advertencia...

Page 27: ...ibraci n Ahora est listo para reiniciar y realizar una prueba de conducci n Si los hovershoes de XPLORA no est n horizontales debes realizar la calibraci n nuevamente Girar Los XPLORA Hovershoes girar...

Page 28: ...an al mismo nivel Si contin as inclin ndote hacia adelante para acelerar los hovershoes de XPLORA pueden perder el equilibrio y te podr as caer Sobrecarga o permanencia prolongada en la pendiente cuan...

Page 29: ...3 Subirse Con la ayuda de tu amigo pariente coloca un pie en el centro de la base de la unidad Cuando est s c modo p rate dere cho y mira hacia adelante mientras colocas el otro pie en la otra unidad...

Page 30: ...o solventes corrosivos o vol tiles para limpiarlos XPLORA Hovershoes Estas sustancias pueden da ar el aspecto y la estructura interna de los XPLORA Hovershoes Mantenimiento y almacenaje Intenta evitar...

Page 31: ...n de derecha a izquierda 50 Terreno transitable Superficie plana o dura sin bultos agujeros u obst culos Temperatura de funcionamiento 10 to 40 C Clasificaci n IP IP65 Bater a Tiempo de carga 2 horas...

Page 32: ...rador y el comprador debe presentar el recibo de compra para recibir el servicio de garant a El comprador debe asumir los costes de mantenimiento m s all del per odo de garant a as como los costes no...

Reviews:

Related manuals for A10K