background image

5

Before installing the receiver permanently, fit it in the approximate place in your car ,and connect the
equipment according to the speakers and electrical connections. When
your system is operated properly,(preferably with the
car engine running), follow the instructions
for permanent installation
of your system.

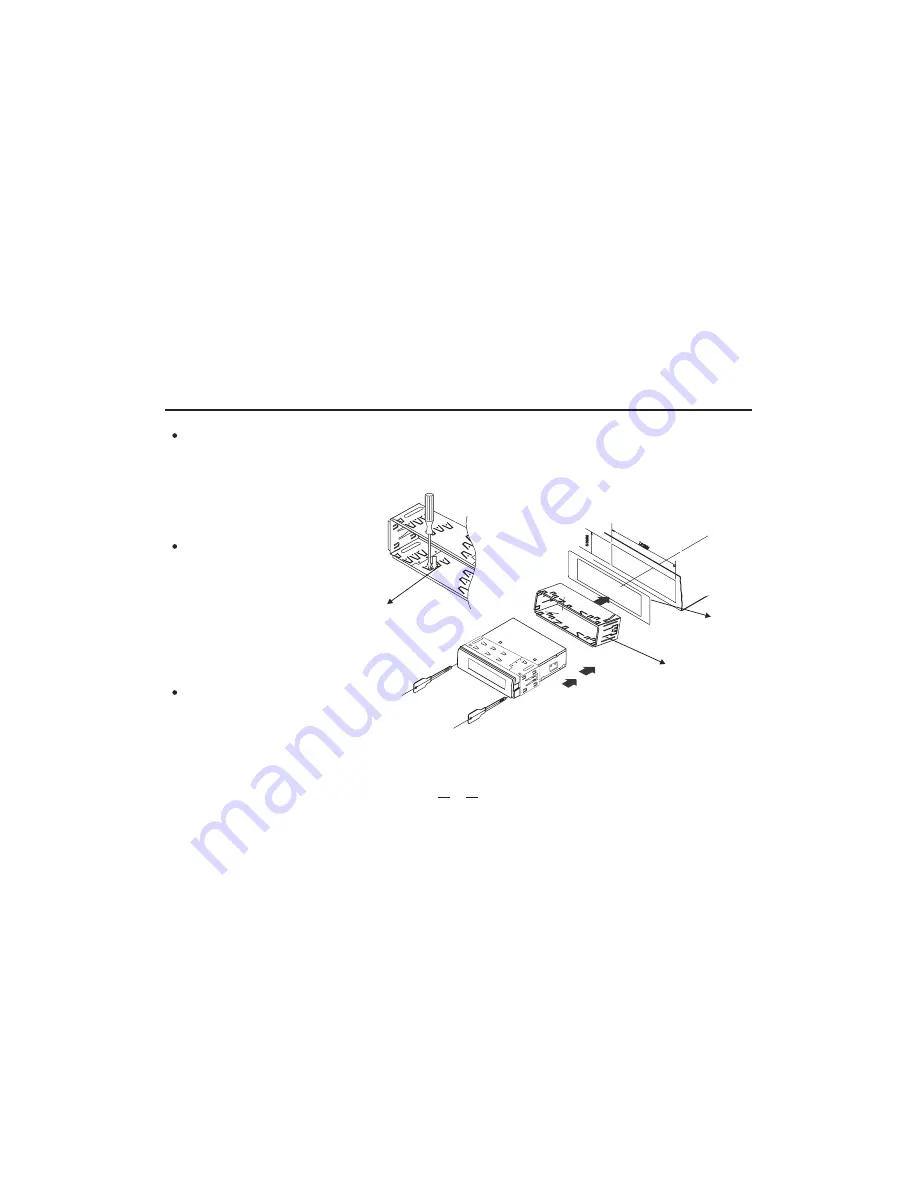
1) Adapter
(not supplied)

2)Bend over tabs

of half sleeve

(supplied)

Half sleeve
(supplied)

3) Two wrenches for releasing
the unit (supplied)

INSTALL THE UNIT

1)Install half sleeve, can be with or
without adapter. It will fit better
with adapter.
2)Bend over some tabs to secure
the half sleeve inside of dash.
3) Support strap to be strutted
under dash, secure this strip to
avoid skipping of disc.

Insert removal wrench into the small
gap on the right side of the unit and pull
the unit slightly out on the same side,
then release the wrench. Repeat the
same action for the left side. By now,
you can remove the unit and unplug
the wires connector.

REMOVE THE UNIT

Installation

Summary of Contents for X348NT

Page 1: ...PWR PWR TOUCH SCREEN 1 DIN 7 TFT LCD DVD PLAYER X348NT MADE IN CHINA R...

Page 2: ...Contents Warning and Precautions 2 Electric Connection 4 Installation 5 General Features 6 Setup Operation 11 Radio Operation 12 Remote Control 7 Accessories 19 Specifications 26 Troubleshooting 21 Pl...

Page 3: ...to moisture or water to prevent electronic sparks or fires Please don t change the fuse in the power cord without professional guidance improper fuse may cause damage to this using unit or even cause...

Page 4: ...ulate inside the unit DO NOT use the unit in this situation eject the disc and wipe off the bead on the disc If the unit still doesn No fierce impact to the LCD monitor when it is in open position for...

Page 5: ...To car chassis CAR ANTENNA FRONT L FRONT R REAR L Light wire REAR R Orange TV ANTENNAPLUG Without TV tuner without this wire Brown Back car detecting wire Parking Brake Light Gray Connect control for...

Page 6: ...ve supplied 3 Two wrenches for releasing the unit supplied INSTALL THE UNIT 1 Install half sleeve can be with or without adapter It will fit better with adapter 2 Bend over some tabs to secure the hal...

Page 7: ...6 General Features ADJ CLOCK ST BAND BT MUTE EJECT V O L MIC IR RESET AUX IN STOP RPT SRC Adjust angle Stop Clock Adjust angle RPT ST 10 8 6 3 1 4 19 2 9 7 12 11 17 5 18 16 15 14 13 PWR...

Page 8: ...rding to the 1 2 3 4 5 6 7 and poles Store the battery in a place where children cannot reach to avoid risk of accident 8 10 1 2 3 4 5 6 7 8 9 12 15 13 11 14 10 VOL SRC PWR Button Rotate the VOL butto...

Page 9: ...adio scan AF Button Search stations automatically TA Button Traffic broadcast PTY Button Program style Button Forward Next chapter Button Rewind Last chapter Button Increase recluce volume SEL Button...

Page 10: ...ume Rotate the VOL button in counterclockwise direction NOTE When the power is on the screen enters RADIO mode automatically press ESC button to go back to the main menu press SRC button shortly to sw...

Page 11: ...tton it can move one grade down along indication it can resume up along indication When you turn on the unit again the angle will be the same as the last angle that you set ADJ ANGLE 10 Play operation...

Page 12: ...ight Color Contrast Tint Vmode STAD USER BRIG SOFT Audio setup Audio setup Bass Treble Balance Fader setup between 0 14 EQ setting FLAT System setup Loud ON and OFF Beep ON and OFF Time Adjust press o...

Page 13: ...and will stop when meeting one Press AS PS button Seek Tune In radio playing mode holding down the AS PS icon will seek and store strong frequency stations automatically Select station Note FM band ca...

Page 14: ...o signal or CD program If press TA again other program will recover and the traffic information program will quit PTY Program type Press PTY the unit will begin to receive program as news current affa...

Page 15: ...ONE REP ALL REPEAT OFF TIT Play pause In play mode press button to switch to play or pause mode Five direction button In play mode you can touch icon to choose music touch to play music E L R E L R R...

Page 16: ...ss button to play or pause PLAY PAUSE Under USB or SD play press can select tracks Press ST RPT button first to repeat the playing track RPT ONE RPT ALL RPT DIR RPT OFF REPEAT Select Press button to p...

Page 17: ...of Bluetooth Bluetooth has the following functions A Paring Make DVD Bluetooth function as handsets facility through pairing B Connecting After connecting with the handset you can operate the mobile p...

Page 18: ...t the numbers on the screen press icon can correct the numbers Press icon to answer phone call Press icon to cancel or hang up Answering Answering functions as follows A After connected the unit can u...

Page 19: ...TFT screen to enter TV mode You need install TV antenna when receive program Only for remote control Enter a channel number by pressing 0 to 9 Direct Channel Selection Note If the unit does not have t...

Page 20: ...mber of items External view Number of items The use of any accessories except of those provided might result in damage to the unit Make sure only to use the accessories shipped with the unit as shown...

Page 21: ...upside down No disc in the unit Disc is extreme dirty Disc is inserted upside down The disc is not compatible with the unit The disc s region code is not the same as the unit s Clean the disc or chang...

Page 22: ...power rating does not fit into the unit output power The speakers are connected incorrectly The speaker cord is contacted with the bodywork ACC and BATT are connected incorrectly The speakers have bee...

Page 23: ...the same as the marked color system on the label for some piratic discs The video cord is broken The video cord is not connected correctly False operations Correct the connection according to Electri...

Page 24: ...ns Overall Diagram Close the LOCAL function Disc cannot be played back Interruption occurred during playback Disc is scratched Disc is too dirty or wet The pickup is dirty Disc is scratched Disc is in...

Page 25: ...ing subtitle files Audio language subtitle cannot be changed There is only one audio language subtitle in the disc Change another disc containing multi language audio or subtitle View angle cannot be...

Page 26: ...s only front and rear channels cannot be combined in use with 2speakers Load impedance compatible 4 to 8 ohm speakers Fuses 10 amp Dimensions 52 5cm L x26 0cm W x29 3cm H Weight 2 5Kg DISPLAY UNIT GEN...

Page 27: ...t cover the costs incurred for installation removal product damages i e discs tapes etc or reinstallation of the product This warranty is void if company deems the unit to have been damaged through mo...

Reviews: