background image


OPERATING INSTRUCTIONS 


Operating the system 
 

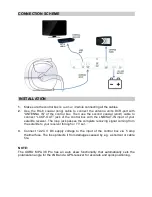
Make sure all the connections between antenna system and control box and between 
receiver and control box using the loop out port are connected properly.  
 
Make sure the handle of the antenna points towards the floor while in operation in order 
to prevent a limited signal reception. 
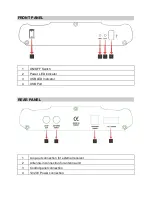
 

Turn on the system 

“Turn on” the On/Off switch on the front of the control box. The LED on the front panel 
will turn on and the system will start to operate. You can see on the control panel what 
satellite the system is set to. 
 
The  system  will  automatically  search  for  the  satellite.  This  will  take  about  30-60 
seconds. After the satellite has been found the signal will be transferred to your receiver 
or TV set via the loop out port of the control box. 
 
You can use the control panel to switch between the preprogrammed satellite positions. 
 

Turn off the system 

 
To turn off the system, press the “ ” button located on the front of the control panel.  
When the antenna system is totally closed, the LED indicator will be turned off on the 
control panel.  
 

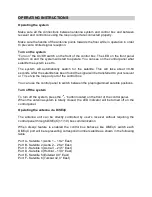
Operating the antenna via DiSEqC  
 

The  antenna  unit  can  be  directly  controlled  by  user’s  receiver  without  requiring  the 
control panel through DiSEqC(1.1/1.0) bus communication 
 
When  diseqc  feature  is  enabled  the  control  box  behaves  like  DiSEqC  switch  each 
DiSEqC port will be representing correspond number satellite as shown in the following 
table 
 
Port A - Satellite 1 (Astra 1 – 19,2° East)           


Port B - Satellite 2 (Astra 2 – 28,2° East)                    
Port C - Satellite 3 (Astra 3 – 23,5° East)           
Port D - Satellite 4 (Hotbird – 13,0° East)           
Port E - Satellite 5 (Eutelsat 9,0° East) 
Port F - Satellite 6 (Turksat 42,0° East) 


Summary of Contents for MPA 38

Page 1: ...PORTABLE ANTENNA SYSTEM XORO MPA 38 PRO INSTALLATION AND OPERATING MANUAL...

Page 2: ...GENERAL 3 SAFETY INSTRUCTIONS 3 PACKING LIST 3 SET UP LOCATION 4 CONNECTION SCHEME 5 INSTALLATION 5 FRONT PANEL 6 REAR PANEL 6 OPERATING INSTRUCTIONS 7 WARRANTY TERMS 8...

Page 3: ...technical service This system is not suitable for using while in motion The control box is designed to be installed into the dashboard of the vehicles If dashboard installation is not possible for ve...

Page 4: ...he signals Any tall objects will block the signal The antenna unit requires direct line of sight to satellites for optimal signal reception The signal receiving performance of the system may decrease...

Page 5: ...with the LNB SAT IN input of your satellite receiver The loop jack passes the complete receiving signal coming from the satellite to your receiver through or TV set 3 Connect 12 24 V DC supply voltag...

Page 6: ...N OFF Switch 2 Power LED Indicator 3 USB LED Indicator 4 USB Port REAR PANEL 1 Loop out connection for external receiver 2 Antenna in connection for antenna unit 3 Control panel connection 4 12 24V Po...

Page 7: ...ceiver or TV set via the loop out port of the control box You can use the control panel to switch between the preprogrammed satellite positions Turn off the system To turn off the system press the but...

Page 8: ...fulfilled according to the current legal warranty The warranty applies only in the country where the product was purchased The following is excluded from warranty damage to the polish accessories batt...

Page 9: ...Notes...

Page 10: ...zimuth moving range 0 380 limited Elevation moving range 0 80 Operating voltage 12 24V DC Operating power consumption 30W Dimensions in closed position 45x48x46 LxWxH in cm Weight 5 5 kg Storage tempe...

Reviews: