XE Series LCD Functionality: User Guide
Page 4 of 6
Xorcom Ltd.
Misgav Industrial Park, POB 60
D.N. Misgav 20174, Israel
Tel: +972-4-9951999
Matching Extension Numbers to Ports
Overview
Another great application supported by the touch panel on the Xorcom XE Series is the ability to match
telephone extension numbers with physical FXS ports. This feature is very useful when attaching your
telephone cables for the first time. It is also quite helpful during troubleshooting.
Methods for Identifying the Ports
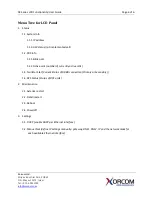
The tree-view menu on the screen supports four methods for identifying the physical port:
1.
Extension: the telephone’s extension number
2.
Channel: the DAHDI channel number
3.
XPD: the DAHDI XPD number
4.
SPAN: the DAHDI SPAN number
Make sure to have your numbers ready before starting the identification process.
The Identification Process
To start the identification process, access the Menu on the server’s touch panel by pressing the “Enter”
key. Press “Enter” to choose “Status”, use the down arrow to navigate to “PBX Info” and press “Enter”.
Finally, press “Enter” to choose “Blink Port”. This function will cause the Light Emitting Diodes (LEDs) to
blink for a few seconds once you input the identifier. From this point on the menu you’ll see the four
methods for identifying the physical port: extension number, channel number, XPD and SPAN. For
example, to match using the extension number, choose the “Extension” option by pressing “Enter”. Use
the number pad to input the relevant extension number, pressing “Enter” to submit. As a result, you’ll
notice that the red and green LEDs are blinking on the associated port for approximately 5 seconds.
Once you’ve identified a port, simply attach the corresponding cable to it.

