background image

Touch Screen Operation

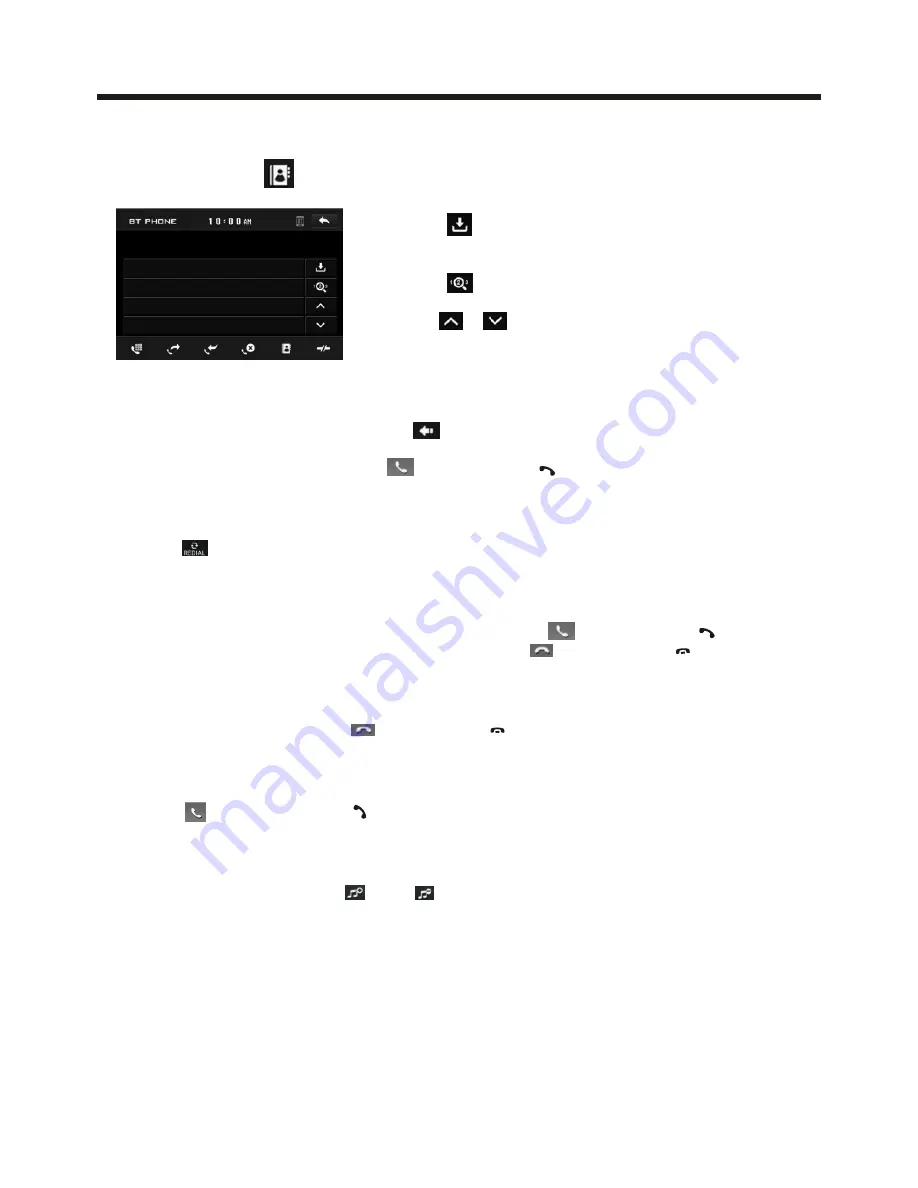
CONTACTS

 b. Use the number icons to input your desired phone number;

 *  When inputting a wrong digit, use         icon or < button to delete it. 

 c. After finishing inputting, touch        icon or press       button on control panel 
     to dial out.

2)  Redial last dialed phone number
     Touch        icon to dial out the last dialed phone number.     

3)  Answer a call
     During an incoming call, the incoming telephone number displays in the the BT 
     PHONE interface. If you want to receive it, touch         icon or press       button 
     on remote control; if you want to reject it, touch       icon or press      button 
     on remote control.

4)  Ending a call
     When ending a call, touch         icon or use        button.  

5)  Switch the audio between the unit and your device
     During phone

 hands-free system of the car A/V system, 

     touch          icon or  press           button on remote control to switch the audio 
     between the unit and your device.

6)

During phone

      and        icon or 


; use the MUTE button to mute sound

*    * / # icons and buttons
     they perform as * / # buttons on mobile phone.

 talking using the

 BT

  Adjusting the volume during a call


 talking, use 

VOL knob or VOL+ and VOL- 

buttons to adjust volume level

.


Tap a icon such as          to show as follow:


           : Tap to download the contacts from
              your phone.

           : Tap for phone number search.

        &      : For page turning.


Summary of Contents for XM-VRSU720BT

Page 1: ...Illumination TFT Touch Screen Detachable Control Panel Remote Control Control Panel USB Port and AUX Input Memory Card Slot AM FM RDS Digital PLL Tuning Radio BT Compatible INSTALLATION MANUAL XM VRSU720BT CAR AUDIO VIDEO SYSTEM ...

Page 2: ...To ensure safety while driving and to comply with laws drivers should not watch video or operate the video device while driving ...

Page 3: ...ecome clear the temper ature in your car becomes normal DO NOT install any receiver in locations where it may obstruct the steering wheel and gearshift lever operations as this may result in a traffic accident it may obstruct the operation of safety devices such as air bags as this may result in a fatal accident it may obstruct visibility DO NOT operate any receiver while manipulating the steering...

Page 4: ...ECOMMENDED ACCESSORIES THIS DEVICE IS INTENDED FOR CONTINUOUS OPERATION This product incorporates copyright protection technology that is protected by method claims of certain U S Patents and other intellectual property rights owned by Macrovision Corporation and other rights owners Use of this copyright protection technology must be authorized by Macro vision Corporation and is intended for home ...

Page 5: ... vehicle Install the unit where it does not get in the driver s way and cannot injure the passenger if there is a sudden stop like an emergency stop If installation angle exceeds 30 from horizontal the unit might not give its optimum performance Avoid installing the unit where it would be subject to high temperature such as from direct sunlight or from hot air from the heater or where it would be ...

Page 6: ...T of the both sides away then insert the two KEY PLATE into left and right side of chassis as above illustration Installating the unit DASH BOARD METAL MOUNTING STRAP HEX NUT SPRING WASHER PLAIN WASHER TAPPING SCREW CONSOLE SLIDE BRACKET HOUSING HEX BOLT SCREWDRIVER TABS KEY PLATE PLASTIC TRIM OUT KEY PLATE ...

Page 7: ...OUND BLACK KEY 1 BROWN KEY 2 WHITE 25 1 SUBWOOFER GREY RCH RED LCH WHITE REAR OUTPUT CABLE FRONT RCA WHITE L FRONT RCA RED R VIDEO OUT YELLOW FRONT RCA OUTPUT CABLE REAR CAMERA INPUT YELLOW RCH IN RED LCH IN WHITE VIDEO OUT 2 YELLOW VIDEO IN YELLOW AV IN FUSE RADIO ANTENNA JACK Note the earth connection cable parking brake B must be connected in order for pictures to be played back to the monitor ...

Page 8: ... playback In Radio mode press to scan step by step PLAY PAUSE In Disc Playback mode press to pause playback Press again to start where playback stopped Press these buttons to skip ahead or back one track Repeat function for media playing In radio mode press to select the store station 2 TITLE RPT 2 When playing a Digital Video pressing this button will open the TITLE menu which is recorded on the ...

Page 9: ...ress this button briefly to display the root level directory of a digital video disc In radio mode press to select the store station 4 14 15 16 BAND In Radio mode press this button repeatedly to switch between the five radio bands FM1 FM2 FM3 AM1 MW1 AM2 MW2 In BT mode press to reject a call MUTE EQ Press this button to turn off the audio Press again to restore the sound to its prior volume level ...

Page 10: ...ove the battery holder as the direction indicated by the arrow See 2 Replace the battery Set a new battery property with side up as illustrated See 3 Insert the battery holder Push in the holder to the original position See 1 2 3 4 Inserting the Battery Note The lithium cell in the battery compartment of remote control has been secured for transport with a Before initial use please remove this pla...

Page 11: ... turn upward automa tically and stop at vertical position FIG 2 FIG 3 Do not rotate the monitor forcibly to avoid mechanical damage FIG 4 Adjusting the viewing angle When the monitor does not move long press button on the panel to turn the monitor upward or downward at fine steps to get a desired viewing angle Return the monitor to the central viewing position long press OPEN button on the front p...

Page 12: ...ATION COLOR General setup interface1 GENERAL ANIMATION 2 MINUTE KEY BEEP ON DISC RADIO 1 When the unit is power on tap to turn off the display and the unit still work tap anywhere of the display to turn on the display again 2 POWER icon In any modes touch the POWER icon to switch the unit off The monitor will draw in automatically 3 UP icon Touch this icon to adjust the angle of the monitor upward...

Page 13: ...discs recorded in either PAL or NTSC formats Make the selection based on whether you are connecting the unit to a PAL TV or an NTSC TV You can also set the unit to AUTO auto select The disadvantage to autoselect is that each time you turn the unit on it checks to see what kind of monitor is connected which causes a small delay and some flickering of the display image which you may find unpleasant ...

Page 14: ...P COLOR 0 to 40 Adjust the color for the picture lighter or darker BRIGHTNESS 0 to 40 Adjust if the picture is too bright or too dark CONTRAST 0 to 40 Adjust the contrast of the bright and dark portion TINT 0 to 40 Adjust the tint if the human skin color is unnatural Adjustable when NTSC is selected for NTSC PAL LANGUAGE Touch to select OSD language ILLUMINATION COLOR Touch to select the backlight...

Page 15: ... change the gear to the back position Note additional monitor can not display the image Reset Factory Settings RESET button is placed on the housing and must be activated with either a ballpoint pen or thin metal object The RESET button is to be activated for the following reasons A Initial installation of the unit when all wiring is completed B All the function buttons do not operate C Error symb...

Page 16: ...witch between BASS TREBLE BALANCE SWF VOL SWF FREQ After switching on the desired mode above rotate VOL knob or press VOL VOL buttons to set it In radio mode press the SEL to select MANUAL AUTO mode in radio manual mode to scan the frequency by rotate the VOL knob select radio auto mode to cancel the scan function 3 POWER On Off MODE BUTTON ress it to turn on the unit to the In mode Press it repea...

Page 17: ...from the current frequency In media or BT MUSIC mode pressing or button can play previous or next track continuously and long pressing or button can fast backwards or forwards at the following multiple of normal speed x2 x4 x8 x20 x1 In BT MUSIC mode the function of the fast forwards or backwards is disabled In BT PHONE mode for the function of the and buttons please refer to the part of the BT Op...

Page 18: ...wing and hold more than 2 s the MU PTY knob in the TA AF direction the AF function is activated The AF symbol appears in the display swing and hold it again to cancel this function Note In Radio mode press and hold the SEL knob for a long time to access the selection menu REG ON REG OFF PI MUTE PI SOUND AF ON AF OFF Repeatedly pressing the SEL knob to select the item and by using the VOL to change...

Page 19: ...elect the station Press and the station until it show the frequency band your select Retrieve a preset station Touch the 1 6 ranges briefly to retrieve a station which had been stored in the memory in advance the chose number is shown on display In radio mode LOC or tap icon select LOC DX Selecting The Frequency Band Touch the screen of BAND section repeatedly to select the band the message will s...

Page 20: ...MUTE RDS TA OFF RDS AF OFF REG FUNCTION at certain times some stations divide up their programs into regional programs with varying content REG ON the message REG ON will appears in the display for a few seconds Note the display capacity is limited It is possible that in the double display mode some segments of the display are deleted the function REG ON prevents the radio from switching to altern...

Page 21: ...itch the AF function ON and OFF Touch the AF section on touch screen or swing and keep the SEL knob in the TA AF direction for about 2 seconds the AF function is activated The AF symbol appears in the display When the AF function has been switched on the radio continuously tests the signal strength of the AF frequency The test interval for each AF frequency depends on the signal strength of the cu...

Page 22: ...announcements on and off Switching on and off an Alternative frequency Play Pause the playing To skip the next track To skip the previous track Repeat Function Random Function Previous menu Tap to turn to BT PHONE mode after pairing and connecting a mobile phone with BT function The icons for other mode The same icon have the same function in each mode In PHOTO playing tap to change the photo dire...

Page 23: ... to return the normal playback BASIC OPERATION FOR Digital Video Tap the icon or press the RPT button on the remote control to select REPEAT mode as follows REPEAT ALL CHAPTER REPEAT ON TITLE REPEAT ON REPEAT OFF REPEAT OFF REPEAT ONE REPEAT ALL REPEAT ALL REPEAT ONE REPEAT FOLDER or DIR REPEAT OFF SELECTING PLAY MODES During the Disc playback select the RPT RDM to select your favour play mode 1 R...

Page 24: ...e screen as show the screen will display the following message Touch to select the adjustment item then select the item your favour by touching the numberic buttons then touch the OK to confirm For Movie Photo Touch the screen as show the screen will display the following message T 001 004 PBC MIX 00 25 08 01 03 02 F 001 003 T 001 001 T 001 004 C 001 001 MENU During playback touch the screen or pr...

Page 25: ...iple titles recorded on the disc It can select preferred title from the title menu to start playback During Digital Video playback press TITLE button on the remote The title menu is display Select preferred title by the cursor button and confirmed by press the ENTER button For VCD Press TITLE button on the remote control while the disc is playing you can switch between PBC ON and PBC off mode Digi...

Page 26: ...or call out to wake up this unit and turn to BT hands free mode when the phone call ended the unit back to power off mode 1 Make a call 1 Dial with mobile phone directly 2 a Touch the BT PHONE icon in home menu or touch the icon during playing to turn to BT PHONE interface the icons function as follows pair and connect them elect the item to find a When it finds the of the A V system the name will...

Page 27: ... if you want to reject it touch icon or press button on remote control 4 Ending a call When ending a call touch icon or use button 5 Switch the audio between the unit and your device During phone hands free system of the car A V system touch icon or press button on remote control to switch the audio between the unit and your device 6 During phone and icon or use the MUTE button to mute sound icons...

Page 28: ...layback after pausing or stopping is available only for some mobile phone 2 When the play is paired and connected to the unit the car A V system 3 he device of supports AVRCP corresponding o fast forward backward functions Mute function To select the Equalizer mode To decrease the volume level To increase the volume level Loudness Function Subwoofer Function 3 BT MUSIC 1 Touch BT MUSIC in home men...

Page 29: ...n On the front panel of this unit there is an AUX IN jack follow the diagram below to connect analogue replay devices only for the Audio connect if you want to connect the Video please plug the Video input on the back of the unit Use this jack to replay sound of other replay equipment such as Digital Video players computers etc Via the loud speakers 1 Please connect the external device with stereo...

Page 30: ...e safety while driving and to comply with lows drivers should not watch video or operate the video device while driving As the interface show here is only the audio output now tap the icon the picture of the auxiliary input video show on the display and tap the display again to turn to audio mode Now you can watch the video from your External video equipment such as Digital Video players computers...

Page 31: ... play track 1 Current type highlighted bar 2 Audio play mode select 3 Picture play mode select 4 Movie play mode select 5 Current play track Card OPERATION The unit can support playback MP3 WMA JPEG MP4 format which are stored on SD memory cards Please read the following instructions before you start using a memory card Inserting the card as follow USB OPERATION Card OPERATION SONG SONG USB 001 00...

Page 32: ...h the icon to turn to home menu Before operation press the icon to cancel the original input that to set your favour There are 2 KEY for no more than 12 buttons to select For first time use this function input a key such as 0 38 0 38 is a magnitude of voltage according to your car through the steering remote and show in button 1 position Then tap Assign and tap the button 1 and then select the ico...

Page 33: ... due to noise The antenna cable is not connected Insert the antenna cable firmly The signals are too weak Select a station manually SYMPTOM CAUSE SOLUTION Video image appears black white The color system is set incorrectly Please switch to correct color system from menu No video image appears The unit is not connected to the parking brake detection switch Make proper connection according to wire c...

Reviews: