Xo XOGVIL36S Manual Download Page 15

- 15 -

installation

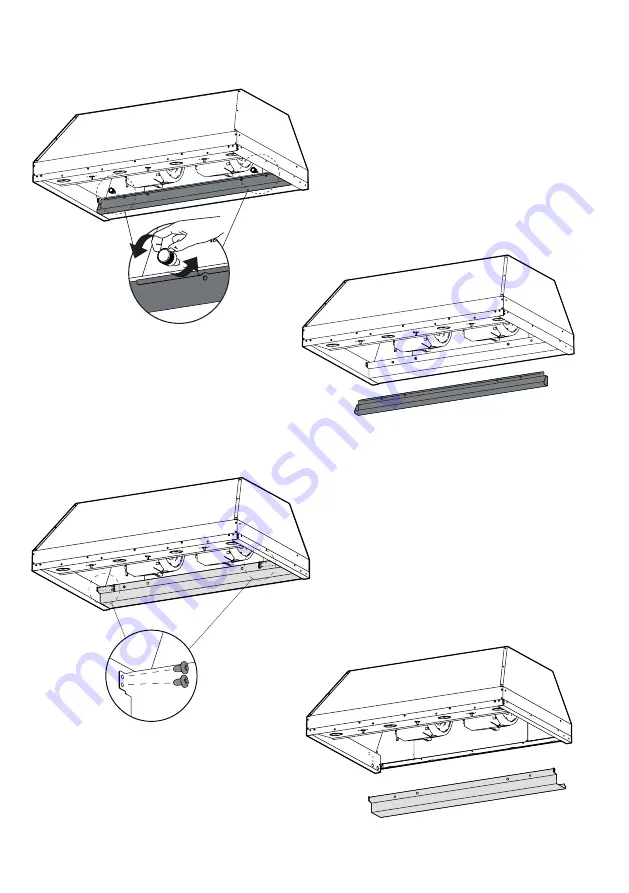
BEFORE FITTING THE HOOD INTO THE 

CABINET:

1. Remove the two (2) knobs holding the oil 
drain pan (B) in place. Remove the pan and 
set it aside.

2. Remove the four (4) screws holding the 
bracket (H) in place. Remove the bracket 
and set aside.

Summary of Contents for XOGVIL36S

Page 1: ...I worked really hard on this manual so please read it XO OUTDOOR EXHAUST HOODS MODELS XOGVIL36S XOGVIL42S XOGVIL48S...

Page 2: ...ance com priority service for your xo product Or by phone 973 403 8900 CONGRATULATIONS on purchasing your XO Before you proceed take just a moment to register your XO at www xoappliance com register y...

Page 3: ...EADY Safety and Precautions Planning Ductwork Install Examples Dimensions THE INSTALL Mounting Height Top or Rear Exhaust Installing Electrical Connections MAINTENANCE Filters Cleaning Recirculation O...

Page 4: ...esidential Kitchen ventilating use only Do not use to exhaust haz ardous or explosive materials and vapors CAUTION To avoid motor bearing damage and noisy and or unbalanced impellers keep drywall spra...

Page 5: ...DO NOT USE WATER including wet dishcloths or towels a violent steam explosion will result D Use an extinguisher ONLY if 1 You know you have a Class ABC extinguisher and you already know how to operate...

Page 6: ...N CIRCUMSTANCES DOMESTIC APPLIANCES MAY BE DANGEROUS A No food must be cooked flamb underneath the hood B The use of an unprotected flame is dangerous for the filters and could cause fires C Watch con...

Page 7: ...HAN 6 NEVER USE PLASTIC DUCTING USE SMOOTH BORE METAL DUCTING MINIMIZE THE NUMBER OF FITTINGS see chart WHEN YOU MUST USE FITTINGS TRY TO SEPARATE THEM WITH SECTIONS OF 4 OR MORE OF STRAIGHT DUCT ALWA...

Page 8: ...AIGHT DUCT YOU WILL BE USING I E FOR 20 FT ENTER 20 FOR 30FT ENTER 30 ENTER THE NUMBER OF EACH TYPE OF TURN YOU ARE USING AND THE TYPE OF END CAP MULTIPLY ACROSS EACH ROW THE MULTIPLIER x QTY USED TO...

Page 9: ...9 typical installation examples TOP VENT OVERHEAD CONSTRUCTION REAR VENT REAR WALL...

Page 10: ...10 10 12 18 1 4 10 27 3 4 22 9 16 16 2 8 15 A Front of hood Side of hood Top of hood DIMENSIONS MODEL A GrossweightKg XOGVIL36S 36 36 XOGVIL42S 42 38 XOGVIL48S 48 42...

Page 11: ...hood into a custom canopy or cabinet refer to the cutout dimensions above for your particular model Gap around the unit should be minimized 1 16 to ensure a snug fit MODEL XOGVIL36S XOGVIL42S XOGVIL48...

Page 12: ...fficiency IMPORTANT This range hood is intended for covered patios or terraces This unit must protected from the effects of weather The roof cap and the wall cap must be considered to prevent the ente...

Page 13: ...THESE SIMPLE STEPS 1 Unplug the quick disconnect coupling that supplies power to the motor 2 Remove screws X 8 of motor mount E Unhook the motor assembly rotate it and place it in the back of the hood...

Page 14: ...position of air flange F by unscrewing screws Y 10 and positioning it at the rear of the unit 4 Also reverse the position of the plugs C by unscrewing the screws Z 4 5 Reconnect the quick release conn...

Page 15: ...RE FITTING THE HOOD INTO THE CABINET 1 Remove the two 2 knobs holding the oil drain pan B in place Remove the pan and set it aside 2 Remove the four 4 screws holding the bracket H in place Remove the...

Page 16: ...16 installation continued 1 4 1 1 8 8x INSERT THE HOOD INTO THE CUTOUT FASTEN THE HOOD IN PLACE Using four 4 screws along the inside front edge and four 4 screws in the back corners as shown...

Page 17: ...OT LEG WHITE NEUTRAL GREEN YELLOW GROUND Polarity must be observed Unit must be properly grounded Use a double throw disconnect switch 3 Replace the box cover 4 Replace the Anti grease Baffles All wir...

Page 18: ...tical to minimize the risk of fire Baffle filters should be cleaned at least once every 2 months more frequently depending on the type of cooking performed and the build up of grease CLEANING STAINLES...

Page 19: ...ew the three knobs G and pull downwards Clean the tank and reassemble it by performing the reverse operation XOPSPK6509 LED LIGHT REPLACEMENT To replace the bulbs rotate the lamp anticlo ckwise as sho...

Page 20: ...4 fourth speed KNOB B Turns the hood lights on and off 0 lights off 1 lights on KNOB C Operates the second motor 0 motor off 1 first speed 2 second speed 3 third speed 4 fourth speed The two motors c...

Page 21: ...NT LIGHTS DUCT COVERS REPLACEMENT SWITCHES BLOWER MOTORS FAN WHEELS ALL OF THESE PARTS AND MORE ARE AVAILABLE SIMPLY VISIT WWW XOAPPLIANCE COM and click on PARTS STORE OR CALL US AT 973 403 8900 parts...

Page 22: ...vor of the original purchaser user at the original installation location Any such assignment or transfer shall void the warranties herein made and shall void all warranties express or implied includin...

Page 23: ...J ai travaill tr s dur sur ce manuel veuillez donc le lire XO HOTTES D EXT RIEUR MOD LES XOGVIL36S XOGVIL42S XOGVIL48S...

Page 24: ...liance com priority service for your xo product Ou par t l phone 973 403 8900 F LICITATIONS pour l achat de votre XO Avant de continuer prenez un instant pour enregistrer votre XO l adresse www xoappl...

Page 25: ...ons Planification des conduits Exemples d installation Dimensions L INSTALLATION Hauteur de montage vent d chappement sup rieur ou arri re Installation Connexions lectriques ENTRETIEN Filtres Nettoyag...

Page 26: ...sport l ext rieur travers un conduit d vacuation Ne pas vacuer l air dans des interstices tels qu entre des cloisons ou des plafonds dans des greniers des espaces confin s ou des garages ATTENTION N u...

Page 27: ...temp rature G Ne jamais laisser la cuisini re sans surveillance pendant la cuisson H Utiliser syst matiquement des ustensiles de cuisine adapt s au type et la quantit d aliments que l on pr pare AVER...

Page 28: ...ng Refrigeration and Air Conditioning Engineers ASHRAE et par les autorit s locales pr pos es C Au cours des op rations de d coupage ou de perforation du mur ou du plafond veiller ne pas endommager le...

Page 29: ...MBRE DE RACCORDS voir tableau LORSQUE VOUS DEVEZ UTILISER DES RACCORDS ESSAYEZ DE LES S PARER AVEC DES SECTIONS DE 4 pi OU PLUS DE CONDUIT DROIT SUIVEZ TOUJOURS LES DIRECTIVES DU FABRICANT POUR L QUIP...

Page 30: ...UTILISEREZ C D POUR 20 PI ENTREZ 20 POUR 30 PI ENTREZ 30 SAISISSEZ LE NOMBRE DE CHAQUE TYPE DE COURBE QUE VOUS UTILISEZ ET LE TYPE DE CAPUCHON D EXTR MIT OF MULTIPLIEZ SUR CHAQUE LIGNE LE MULTIPLICAT...

Page 31: ...31 exemples d installation typiques vent sup rieur CONSTRUCTION A RIENNE vent arri re paroi arri re...

Page 32: ...32 10 12 18 1 4 10 27 3 4 22 9 16 16 2 8 15 A Devant de la hotte C t de la hotte DIMENSIONS MOD LE A Poids brut Kg XOGVIL36S 36 36 XOGVIL42S 42 38 XOGVIL48S 48 42...

Page 33: ...personnalis e reportez vous aux dimensions de d coupe ci dessus pour votre mod le particulier L espace autour de l unit doit tre minimis 1 16 po pour assurer un ajustement parfait LA D COUPE MOD LE XO...

Page 34: ...nt leurs performances et leur efficacit IMPORTANT Cette hotte est destin e aux patios ou terrasses couverts Cet appareil doit tre prot g des effets des intemp ries Le chapeau de toit et le chapeau de...

Page 35: ...IMPLES 1 D branchez le raccord d connexion rapide qui alimente le moteur commutation de la ventilation sup rieure et arri re 2 Retirez les vis X 8 du support de moteur E D crochez l ensemble moteur fa...

Page 36: ...Inversez la position de la bride d air F en d vissant les vis Y 10 et en la positionnant l arri re de l appareil 4 Inversez galement la position des bouchons C en d vissant les vis Z 4 5 Reconnecter l...

Page 37: ...E DANS L ARMOIRE 1 Retirez les deux 2 boutons qui maintien nent le bac de vidange d huile B en place Retirez le bac et mettez le de c t 2 Retirez les quatre 4 vis qui maintiennent le support H en plac...

Page 38: ...suite de l installation 1 4 1 1 8 8x INS REZ LA HOTTE DANS LA D COUPE FIXEZ LA HOTTE EN PLACE l aide de quatre 4 vis le long du bord avant int rieur et de quatre 4 vis dans les coins arri re comme ill...

Page 39: ...arit doit tre observ e L unit doit tre correctement mise la terre Utilisez un interrupteur de d connexion double jet 3 Remplacez le couvercle de la bo te 4 Remplacez les filtres chicanes anti graisse...

Page 40: ...entiel de minimiser le risque d incendie Les filtres chicanes doivent tre nettoy s au moins une fois tous les 2 mois plus fr quem ment selon le type de cuisson effectu e et l accumulation de graisse N...

Page 41: ...er la lampe dans le sens antihoiraire comme repr sent sur la figure Remplacez les par des ampoules de m me type XOPSPK6509 Pour enlever l huile accumul e dans le r servoir H d vissez les trois boutons...

Page 42: ...itesse BOUTON B Allume et teint les lumi res du capot 0 lumi res teintes 1 lumi res allum es BOUTON C Actionne le deuxi me moteur 0 moteur teint 1 premi re vitesse 2 deuxi me vitesse 3 troisi me vites...

Page 43: ...MENT MOTEURS DE VENTILATEUR ROUES DE VENTILATEUR TOUTES CES PI CES ET PLUS SONT DISPONIBLES VISITEZ SIMPLEMENT WW XOAPPLIANCE COM et cliquez sur LE MAGASIN DE PI CES OU APPELEZ NOUS AU 973 403 8900 pi...

Page 44: ...ine sur le site d installation d origine Une telle cession ou un tel transfert annulera les garanties faites dans les pr sentes et annulera toutes les garanties expresses ou implicites y compris toute...

Page 45: ...He trabajado mucho en este manual as que l alo XO CAMPANAS EXTRACTORAS PARA EX TERIORES MODELOS XOGVIL36S XOGVIL42S XOGVIL48S...

Page 46: ...ity service for your xo product Or por tel fono 973 403 8900 ENHORABUENA por la compra de su XO Antes de continuar t mese un momento para registrar su XO en www xoappliance com register your product E...

Page 47: ...INSTALACI N Altura de Montaje Escape Superior o Trasero Conexiones el ctricas Instalaci n MANTENIMIENTO Filtros Limpieza Recirculaci n Dep sito de aceite Sustituci n de la Luz FUNCIONAMIENTO Control c...

Page 48: ...pto para aspirar materiales o vapores peligrosos o explosivos ATENCION Para evitar da os al motor y rumores y o h lices desbalanceadas evite que la unidad de alimentaci n llegue a contacto con esprays...

Page 49: ...e el quemador PRESTE MUCHA ATENCION DURANTE ESTA OPERACION PARA EVITAR QUEMADURAS Si las llamas no se extinguen inmediatamente EVACUE EL LUGAR Y LLAME A LOS BOMBEROS B NO TOQUE NUNCA UNA CAZUELA HIRVI...

Page 50: ...D El aparato debe estar siempre conectado a un agujero de evacuaci n hacia el exterior E La unidad deber ser conectada al suelo ADVERTENCIA PARA REDUCIR EL RIESGO DE INCENDIO USE SOLO TUBERIAS METALIC...

Page 51: ...CESORIOS consulte la tabla CUANDO DEBA USAR ACCESORIOS INTENTE SEPARARLOS CON SECCIONES DE 4 O M S DE CONDUCTO RECTO SIGA SIEMPRE LAS DIRECTRICES DEL FABRICANTE PARA EL EQUIPO DE COCINA QUE EST VENTIL...

Page 52: ...NGRESE 20 PARA 30 INGRESE 30 INTRODUZCA EL N MERO DE CADA TIPO DE GIRO QUE EST UTILIZANDO Y EL TIPO DE TAPA DE EXTREMO MULTIPLIQUE A LO LARGO DE CADA FILA EL MULTIPLICADOR x CANTIDAD UTILIZADA PARA OB...

Page 53: ...53 ejemplos t picos de instalaci n ventilaci n superior construcci n a rea ventilaci n trasera pared posterior...

Page 54: ...54 10 12 18 1 4 10 27 3 4 22 9 16 16 2 8 15 A Parte delantera de la campana Lado de la campana DIMENSIONES MODELO A Peso bruto Kg XOGVIL36S 36 36 XOGVIL42S 42 38 XOGVIL48S 48 42...

Page 55: ...rsonalizado consulte las dimen siones de recorte anteriores para su modelo particular Se debe minimizar la brecha alrededor de la unidad 1 16 para garantizar un ajuste perfecto EL RECORTE MODELO XOGVI...

Page 56: ...perder n su rendimiento y eficiencia IMPORTANTE Esta campana extractora est pensada para patios o terrazas cubiertas Esta unidad debe estar protegida de los efectos de la intemperie La tapa del tejad...

Page 57: ...chufe el acoplamiento de desconexi n r pida que suministra energ a al motor conmutaci n de la ventilaci n superior y trasera 2 Retire los tornillos X 8 del soporte del motor E Desenganche el conjunto...

Page 58: ...osici n de la brida de aire F desatornillando los tornillos Y 10 y coloc ndola en la parte trasera de la unidad 4 Invierta tambi n la posici n de los tapones C desenroscando los tornillos Z 4 5 Vuelva...

Page 59: ...EN EL GABINETE 1 Retire los dos 2 pomos que sujetan la bandeja de drenaje de aceite B en su lugar Retire la bandeja y d jela a un lado 2 Retire los cuatro 4 tornillos que sujetan el soporte H en su l...

Page 60: ...n continuada 1 4 1 1 8 8x INSERTE LA CAMPANA EN EL RECORTE SUJETE LA CAMPANA EN SU LUGAR Usando cuatro 4 tornillos a lo largo del borde frontal interior y cuatro 4 tornillos en las esquinas traseras c...

Page 61: ...O VERDE AMARILLO TIERRA Se debe respetar la polaridad La unidad debe estar correctamente conectada a tierra Utilice un interruptor de desconexi n de doble tiro 3 Vuelva a colocar la cubierta de la caj...

Page 62: ...mpia y saludable pero tambi n es fundamental minimizar el riesgo de incendio Los filtros deflectores deben limpiarse al menos una vez cada 2 meses m s frecuentemente dependiendo del tipo de cocci n re...

Page 63: ...girar la l mpara en sentido antihorario como se muestra en la figura Sustit yalas por l mparas del mismo tipo XOPSPK6509 Para retirar el aceite acumulado en el dep sito H desenrosque los tres pomos G...

Page 64: ...velocidad POMO B Enciende y apaga las luces del cap 0 luces apagadas 1 luces encendidas POMO C Acciona el segundo motor 0 motor apagado 1 primera velocidad 2 segunda velocidad 3 tercera velocidad 4 cu...

Page 65: ...UCTOS INTERRUPTORES DE REPUESTO MOTORES DEL SOPLADOR RUEDAS DEL VENTILADOR TODAS ESTAS PIEZAS Y M S EST N DISPONIBLES SIMPLEMENTE VISITE WWW XOAPPLIANCE COM y haga clic en LA TIENDA de piezas O LL MEN...

Page 66: ...usuario ori ginal en el lugar de instalaci n original Cualquier cesi n o transferencia anular las garant as aqu hechas y anular todas las garant as expresas o impl citas incluyendo cualquier garant a...

Page 67: ......

Page 68: ...3011000160000 00...

Reviews: