


EN
© 2023
XO
–
All rights reserved.
Multi-Functional Car MP3 Charger
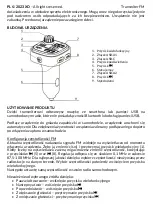
PRODUCT CONSTRUCTION
USING THE PRODUCT
The device can play music from a smartphone or USB memory stick on a car radio that has
no Bluetooth or USB memory functionality.
Connect the device to the lighter socket in the car, the device will start automatically. To
increase the life of the device, we recommend connecting it only after switching on the
ignition in the car.
FM frequency configuration
The current frequency of the FM signal is shown on the display from the moment the
device is turned on. To change it, press and hold the MFB button (1). When the digits on
the display start flashing, you can adjust the frequency using (5) and (8) buttons. The
adjustment is made in steps of 0.1 MHz in the range of 87.5-108 MHz. For the best sound
quality, select a frequency that is not used by radio stations in your area. Confirm the
chosen frequency selection by pressing the MFB button.
Then set the same frequency in your car radio.
Regardless of the selected audio source:
•
Pause/play - press the MFB button
•
Next track - press the button
•
Previous track
–
press the button
•
Volume up - hold down the button
•
Volume down - hold down the button
Bluetooth
Once the device is turned on, Bluetooth connectivity is immediately available. To pair,
search your Bluetooth-enabled smartphone, tablet or notebook for "
XO-BCCC08
" and
pair the devices. If it is necessary to enter a PIN code on the source device, enter: "
0000
"
(four zeros). Correct pairing of devices will be confirmed by a sound message.
If the device has already been paired, then when turned on, it will automatically connect
to the last device it was connected to (if this device is currently available).
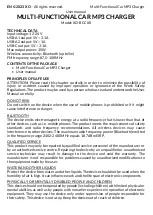
1
2
3
4
5
6
7
8
9
1. MFB button
2. USB-A1 connector
3. USB-C connector
4. Backlight button
5.
button
6. Negative electrode
7. USB-A2 connector
8.
button
9. Positive electrode