


Assembly
1
22
22
22
22
8
7
21
21
21
21
19
16
13
6
1
1
8
8
21
21
22
22
22
22
4
5
5
22
22
22
22
22
22
13
13
8
8
8
8
21
21
21
21
2
2
15
15
15
16
16
16
1
1
2
3
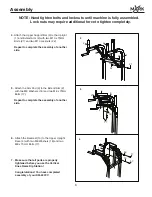
NOTE: Hand tighten bolts and locknuts until machine is fully assembled.
Lock nuts may require additional force to tighten completely.
1.
2.
3.
Attach the Upright (1) to the Base (13) with an
M10 x 70mm Bolt (21) and an M10 Locknut (22).
Attach the Lower Support (7) to the Upright (1)
with one Plate (8), two M10 x 70mm Bolts (21)
Attach the Lower Support (7) to the Base (13) with
two M10 x 70mm Bolts (21) and two M10 Locknuts
(22).
Attach the Handle Tube (6) to the Lower Support
(7) with one M10 Washer (16) and one M10 x 20mm
Bolt (19).
Repeat to complete the assembly of another
side.
Repeat to complete the assembly of another
side.
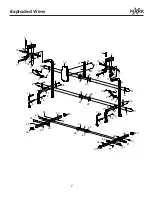
Attach the Crossbars (5) to the Uprights (1) wtih
eight M10 x 70mm Bolts (21), four the Plates (8)
and eight M10 Locknuts (22).
Attach the Upper Upright Brace (4) to the Uprights
(1) with four M10 x 70mm Bolts (21), two the plates
(8) and four M10 Locknuts (22).
Attach the Extend Arm (2) to the Upright (1)
with five M10 x 15mm Bolts (15) and five M10
Washers (16).
5
Attach the Handle Tube (6) to the Base (13) with
one M10 x 70mm Bolt (21) and one M10 Lockut (22).
and two M10 Locknuts (22).


