XK-WHIPC-ADV - XKchrome App Controlled ATV/UTV Whip Kits
Mounting Instructions
1.
Test all components before mounting:
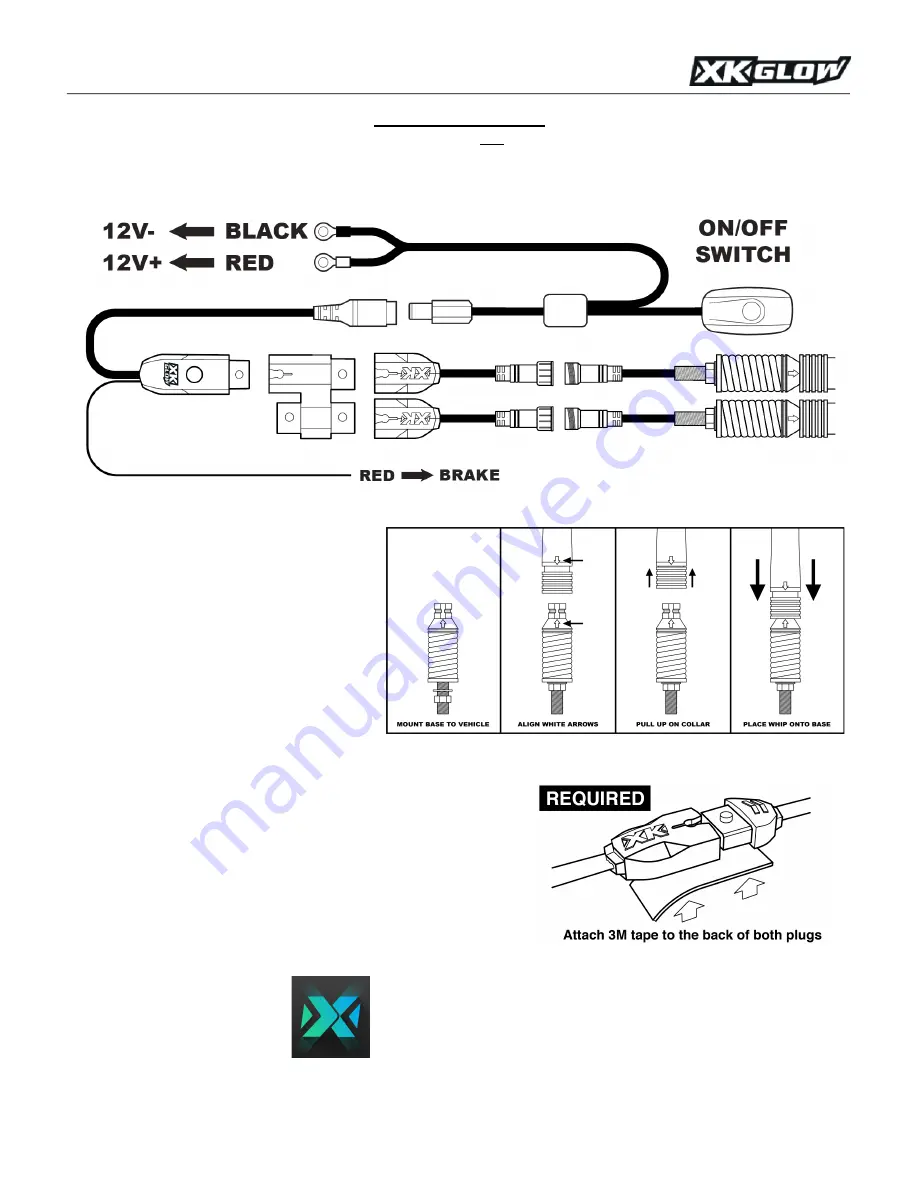
As shown below, plug ALL light units together and connect them to the controller and
the switch wiring harness. Connect the RED battery terminal to the POSITIVE pole of 12V DC battery. Connect the BLACK
battery terminal to the NEGATIVE pole. Turn on the switch and push the touch button to test the WHIP/S. If the lights show
any defects, please contact us and we will be happy to replace them for you.
2.
Route wiring:
Secure controller in safe,
accessible location. Plug in adapter wire/s
and route to the rear of the vehicle.
3.
Mount whip:
Using the supplied hardware,
mount the base of the LED whip to the
vehicle and plug in to the adapter wire. To
connect the whip, align the WHITE arrow on
the base to the WHITE arrow on the LED
whip. While pulling up on the collar of the
LED whip, push the LED whip onto the base
and release the collar. See diagram below.
To remove, simply pull up on the collar to
release the LED whip.
4.
OPTIONAL: Connect sensor wires:
This step will allow the LED Whips to turn red when the brake is applied. Please check
service manual specific to your make and model to verify wires. Tap the RED sensor wire into the positive brake wire. This will
turn the lights red automatically when the brake is on.
5.
Secure all wires and connectors:
Use zip ties to neatly mount and
hide any loose wires. Use 3M double side tape to hold male and
female plugs together. Make sure wires are not touching anything hot
or located on moving parts. Locate the ON/OFF switch in a convenient
location.
6.
Connect to 12V DC power:
Firmly connect the wire terminals to the
positive and negative poles of the battery. Power on, download the
XKchrome
App, and enjoy!
Please note:
There are multiple XKGLOW apps
on the App Store. Only the XKchrome App will
work with the XKchrome Bluetooth Controller.
The App icon is pictured here.


