xixvision JVS-H411 Quick Installaion Manual Download Page 2

3. Binding Settings for the phone

First Step, connect IP camera with power supply.

Second Step, download and install APP for mobile phones.

Two ways can be used.

1. Search “NVSIP” in App Store ( for iOS ) or in Google play (for Android).

2. Or scan QR code as below.


Third step, register and bind email (take App for Android phone as an

example)

Note: 

bundle valid email at the time of registration, you can retrieve password  

through the email when you forget.

4. Add device

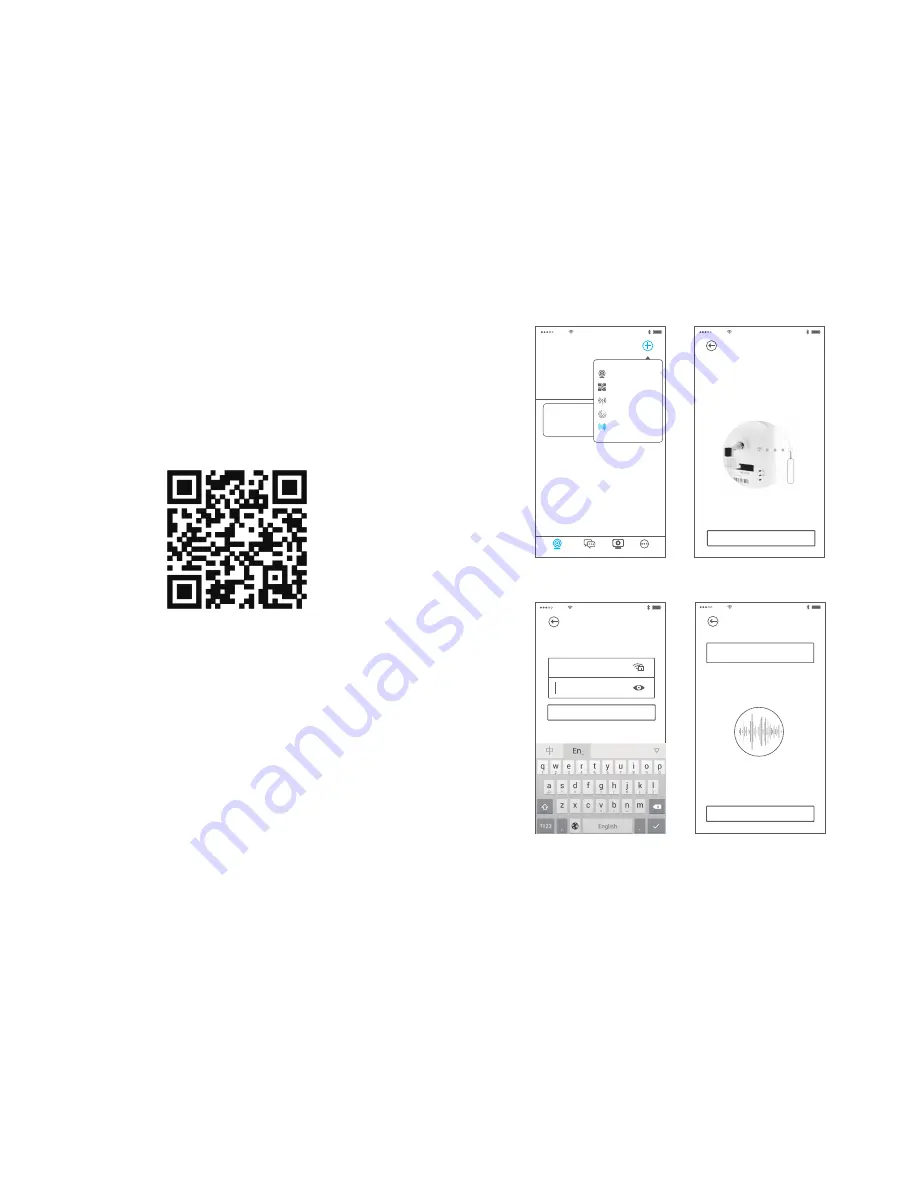
4.1 Add via sound wave

Click “Add by sound wave”, and set step by step according to tips. 


My Device

Add by Device ID

Scan QR Code

Add Wi-Fi Device

Scan devices in LAN 

Add by sound wave

B73017610

Login vide

See wonde

Preparating

Please press the reset button, then 

release the button after hearing the

voice guide.

Next Step

AT&T

11:57 AM

AT&T

11:57 AM

My Device

Alarm Message

Setting

More Fucntion

Next Step

Sound-wave Configuration

Preparing  Configuration

Next Step

Please input password of the network

The camera temporarily doesn’t support Wi-Fi connection 5G

FAE

Click to send sound-wave

View operation demo

AT&T

11:57 AM

AT&T

11:57 AM

Summary of Contents for JVS-H411

Page 1: ...onnect device Notes On Wi Fi condition the router must be wireless router Wired connection picture Wireless connection picture Ethernet Power line Power Power Power Power Wireless route Router Modem Modem Internet Internet Ethernet Power line LED lights Built in speaker Lens Antenna IR Cut TF card slot Built in MIC Power RJ45 port Alarm device port Earphone port ...

Page 2: ...d device 4 1 Add via sound wave Click Add by sound wave and set step by step according to tips My Device Add by Device ID Scan QR Code Add Wi Fi Device Scan devices in LAN Add by sound wave B73017610 Login vide See wonde Preparating Please press the reset button then release the button after hearing the voice guide Next Step AT T 11 57 AM AT T 11 57 AM My Device Alarm Message Setting More Fucntion...

Page 3: ... are similar to the iOS app refer to configuration steps as described above 4 2 Add via wireless configuration 4 2 1 Add via wireless configuration Android client end Click Add Wi Fi Device and set step by step according to tips AT T 11 57 AM Wi Fi Configuration process 1 Choose the device that you want to configure Wi Fi 2 Choose the network 3 Configure the device and the configuration is complet...

Page 4: ...yong1 James Note If you want reconfigure wireless network when device connection with wireless please click RESET button for 10s if device support audio it will be ok after hearing device reset 4 2 2 IOS client end When adding device through wireless need to connect the device as signal steps as follows PTZ Playback Device Manage AT T 11 57 AM AT T 11 57 AM HD Recored Talk Capture S288960969 Inter...

Page 5: ... Statc 2 Remember the mobile phone DHCP Bootp My Device Wired Device AT T 11 57 AM My Device Setting More Fucntion Demo Device setting will be opened after login the APP Steps as below Video detecting PTZ Next Next AT T 11 57 AM AT T 11 57 AM Find a new device NEW 1 Experience video audio two way talk and PTZ function 2 Choose the network 3 Configure the device and the configuration is completed s...

Page 6: ...ntion Demo S288960969 Internet online Wi Fi 4 3 Add by Device ID Notes 1 On the interface of My Device slide to find the device check Device online or not and click the device icon to see the video AT T 11 57 AM AT T 11 57 AM Wired Device My Device Add by Device ID Scan QR Code Add Wi Fi Device Scan devices in LAN Add by sound wave Wireless device Quick install Wireless device My Device Setting Mo...

Page 7: ...fer to configuration steps as described above 5 Appendix Maintenance Maintenance Instructions 1 Check the leak proofness of the camera regularly it is related to the camera and dust proof performance 2 Please regularly check whether there is water in the camera water can lead to hardware short circuit 3 Check the circuit regularly to prevent loosen and aging 4 Don t install the camera near the air...

Page 8: ...ot Alarm photo or video can t be received if there is no TF card Please check if the alarm recording function has been enabled on the top right of the video viewing interface The default is manual recording please touch the icon to switch to Alarm recording function 3 How to use TF card to record and view Answer Insert the TF card up to 64GB into the TF card slot of the camera model H210 H411 etc ...

Reviews: