background image

Xerox 7600i
User’s Guide

68

6.

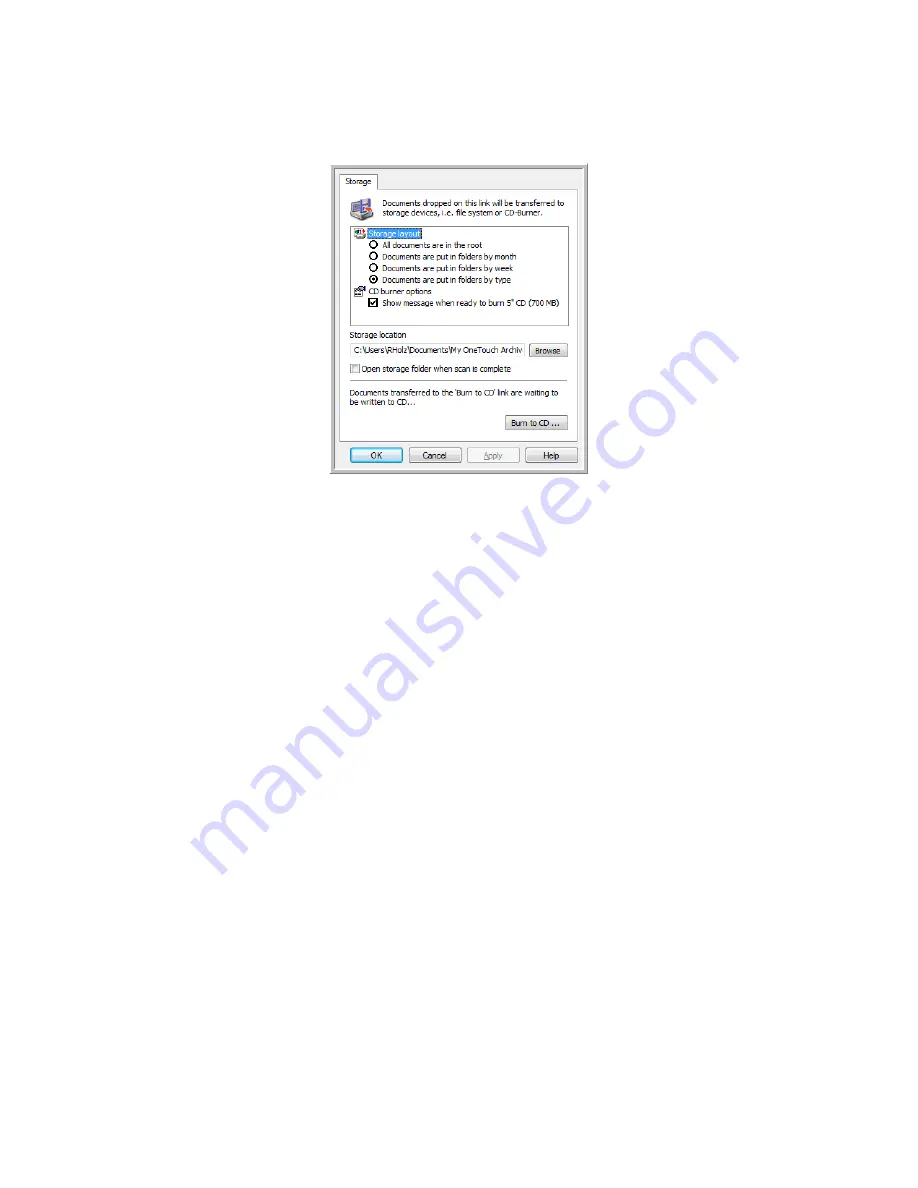
When you are ready to burn the files to a CD, open the One Touch Properties window, select 

Burn to CD

 and 

then click the 

Properties

 button. 

7.

Make sure a blank CD is in the CD burner.

8.

Click the 

Burn to CD

 button. The CD burner begins and your scanned documents are written to the CD.

If other files are also waiting in this location, they will get written with the One Touch files on the CD.

Summary of Contents for Xerox 7600i

Page 1: ...Xerox 7600i One Touch 4 6 November 2011 05 0842 000 User s Guide ...

Page 2: ...a registered trademark of ZyLAB International Inc ZyINDEX toolkit portions Copyright 1990 1998 ZyLAB International Inc Document Version 05 0842 000 November 2011 All Rights Reserved All other products mentioned herein may be trademarks of their respective companies Information is subject to change without notice and does not represent a commitment on the part of Visioneer The software described is...

Page 3: ...le 26 Installing Visioneer One Touch 28 Register Your Scanner 29 Installing Additional Applications 30 View the User Guides 31 4 Loading Documents to Scan Scanning from the Flatbed Glass 34 Scanning Interfaces 35 5 Scanning and Configuring One Touch Default One Touch Settings 39 Scan from the One Touch Button Panel 40 Features of the One Touch Button Panel 40 Changing the Button Settings 42 Select...

Page 4: ...age Documents Properties 90 Adding Image Editor Applications to One Touch 91 PDF Applications 92 Send to Application 95 Scanning to Multiple Destinations 98 Scanning with Job Separation 101 Scanning with Optical Character Recognition OCR 104 Text Formats 105 Selecting One Touch OmniPage OCR Options 108 The OCR Tab 109 Creating Your Own Dictionaries 110 Editing User Dictionaries 112 The Format Tab ...

Page 5: ...ion 156 Module Configuration 156 Scanner Configuration 157 Hardware Properties and Interface Behavior 158 Device Settings 158 Driver Settings 159 7 Maintenance Cleaning the Scanner 162 Cleaning the Scanner Glass 162 Troubleshooting 163 Uninstalling Your Scanner 166 Xerox 7600i Scanner Specifications 167 Xerox 7600i Parts List 168 A Regulatory Information Basic Regulations 170 United States FCC Reg...

Page 6: ...Xerox 7600i User s Guide 6 ...

Page 7: ...hapter includes Safety Introduction on page 8 Operational Safety Information on page 9 Emergency Power Off on page 10 Maintenance Information on page 11 Product Safety Certification on page 12 Environmental Health and Safety Contacts on page 13 ...

Page 8: ...strict safety requirements These include safety agency evaluation and certification and compliance with electromagnetic regulations and established environmental standards The safety and environment testing and performance of this product have been verified using Xerox materials only Warning Unauthorized alterations which may include the addition of new functions or connection of external devices ...

Page 9: ...f other materials may result in poor performance and create a hazardous situation Do not use aerosol cleaners they may be explosive and flammable under certain conditions Always exercise care when moving or relocating equipment Always locate the machine on a solid support surface that has adequate strength to support the weight of the machine Always locate the machine in an area that has adequate ...

Page 10: ... if applicable and disconnect the USB cable from the scanner and the computer Contact an authorized Xerox Service Representative to correct the problem The equipment emits unusual odors or makes unusual noises Liquid is spilled into the machine The machine is exposed to water Any part of the machine is damaged ...

Page 11: ... use of cleaners that are not approved may cause poor performance of the equipment and could cause a dangerous condition 4 Use supplies and cleaning materials only as directed in this manual 5 Do not remove covers or guards that are fastened with screws There are no parts behind these covers that you can maintain or service 6 Do not perform any maintenance procedures unless you have been trained t...

Page 12: ...ide 12 Product Safety Certification This product is certified by the following Agency using the Safety standards listed Agency Standard Underwriters Laboratories Inc UL60950 1 USA CSA 22 2 No 60950 1 Canada TUV IEC 60950 1 ...

Page 13: ...ealth and Safety Contacts Contact Information For more information on Environment Health and Safety in relation to this Xerox product and supplies please contact the following customer help lines USA Canada 1 800 828 6571 Europe 44 1707 353 434 ...

Page 14: ...Xerox 7600i User s Guide 14 ...

Page 15: ...the Box on page 16 System Requirements on page 17 Documentation on page 18 The Xerox 7600i Scanner on page 19 Scanner Setup on page 20 Your new Xerox scanner can quickly scan stacks of single sided or double sided pages and place their electronic images on your computer ...

Page 16: ... the Box Before proceeding check the contents of the box If items are missing or damaged contact the dealer where you purchased the scanner Xerox 7600i Scanner Quick Install Guide Technical Support Card Windows Installation Disc USB Cable ...

Page 17: ... scanner is compatible with Service Pack 3 for Windows XP and Service Pack 1 for Windows Vista Minimum of 2 gigabyte GB of internal memory RAM 350 MB minimum of free hard disk space A VGA or SVGA Monitor The recommended settings for your monitor are Color quality of 16 bit or 32 bit Resolution set to at least 800 x 600 pixels Refer to your Windows documentation for instructions on setting the colo...

Page 18: ...On the Installation Disc contains detailed installation scanning configuration and maintenance information Nuance PaperPort User s Guide On the Installation Disc contains detailed feature and configuration information for the PaperPort software Nuance OmniPage User s Guide On the Installation Disc contains detailed feature and configuration information for the OmniPage software ...

Page 19: ...olds documents in place on the scanner glass Flatbed Glass Place document face down to scan Control panel One Touch scanning controls Universal Serial Bus USB port Connects the scanner to the computer 3 Flatbed Glass Control Panel Document Pad USB Port 4 1 2 1 2 3 4 ...

Page 20: ...Xerox 7600 User s Guide 20 Scanner Setup 1 Remove the scanner from its protective foam and plastic bag 2 Remove the foam strip from the inside of the scanner 3 Close the cover when you are done ...

Page 21: ... Installation This chapter includes Before You Begin on page 22 Install the Software and Connect the Scanner on page 23 Register Your Scanner on page 29 Installing Additional Applications on page 30 View the User Guides on page 31 ...

Page 22: ...d Although the messages will differ based on the software your computer is running in each case you should allow the installation to proceed if that option is available Alternatively you can turn off the AntiVirus or AntiSpyware software before installing your scanner but if you do make sure to turn it back on again when installation is finished If you already have a scanner connected to your comp...

Page 23: ...uage window opens Click the drop down menu arrow and select the language to use Click OK 4 The disc s Main nenu window opens Note If the disc does not start check the following Make sure the disc drive s door is completely shut Make sure the disc was inserted in the drive in the proper direction label side up To launch the disc manually Open the Windows options for your computer s disc drives Doub...

Page 24: ...l products 6 Make sure the boxes for Scanner Driver and Visioneer One Touch are selected as well as any other applications you want to install 7 Click Install now Note The software provided with your scanner may differ slightly from the list shown in the window ...

Page 25: ...ms select I Agree then click Next If you choose not to accept the license agreement click Cancel Click Close on the Installation Interrupted window 4 The software will now be installed 5 Stop when you see the Complete the installation by connecting your hardware window Do not click OK yet Leave the window open and proceed to the next section Note If you do not see this on screen diagram for connec...

Page 26: ...e is finished loading onto your computer 1 Remove any tape from the USB cable 2 Plug the USB cable into the USB port on the scanner then into a USB port on the computer If the plug does not attach easily make sure that you are plugging it in correctly Do not force the plug into either connection Your computer recognizes that a scanner has been plugged into the USB port and automatically loads the ...

Page 27: ...that the software has completely loaded return to the Complete the installation by connecting your hardware window 4 Click OK to complete the installation process 5 Click Close on the Installation Complete window to close and exit the driver installer ...

Page 28: ...greement window read the license agreement If you accept the terms select I Agree then click Next If you choose not to accept the license agreement the installation will terminate and One Touch will not be installed 3 Click Close on the Installation Complete window to close and exit the software installer If you selected other software to install from the DVD the installation for that software wil...

Page 29: ...canner for our customer service contact information 1 Open an Internet Explorer window or any other internet browser you have installed on your computer 2 In the web address field type www xeroxscanners com 3 Press Enter on your computer s keyboard or click the option on screen to go to the web address 4 When the Xerox scanners web page loads click on Register Your Product 5 Fill in the registrati...

Page 30: ...new pages into an existing file and name your file immediately after scanning From within the PaperPort desktop you can sort your documents and move them between folders as you would through the Windows My Documents folder You can reorder the pages in a PDF file and unstack a document so all the pages are resaved as individual files PaperPort also has some basic image editing options in the PaperP...

Page 31: ...currently installed on your computer 2 Click on View scanner documentation to access the scanner user guide Click on View software documentation to access the user guides for the software applications provided with the scanner From either of these user guide windows click on the User guide menu button to return to the main user guide window then select the other documentation section to view the u...

Page 32: ...e 32 4 When you re finished click Main menu to return to the Main menu window and click Exit 5 Remove the installation disc and store it in a safe place That s it Installation is finished and your Xerox 7600i is ready to scan ...

Page 33: ...n page 35 This chapter illustrates scanning with the buttons on the scanner After loading documents in the scanner as described below you can also scan using the One Touch Button Panel on screen or using a scanning application Note Always remove any staples or paper clips from documents before placing them on the glass to avoid scratching it ...

Page 34: ...Glass 1 Lift the scanner cover and place an item face down on the glass 2 Align the item with the arrow on the reference frame then close the cover 3 You can now scan the document using the scanner buttons One Touch or one of the other scanning interfaces ...

Page 35: ...ges are then sent to a destination on your computer or network drive One Touch Button Panel Use this scan option when you want to scan from the computer screen Scanning from the on screen One Touch Button Panel is the same as selecting a scanning option on the scanner except you click an icon that represents the function number TWAIN Interface This option uses your scanner s TWAIN interface to sca...

Page 36: ...Xerox 7600i User s Guide 36 ...

Page 37: ...TP Transfer on page 76 SMTP on page 78 Email Applications on page 81 Text Editors on page 83 Still Image Client on page 87 Image Editors on page 89 PDF Applications on page 92 Send to Application on page 95 Scanning to Multiple Destinations on page 98 Scanning with Job Separation on page 101 Scanning with Optical Character Recognition OCR on page 104 Selecting One Touch OmniPage OCR Options on pag...

Page 38: ...er screen shows the pre set function for each button such as Email and the icon of the destination called the Destination Application where the images will be sent when scanning is finished The One Touch button panel shows which application the button is configured to send images to ...

Page 39: ...at the button is set up to archive the scanned item The scanner sends the scanned image directly to a folder without opening the image first in a software application A question mark for a button means your computer does not have the appropriate software or hardware for the initial factory settings If OmniPage or the One Touch OmniPage Module is not installed then the options for sending to word p...

Page 40: ...lower right corner of the screen 3 The One Touch Button Panel opens 4 Click the button you want to use to scan 5 The scanner starts scanning and the image is sent to the selected destination for the One Touch button you are using to scan Features of the One Touch Button Panel The One Touch panel is your on screen set of controls for the scanner From the panel you can access the hardware settings f...

Page 41: ... Left click on the arrow buttons on the right side of the panel to view the rest of the One Touch buttons The Detail View Left click on a Destination Application icon to start scanning Right click on a Destination Application icon to open the One Touch Properties Single click on the detailed information to open the One Touch Properties The Hardware View Left click on the scanner icon to return to ...

Page 42: ...ion you select The icon names indicate their file types See File Formats on page 54 for more information about the available formats 6 Select a scanning configuration in the Select configuration list The configuration s basic settings include scanning mode resolution dpi page size brightness Br and contrast Cr To see a selected scan configuration s settings click its icon Click the icon again to c...

Page 43: ... links between all your computer s Destination Applications and One Touch If you install new software that can be used as a Destination Application click the Refresh button to link the new software to One Touch New Copy Edit Delete buttons click New or Copy to add new scan configurations to the list Click Edit or Delete to change or remove them OK Cancel Apply buttons OK accepts any changes and cl...

Page 44: ...ng and keeping track of your scanned documents This category includes the Send to Application and Open Scanned Document s destinations Image editors include Microsoft Paint and other drawing and graphics applications Text editors include Microsoft Word and WordPad Microsoft Excel and other word processing and spreadsheet applications Select this option if you want OCR processing to convert your sc...

Page 45: ...ou input in this field Note that when scanning duplex the number of images detected is twice the number of pages scanned For example if you input 5 in the field and scan 10 pages 20 images are captured and you will get 4 separate files with 5 images in each file Please refer to Scanning with Job Separation on page 101 for detailed information about scanning with job separation and how it works wit...

Page 46: ...ingle digit time values 2 HH inserts the 24 hour clock hour with a zero added to single digit time values 02 m inserts the minute without a zero added to single digit time values 7 mm inserts the minute with a zero added to single digit time values 07 s inserts the second without zero added to single digit time values 9 ss inserts the second with zero added to single digit time values 09 User inse...

Page 47: ...guration click the Delete button To edit the configuration click the Edit button Edit the settings and click OK Note Your scanner comes with a number of configurations pre set at the factory To ensure that your scanner will always have a set of correct scan configurations do not delete the pre set configurations We also recommend that you keep those configurations locked so they are not inadverten...

Page 48: ... and memos are usually scanned in black and white Grayscale to scan items such as documents containing drawings or black and white photographs Color to scan color photographs and other color items Color scans have the largest file size Resolution drag the slider to the right or left to adjust the dots per inch dpi of the resolution The higher the dpi setting the sharper and clearer the scanned ima...

Page 49: ... that sometimes appear on the scanned images of photographs or illustrations particularly newspaper and magazine illustrations Selecting Reduce moiré patterns will limit or eliminate moiré patterns in the scanned image This option is only available when scanning in Color or Grayscale at lower resolutions and when the scanner supports this feature Straighten image select this option to let the scan...

Page 50: ... detected the sensitivity level for Skip Blank Originals is the sensitivity level that will be used when both features are enabled Note that when the feature Use job separator in multi page batch is enabled and the option selected is When the number of images reaches the blank originals are discarded before the images are counted For example if you scan 3 pages in duplex mode each side of the page...

Page 51: ...e selected scan mode is Color Gamma is the tone curve and the starting point for image enhancement As you raise or lower the Gamma value the values at which saturation hue brightness and contrast affect the image are changed It is recommended that you keep the default Gamma value or adjust this setting before adjusting the other options This option is available for both Color and Grayscale scannin...

Page 52: ...st Click one time on the default value 0 00 in each field to enable the control box for you to input the start position and redaction area size The units of measurement is displayed on the lower right corner next to the Paper size field From left input the upper left corner start position measured from the left side of the page From top input the upper left corner start position measured from the ...

Page 53: ... below On the Page Settings tab click the name inches or mm to toggle between the two units of measurement When you click back on the Redaction Settings tab the lower right corner displays the Paper size in the units of measurement you selected Make sure the page size selected on the Page Settings tab is correct for the documents you are scanning otherwise the redaction may not occur in the correc...

Page 54: ...anel indicates the file type extension for the scanned file Create Single Image Files The TIFF and PDF formats as well as the text file formats support multiple page documents in a single file If you are scanning as a TIFF or PDF format or as one of the text formats and want one file created for each image scanned select Create single image files Note that this option is automatically selected and...

Page 55: ...mpression greatly reduces the file size when compared to a BMP file of the same image However the PNG compression is different from GIF compression in that PNG images look better when scaled Therefore PNG is often used in place of GIF for company logos with a lot of detail clickable buttons medium sized pictures and so on TIFF the tif tagged image file format format is another image type that is o...

Page 56: ...ile PDF A compliant To select a PDF file size 1 Select PDF as the page format PDF the pdf portable document format image format is often used to create images of text pages The image compression of PDF files creates relatively small file sizes when scanning multiple page files in color While the TIFF image format also supports multiple page files when scanning in color the TIFF files are often too...

Page 57: ...cessing as an automatic step for scanning Therefore when you scan a document with the text format selected the text portions of the document are automatically converted to editable text Select a text format for documents with text or numbers such as a business letter report or spreadsheet The text format icon has several file formats available depending on the Destination Application you select De...

Page 58: ... Properties window for that button 1 Open the One Touch Properties window 2 Select the scan configuration Configure Before Scan 3 Click OK or Apply on the One Touch Properties window To Scan Using Configure Before Scan 1 Click the button you set up to use Configure Before Scan 2 The TWAIN Interface opens 3 Choose your scan settings such as the Picture Type of Color Grayscale or Black White Resolut...

Page 59: ...t over but select the correct picture type before scanning No scanning stops but all pages scanned in this batch up to this point are not deleted and the TWAIN interface remains open You can place a new page in the scanner adjust the TWAIN settings for it then click the Scan button in the TWAIN interface to continue scanning At the end of the scanning batch all pages from the first portion of the ...

Page 60: ... in the destination list you must select Document management on the Options tab in the One Touch Properties window Technical Note If there is no application installed for the file format you selected the One Touch Link Log Viewer will open when scanning is finished showing the failure You can double click on the log failure to open the detail view of the failed transfer For example if you select P...

Page 61: ...in the destination list you must select Storage and CD R W on the Options tab in the One Touch Properties window Setting the Folder and Options from One Touch In the One Touch Properties window select Transfer to Storage as the Destination Application for scanning Click the Properties button to open the One Touch Link Properties for Transfer to Storage From this window you can change the global de...

Page 62: ...ments Storage location This is the location on the computer or network where the file will be saved Click on the Browse button to change the location by browsing through your Windows folder list or type a location directly into the input field You can select a local folder or a folder on a server or mapped drive Open storage folder when scan is complete Select this option to have the folder specif...

Page 63: ...e scan configuration that is assigned to the button you select If you have multiple One Touch 4 6 scanners installed the first sub menu will show a list of the currently connected scanners for you to select which scanner to update Note that this option is disabled if there is no scanner plugged in and turned on Scanning to Multiple Folders When archiving documents with Transfer to Storage option y...

Page 64: ... opens 5 To help you remember which folder it is give the new configuration a name that indicates the folder name such as Business Receipts 6 Click the Scan Settings Page Settings and Advanced Settings tabs and select the settings you want 7 Click the Storage Options tab 8 Click the Browse button ...

Page 65: ...e set as the Storage location such as Business Receipts 11 Click OK The new configuration is now listed as a Transfer to Storage configuration 12 Repeat the process to create additional new configurations such as one named Personal Receipts Note Make sure to designate separate folders as the Storage Locations for each new configuration ...

Page 66: ...can to multiple storage folders 1 Insert the document you want to scan to storage 2 Start scanning with the first button that you set to scan documents and transfer to storage 3 When scanning is complete insert the next set of documents in the scanner then press the second button you set to scan documents and transfer them to storage 4 When scanning is finished the documents are stored in the two ...

Page 67: ...ailable when OCR is installed Destination type the Burn to CD ROM destination is classified as a Storage Link To make it available in the destination list you must select Storage and CD R W on the Options tab in the One Touch Properties window 1 Open the One Touch Properties window 2 Select Burn to CD as the Destination Application 3 Choose a File Format and a Scan Configuration 4 Click OK 5 Now s...

Page 68: ...ndow select Burn to CD and then click the Properties button 7 Make sure a blank CD is in the CD burner 8 Click the Burn to CD button The CD burner begins and your scanned documents are written to the CD If other files are also waiting in this location they will get written with the One Touch files on the CD ...

Page 69: ...nly uncompressed data can be send to these devices Destination type printers and Faxes are classified as Device Links To make them available in the destination list you must select Fax and Print on the Options tab in the One Touch Properties window The Properties button will be disabled in One Touch as there are no global properties for this type of destination Select a printer or fax device in th...

Page 70: ...p of the image s dimensions Select this option so the image s relative proportions remain constant AutoRotate image for best fit if the image is a Landscape format and the device is printing in the Portrait mode or vice versa rotate the image to fit on the page Collate copies if you are printing more than one page collate the copies Enter the number of copies in the Copies box Advanced click to se...

Page 71: ...PaperPort From this window you can change the default folder location and options On initial installation of One Touch all scan configurations send the scanned document to the folder selected in this window When you create new configurations the default settings will also match what you have selected here If you modify the options in an individual configuration changing the options in this Link Pr...

Page 72: ... must be open before scanning for the scans to be sent to the selected folder in the PaperPort folder pane If PaperPort is not open this option is ignored and the scanned file is sent to the folder selected in either the One Touch Link Properties or Scan Configuration window for PaperPort PaperPort One Touch Link Properties window Scan Configuration Properties window PaperPort tab These arethe fol...

Page 73: ...ow All configuration of the SharePoint server is done using the SharePoint settings tab in the Scan Configuration Properties window 1 Select SharePoint as the destination application 2 Open the Scan Configuration you want to modify for scanning to a SharePoint site or create a new Scan Configuration Select an existing configuration in which you have already specified your SharePoint site informati...

Page 74: ...nal file name Because the destination configuration is done through the scan configuration you can set each configuration to scan to different SharePoint site folder filename format using different user credentials and so on This is the same process used as when scanning to different folders using the Transfer to Storage destination as described in detail starting on page 63 Click on the Help butt...

Page 75: ...n the Log Viewer from the SharePoint One Touch Link Properties window There are no global configuration properties for the SharePoint destination application all configuration is done using the Scan Configuration Properties window as described in the previous section ...

Page 76: ...configuration of the FTP server is done using the FTP Transfer tab in the Scan Configuration Properties window 1 Select FTP Transfer as the destination application 2 Open the Scan Configuration you want to modify for scanning to an FTP server or create a new Scan Configuration Select an existing configuration in which you have already specified your FTP server information and then click on the Cop...

Page 77: ...iewer opens automatically when scanning is complete Click on the menu arrow next to View logs for and select FTP Link Agent from the list to display the transfer history for the FTP link only Double click on any of the line items to open the selected log file in the Log File Detail View If you open a failed transfer the log file may contain the information you need to determine why the transfer fa...

Page 78: ...using the SMTP Settings tab in the Scan Configuration Properties window 1 Open the Scan Configuration you want to modify for scanning to an SMTP server or create a new Scan Configuration Select an existing configuration in which you have already specified your SMTP server information and then click on the Copy button to create a new configuration using the settings of the current configuration 2 C...

Page 79: ...e process used as when scanning to different folders using the Transfer to Storage destination as described in detail starting on page 63 Click on the Help button in this configuration tab to launch the SMTP help file The help file contains detailed information about the settings in this window and technical implementation notes SMTP Link Log Viewer The One Touch Link Log Viewer opens automaticall...

Page 80: ...to open the Log Viewer from the SMTP One Touch Link Properties window There are no global configuration properties for the SMTP destination application all configuration is done using the Scan Configuration Properties window as described in the previous section ...

Page 81: ...nt is outside the scope of this document Supported file types all image and text file formats except HTML are available when scanning to an email application Note that text file formats are only available if an OCR module or application is installed Please refer to Text Formats on page 57 to see a list of text file formats that are available when OCR is installed Destination types the email destin...

Page 82: ...ograms tab and choose a new email client from the program list These are the standard Windows Internet Explorer options Please see your Windows documentation for more information about the Internet Explorer options Color document handling click in the Color document handling settings boxes for the options you want Convert Bitmaps using Screen Resolution use this option to ensure that an image will...

Page 83: ...a text icon and there will be no text editor applications in the Select destination list Destination type this destination type is classified as a Text Based Link To make it available in the destination list you must select Text editing applications on the Options tab in the One Touch Properties window If the text editing application you are using does not appear in the Select destination list you...

Page 84: ...estination list You can only delete an application that you have added the destinations that are linked when One Touch is installed cannot be deleted General OCR settings click in the OCR settings boxes for the options you want The options will apply to all the applications in the group Always send a file even when no text was found the scanned file is sent to the application even if the image doe...

Page 85: ... plain text documents that contain formatting Microsoft s WordPad application is a compatible application for the rtf file formation Standard ASCII text file select this option if you want to have plain text without formatting sent to your text editing application Most text editing applications will accept plain text txt files Adobe PDF format select this option if you are adding a PDF viewing or ...

Page 86: ...contain images that you want posted to your website with the HTML text 4 Click OK 5 Start scanning using the button you selected for scanning with the HTML format When scanning is finished the document is first converted to editable text using the OCR process then converted into an HTML format Any images detected by the OCR engine are isolated and linked as gif files 6 Microsoft Internet Explorer ...

Page 87: ...Link To make it available in the destination list you must select STI event forwarding on the Options tab in the One Touch Properties Window Please note that if you are have turned on the option to scan to multiple destinations the Still Image Client destination cannot be selected Please click on the Options tab and deselect Enable scanning to multiple destinations to proceed with scanning to this...

Page 88: ...anel is in Category View Windows XP or Home View Windows Vista and 7 the Scanners and Cameras group will be located under either of the following main groups Windows XP Printers and Other Hardware Windows Vista and 7 Hardware and Sound 3 Open the scanner properties window Windows XP click on the scanner icon and then click on the View device properties link on the left side of the window Windows V...

Page 89: ...t available in the destination list you must select Image editors i e Paint on the Options tab in the One Touch Properties window If the image editing application you are using does not appear in the Select destination list you can add the application using the Image Documents One Touch Link Properties window 1 In the One Touch Properties window select one of the default image editors such as Micr...

Page 90: ...talled cannot be deleted Color document handling click in the Color document handling settings boxes for the options you want These options will apply to all the applications in the group Convert Bitmaps using Screen Resolution use this option to ensure that an image will fit on the computer s screen When a computer screen is set to a lower resolution bitmap images with a higher resolution may be ...

Page 91: ...as not been compressed Tagged Information File select this option if your application supports TIF image files The TIF file format supports multiple pages in a single file JPEG Compressed File this is a compressed image format that is often used when sharing photographs and scanned images electronically as the file size is smaller than a BMP Compugraphics File select this option if your applicatio...

Page 92: ...s in the scanned image are isolated from the text the text on the page is recognized and turned into editable text and the pictures are placed back into the document in the same flow as the original document Destination type this destination type is classified as PDF Link To make it available in the destination list you must select PDF applications on the Options tab in the One Touch Properties wi...

Page 93: ... button The Add Text Based Link dialog box opens 6 Click Browse to find the application you want to add to the list When you select the application using the Browse button Steps 1 and 2 on the dialog box are automatically filled in and the application icon appears in Step 3 7 Select the icon in Step 3 of the dialog box That is the icon that will appear in the One Touch Destination List ...

Page 94: ... PDF image format with a hidden searchable text layer You will not be able to edit the text the file The application you are adding must be able to open pdf files The options you select at Step 4 determine the page format icons in the One Touch Properties window for that group of applications Refer to the documentation you received with the application to see which text formats the application acc...

Page 95: ...that sending the image to the Send to Application link failed Click the Properties button to open the One Touch Link Properties for the Send to Application link From this window you can configure the default application for this link After configuring the link properties all of the default scan configurations will immediately update to send to the application you specify in this window When you cr...

Page 96: ...in this window The default settings will work with most applications The advanced settings are described below 4 Select a file format and scan configuration in the One Touch Properties window If you select a text file format the scanned image is converted into editable text before being sent to your selected application 5 Click on OK to close One Touch 6 Put the document s in the scanner and start...

Page 97: ...ransferred Command line arguments input the options that are to be used when the application is launched These values are application specific and you should only input values that were provided to you by the application developer Command line arguments are not required for you to use this link the field can be left blank and you can change the other settings in this section as needed Append scan ...

Page 98: ...ch One Touch button 1 Open the One Touch Properties window and click on the Options tab 2 Select Enable scanning to multiple destinations then click back on the configuration tab 3 Click each destination where you want to send the scanned image in the Selected destinations list Click again to deselect a destination As you click on each destination the Selected destinations number will count so you...

Page 99: ...ions as described in the previous section s for configuring destination specific options Click on OK when you are done making changes in this window 5 Select the file format you want for the scanned image in the Select format panel You can only scan as one file format at a time so all selected destinations must have a common file type As you select destinations destinations that do not have a file...

Page 100: ...nstructions as described in the previous section s for configuring destination specific options Click on OK when you are done making changes in this window 7 Click on OK on the One Touch Properties window 8 Load the document s in the scanner and start scanning with the button you set to scan to multiple destinations The scanner starts scanning and when finished the image is sent to each destinatio...

Page 101: ...eparator 1 Open the One Touch Properties window 2 Select the Destination Application File Format and Scan Configuration applicable to your scanning batch Make sure the option Create single image files is not selected If this option is selected the job separation features on the Options tab will be disabled 3 Click on the Options tab in the One Touch Properties window 4 Click on the down arrow next...

Page 102: ...ges reached would be 12 7 When you are done making changes click on OK to save the changes and close the window 8 Place your documents in the scanner and start scanning When scanning is finished each file will be sent to the destination location or application you have selected on the button tab Technical Note When Instant delivery is also selected on the Options tab each file will be sent as it i...

Page 103: ...ges reaches and input a number in the control box any blank pages will be discarded first and then the number of images scanned will be counted For example if you scan 12 pages and 3 are blank the total number of images counted for the job separation will be 9 not 12 ...

Page 104: ...file format in the Select format panel For example if you want to edit your document in Microsoft s WordPad select that application then choose a file format such as TEXT or RTF 3 Click on OK to save the changes and close the One Touch Properties window 4 Press or click the One Touch button you set to scan with OCR Your scanned pages appear in the Destination Application with the text ready for ed...

Page 105: ... select Destination Applications that are text applications the text format icon changes to match the file type of the application In some cases the Destination Application supports several file types and you can right click on the icon to choose the particular file type for that application The specific file format is the file name extension on the text format icon To select a file type for the t...

Page 106: ...matting when converted Available with Microsoft WordPad and Word Word Document the doc file format used by Microsoft Word Comma Delimited the csv file format used for database or spreadsheet data with fields when the document is converted into editable text the fields are maintained Excel Spreadsheet the xls file format used by Microsoft Excel HTML Document the htm file format used to create web p...

Page 107: ...aphics With MRC the image is produced using separate processes for text graphics and other elements on the document page The result is clearer graphics and sharper text characters Scans with Use MRC selected may take slightly longer to complete the processing Select Use MRC for documents with harder to read text or lower quality graphics to get the best possible scan output image The Use MRC optio...

Page 108: ...w 2 Select a Destination Application that has one of the text format file types as the page format such as Microsoft Word or WordPad 3 Right click on the page format icon to see the menu 4 Choose OCR Options from the menu The OCR Properties window opens with the OCR tab selected Note The OCR options apply globally to all the One Touch Destination Applications that perform OCR For example if you se...

Page 109: ...e page individually then guesses what the letter or symbol is based on the shape Therefore the OCR engine may have more than one guess for a particular letter or symbol a best guess a second best guess and so on This option tells the OCR engine to look through the dictionary to validate its best guess for the letters in that word if its best guess is not in the dictionary it checks for the second ...

Page 110: ...not recognize the J in REJECT and is the reject character the word would appear as RE ECT in your document The is the default reject character Type the character you want to use in the Reject Character box Try to choose a character that will not appear in your documents Missing Character this is the character that the OCR process inserts for a missing text character A missing text character is one...

Page 111: ...file does not have to contain any text at all and you could add the words using the editing options However if the list of words is long it s usually faster to type them in the word processing program Note also that the words do not need to be alphabetized 4 Save the document in the txt format and give the file the name that you want for the dictionary For example give it the name USERDIC1 5 Now o...

Page 112: ... spellchecking 12 Select a dictionary and click Set As Current to set it as the current dictionary for spellchecking The label current is added to the name If you don t want to use any user dictionaries for spellchecking click none at the top of the list To remove a dictionary from the list select it and click Remove This only removes the dictionary from the list It does not affect the original te...

Page 113: ...cludes any spaces before or after it those spaces are removed and the word is added to the list To delete a word from the list select it and click Delete If a word in the list is misspelled delete it then re type the word correctly in the User Word box and click Add 3 To import a list of words from another text file click Import The Import Contents of User Dictionary window opens 4 Select the file...

Page 114: ...t and click Export The Export User Dictionary window opens 7 Select the dictionary file to export and click Save The file is exported as a formatted dictionary with the ud filename extension so it can be opened by other programs The Format Tab The options on the Format tab window are for setting the input and output formats for the scanned documents ...

Page 115: ...ion you have selected You can later specify whether to export it in a grid or as tab separated text columns Spreadsheet choose this option if the entire document consists of a table that you want to export to a spreadsheet program or have treated as a table No flowing text or graphics will be detected Output Format Options Automatic the document will be formatted as close to its original as possib...

Page 116: ...ed with the PDF format It is not available for the TXT RTF CSV or XLS formats Spreadsheet this output format produces results in a tabular form with each page becoming a separate worksheet The worksheets can then be opened in a spreadsheet application The Spreadsheet output option is only available for documents scanned with the XLS format 2 Click OK or Apply These options will now apply to the OC...

Page 117: ...tions with Acuity options work with One Touch scan settings to produce the best quality images This section explains how to use the Visioneer Acuity features when choosing new scan settings for your scanner The Acuity options appear on the Scan Configuration Properties window that you use to create a new scan configuration for your scanner The Acuity Settings You select the Visioneer Acuity settin...

Page 118: ...an configuration The options are Do not use Acuity image processing scanning will not use the Acuity processing Default settings automatically selects the options your scanner can use with any scan mode Black White Grayscale and Color 6 Select the options for scanning AutoCrop to original Select this option to let the software automatically determine the size of the item being scanned Straighten i...

Page 119: ... the scanned image The Despeckle option identifies these spots and removes them This option is only available when scanning in Black White Color dropout color dropout is the ability of your scanner to automatically remove a color from a scanned image For example if you are scanning a letter with a red watermark you can choose to filter out the red so the scanned letter just shows the text and not ...

Page 120: ...neTouch Panel and the OneTouch Properties window both show the Acuity icon as a reminder The Acuity icon on the top of the One Touch Panel and on the scan configuration remind you that the scan will use the Acuity settings The summary of the scan settings also indicates Acuity settings ...

Page 121: ...e change some of the hardware options configure the scanner interface behavior and adjust application options that may be available for your scanner 1 Right click on the One Touch icon and choose Show Hardware from the pop up menu 2 The Hardware Properties dialog box opens and shows information about your Xerox scanner 3 Click the Properties button ...

Page 122: ...Xerox 7600i User s Guide 122 Device Settings Please refer to Device Settings on page 158 Driver Settings Please refer to Driver Settings on page 159 ...

Page 123: ...erface on page 124 Scanning on page 125 Using the Preview Window on page 126 Document Source Configuration on page 133 Summary on page 135 Presets on page 136 Document Settings on page 141 Image Enhancements on page 146 Driver Configuration on page 156 Hardware Properties and Interface Behavior on page 158 ...

Page 124: ...be accessed from any TWAIN scanning application you have installed on the computer The driver interface described herein is the TWAIN driver that has been developed for your scanner The interface described in this section is the one provided with your scanner and you will see it when scanning from PaperPort or OmniPage Other TWAIN compliant scanning applications may also access this interface Howe...

Page 125: ...why the feature is unavailable 1 Load the document s in the scanner 2 Adjust the settings in the interface for the item you are scanning 3 Click on the Scan button 4 When scanning is complete click Cancel to close the interface 5 The scanned images are now in the scanning application Note if you see this locked version of the scanner s interface please click on this link for Driver Settings to go ...

Page 126: ...e preview window 1 Select the initial scan settings you want to use for the preview image and scanning If you want to modify the settings for a particular preset make sure you select that preset before continuing 2 Click the Preview button to open the preview window The preview window displays the scan area and the current scan region This scan region reflects the paper size currently selected in ...

Page 127: ...ng and saving images 7 After you adjust the scan settings click Refresh preview to get a new sample image that reflects the most current settings in the main interface 8 When you are happy with the sample image click Close to close the preview window and return to the main interface window The sample image is not saved on your computer Click the Scan button in the main interface to scan and save a...

Page 128: ...e main interface click Preview to open the preview window If no previous custom scan regions have been created for the preset you selected the preview window will have a single scan region that is the page size for the current preset This region will be labeled number 1 and be displayed as an outline in the preview area 3 Place an item in the scanner and then click Get preview 4 The scanner scans ...

Page 129: ...been set as a region you will move the existing region 7 Click Close when you are done creating scan regions 8 In the main scanner interface click Save to save the regions to the current preset or save them to a new preset using the Save as dialogue The Summary area in the main interface will indicate when custom regions have been defined in the preview window Click on View or modify custom region...

Page 130: ...active region under the mouse cursor Click on the region and drag the mouse to move the region Resizing regions to resize a region place your mouse cursor over the edge of the region outline The cursor will change to a dual directional arrow Click on the line and drag the mouse to resize the region If you click on the top or bottom edge you can only resize the region up or down If you click on the...

Page 131: ...n that is in the way and select Temporarily send this region to the back to move that region behind the one that you want to move or resize This is a temporary change in the region ordering and cannot be undone That region will automatically move back into its position when you click to move or resize a region Reordering Regions If you have created multiple scan regions you can reorder the region ...

Page 132: ...umber down one in the processing order This option is not available if the region you right clicked on is already the last region in the processing order After selecting this option all other regions will have their number update automatically as appropriate Make this the last region select this option to set the region number to the last number in the processing order This option is not available...

Page 133: ...cans have the largest file size Gray scans the document using varying shades of gray to reproduce the document The grayscale scan mode is often used when scanning documents or graphics where the original color does not need to be retained but the graphics need to be legible Grayscale scanning preserves the graphic quality while keeping the file size less than that of a full color scan Black and Wh...

Page 134: ...sed when scanning documents or graphics where the original color does not need to be retained but the graphics need to be legible Grayscale scanning preserves the graphic quality while keeping the file size less than that of a full color scan Black and White scans the document in bitonal where everything on the page is either black or white This setting is often used when scanning typed or written...

Page 135: ...7600i User s Guide 135 Summary The Summary area displays some of the basic scan options selected in the interface Clicking on one of the links will open the area of the interface where the setting is located ...

Page 136: ...t to save changes to the Last used settings preset without scanning Click the Cancel button to close the scanner interface without saving any changes To save a new preset 1 Adjust the options in the scanner interface as needed 2 Click on the right arrow and select Save as from the list 3 After clicking on the save option a dialogue opens for you to type in a name Type in the name you want then cli...

Page 137: ...n and select Rename 3 Type an new name for the preset in the name field and then click on OK in the dialogue To delete a preset 1 Click the drop menu under Presets and select the preset you want to delete 2 Click the right pointing arrow button and select Delete 3 Click Yes when prompted to confirm that you want to delete the currently selected preset To export a preset 1 Click on the right pointi...

Page 138: ...tton next to the Destination folder field to open a file browsing window 3 Browse to a location and select the folder where you want the preset file to be saved Click on Choose Make sure to choose a location where you will be able to easily find the file ...

Page 139: ...lready exists select one of the options on screen to continue Overwrite select this option to replace the current preset with the one you selected from the list Keep both select this option to keep both presets The preset you selected will have a counting number added to the end of the preset name for example Custom preset name 2 The original preset name will remain unchanged Skip select this opti...

Page 140: ...ote the software will look for duplicate preset names If you see a notification indicating that a preset with the same name already exists select one of the options on screen to continue Overwrite select this option to replace the current preset with the one you selected from the list Keep both select this option to keep both presets The preset you selected will have a counting number added to the...

Page 141: ... when you return to the Main panel that option will be selected Disabled Options in this Section Some options in the interface may be grayed out and cannot be selected Grayed out options are either not appropriate for the current scanner the software needed to enable the feature is not installed or the feature is dependent on another setting in the scanner s interface Hover the mouse cursor over a...

Page 142: ...arer the image However high resolution scans also produce larger file sizes The available range displayed in the slider area are within the minimum and maximum range supported by your scanner The resolution slider will always display the correct range for the current scanner Choosing resolution values Typically when making copies of black and white documents 100 150 dpi will create an image of sim...

Page 143: ... the Page size list does not include the page size for your scanning batch click in one of the fields below the page size list Input the width of the document in the first field then input the height in the second field You can only specify values within the scanner s minimum and maximum supported item size Please refer to the maintenance section of the scanner user s guide for this information Do...

Page 144: ...nal settings for you to fine tune the feature you ve selected Select the Advanced source configuration mode to show this panel Skip Blank Originals Select this option to have the scanner detect if a blank page has been fed through the scanner and remove it from the final file Blank threshold you can adjust the sensitivity level of the blank image detection AutoCrop Depending on the scanner model a...

Page 145: ... option tells the scanner to crop the final image to the bottom of the page being scanned This option is only available if the scanner supports this feature This option may occasionally be grayed out as not all scanning applications support this feature ...

Page 146: ...nel contains advanced document handling options If you select an option in this panel that also appears on the Main panel when you return to the Main panel that option will be selected Disabled Options in this Section Some options in the interface may be grayed out and cannot be selected Grayed out options are either not appropriate for the current scanner the software needed to enable the feature...

Page 147: ...eft or right to darken or lighten the image Adjusting the brightness level adjusts the tone of the pixels without changing the true color of the pixels such as when adjusting hue Note This option is disabled when Threshold is selected while scanning in black and white Choosing brightness values Adjusting the brightness level is based on how you want the image to appear and there is no standard to ...

Page 148: ...nitor may affect how light or dark the scanned image looks when compared to the original If the scanned image is too different from the original image or if adjusting the scanned brightness level does not modify the image how you want try adjusting the monitor s brightness level Refer to the monitor s user guide for adjusting the brightness level and see if the manufacturer has any recommended set...

Page 149: ...Light colored carbon copy paper such as yellow or pale pink or pale green with light text 45 to 55 Newspaper or magazine pages 55 to 70 Book pages 60 to 75 Pictures taken inside or in the shade 40 to 60 Color image contrast examples The examples below show the original image at the default setting of 50 contrast level 25 contrast and 75 contrast Technical note Most monitors have a contrast setting...

Page 150: ...s of the same color rather than just adding white Adjusting the gamma level is based on how you want the image to appear and there is no standard to adhere to Color image gamma examples The examples below show the original image at the default setting of 1 8 gamma level then 1 0 gamma and 2 6 gamma Adjusting the gamma level does not make the image completely black nor completely white Technical no...

Page 151: ...m Newspaper microfilm reverses black and white so that when viewed on a monitor the text is white and the paper is black The following example shows the original grayscale image and the inverted image The following example shows the original color image and the inverted image Mirror Image The Mirror image option flips the image left to right ...

Page 152: ... document is dark such as a colored background that may interfere with detecting black move the slider left This tells the scanner that the level to look for is dark only very dark areas such as text are converted to black pixels If you are scanning documents that are in good condition with black text on a white background the default threshold option will properly scan the item This level only ne...

Page 153: ...er a small wrinkle or holes where a staple was removed may show up as speckles in the scanned image The Despeckle option identifies these spots and removes them This option is only available when scanning in black and white Radius this is the size of the area that is evaluated for stray dots Number this is the maximum number of dots within the radius that should be considered a speckle If this num...

Page 154: ... and Contrast for more information about the features and how to adjust the settings Color Dropout Color dropout tells the scanner and software to remove a specific color from the image You can choose either Red Green or Blue or define a custom color to be dropped out of an image To input a custom color using its RGB value select Custom in this list and then input the values for R G and B in their...

Page 155: ...7600i User s Guide 155 This option is only available when scanning in grayscale or black and white The example below shows the original text with a red watermark and the resulting image with the color removed ...

Page 156: ...n this Section Some options in the interface may be grayed out and cannot be selected Grayed out options are either not appropriate for the current scanner the software needed to enable the feature is not installed or the feature is dependent on another setting in the scanner s interface Hover the mouse cursor over a grayed out feature to see information about why the feature is unavailable Module...

Page 157: ...e module in the list Changing the order of the modules changes the order in which the image processing options are used For example if there are two modules installed and both modules include an automatic image rotation option the first module s rotate option is used and the rotate setting in the second module is ignored so that the image is not rotated twice Scanner Configuration The scanner conf...

Page 158: ... make changes to the system settings Windows Vista from the Windows Control Panel open Hardware and Sound and then Scanners and Cameras Click on the scanner icon then click on the Properties button Click Yes if you are prompted by the Windows User Account Control to confirm that you want make changes to the system settings Windows XP from the Windows Control Panel when in category view open Printe...

Page 159: ...have in some scenarios Only advanced users should modify any of the options in this section Options that are not available for your scanner will be grayed out and disabled General Lock settings this option prevents the user from making changes to the options in the scanner interface When the interface opens only the scanning Presets will be available for a user to select and use for scanning Defau...

Page 160: ... the last used settings will match the application settings that were used to scan Select this option to have the settings reset to the last ones used when this interface was open Enable user compression this option is enabled only if the scanner and the software allow manual adjustment of the image compression Remember compression when a compression option is available for user adjustment it cann...

Page 161: ...ner on page 162 Troubleshooting on page 163 Uninstalling Your Scanner on page 166 Xerox 7600i Scanner Specifications on page 167 Xerox 7600i Parts List on page 168 This section contains information about maintenance troubleshooting uninstalling scanner specifications and spare parts ...

Page 162: ...canner Cleaning the Scanner Glass Scanning items that have excessive amounts of dirt or dust may dirty the glass To ensure the best quality scanned item wipe the scanner glass with a soft dry clean cloth to rid the glass of dust or other debris If any residue remains after wiping the glass with a dry cloth try adding a few drops of Isopropyl alcohol rubbing alcohol to the cloth and wipe off the re...

Page 163: ...he computer back up and restores full power to the system This power fluctuation during the computer s hibernating period may sometimes cause the scanner to lose communication to the computer Problem I got the error message PaperPort cannot allocate enough memory to perform internal critical operations Close any other active applications so that additional memory is available If you click Continue...

Page 164: ...ne Touch unplug the USB cable connected to the scanner 2 Perform the Change Repair function again If you are asked for the Install DVD insert the disc into the DVD ROM player and click OK 3 When prompted plug the USB cable back into the scanner 4 When the installation process finishes click OK on the Complete The Installation window and then click Close 5 Reboot your computer Problem One Touch no ...

Page 165: ...Problem If the USB cable is disconnected during a scan the scanner does not reconnect when the USB cable is plugged back in Unplug the power cable from the scanner and then plug it back in If the scanner does not reconnect 1 Unplug the power cable from the scanner 2 Restart your computer 3 After the restart is complete plug the power cable back in ...

Page 166: ...or Uninstall button 4 Click Yes when asked to confirm that you want to remove these software programs 5 Follow these same steps to select and remove the One Touch software the Kofax VirtualReScan and the One Touch ScanSoft OmniPage OCR modules from the installed programs list 6 The scanner driver and One Touch software is removed from your computer 7 Unplug the USB cable from the scanner 8 Close a...

Page 167: ... 400 mm Weight 3 6 lbs 1 62 kg Operating temperature 50 95 F 10 35 C Relative humidity 10 85 35 C without condensation Power consumption 2 50 Watts during operation 0 75 Watts on standby 0 Watt power off USB cable 1200 mm 28AWG with core RoHS compliant Safety and agency certifications UL C UL TUV GS FCC Class B CE CB WEEE RoHS ENERGY STAR Supported Operating Systems Microsoft Windows 32 bit XP Ser...

Page 168: ...Xerox 7600i User s Guide 168 Xerox 7600i Parts List Please use the following part names and numbers when ordering replacements for your Xerox 7600i scanner Part Name Part Number USB Cable 35 0239 000 ...

Page 169: ...Xerox 7600i User s Guide 169 A Regulatory Information This chapter includes Basic Regulations on page 170 Copy Regulations on page 172 ...

Page 170: ...ircuit different from that to which the receiver is connected Consult the dealer or an experienced radio TV technician for help This device complies with Part 15 of the FCC Rules Operation is subject to the following two conditions 1 This device may not cause harmful interference and 2 this device must accept any interference received including interference that may cause undesired operation Chang...

Page 171: ...r Xerox Limited representative or by contacting Environment Heath and Safety The Document Company Xerox Bessemer Road Welwyn Garden City Herts AL7 1HE England Telephone 44 0 1707 353434 Other Regulations Turkey RoHS Regulation In compliance with Article 7 d We hereby certify It is in compliance with the EEE Regulation EEE yönetmeliğine uygundur ...

Page 172: ...al Postal Money Orders Bills Checks or Drafts of money drawn by or upon authorized officers of the United States Stamps and other representatives of value of whatever denomination which have been or may be issued under any Act of Congress 2 Adjusted Compensation Certificates for Veterans of the World Wars 3 Obligations or Securities of any Foreign Government Bank or Corporation 4 Copyrighted mater...

Page 173: ...ity in Canada or of a court of law 5 Proclamations orders regulations or appointments or notices thereof with intent to falsely cause same to purport to have been printed by the Queen s Printer for Canada or the equivalent printer for a province 6 Marks brands seals wrappers or designs used by or on behalf of the Government of Canada or of a province the government of a state other than Canada or ...

Page 174: ...h reproductions Note This list is not inclusive and no liability is assumed for either its completeness or accuracy In case of doubt contact your legal counsel Currency notes Bank notes and cheques Bank and government bonds and securities Passports and identification cards Copyright material or trademarks without the consent of the owner Postage stamps and other negotiable instruments ...

Page 175: ...Xerox 7600i User s Guide 175 B Compliance Information This chapter includes Product Recycling Disposal on page 176 Energy Star for the USA on page 177 ...

Page 176: ...ng devices such as batteries Special handling may apply please see http www dtsc ca gov hazardouswaste perchlorate European Union RoHS and WEEE Compliance This product is compliant with RoHS Regulations of the European Parliament and Council Directive on the Restrictions of the Use of Certain Hazardous Substances in Electrical and Electronic Equipment 2002 95 EC and with the Waste Electrical and E...

Page 177: ...nited States trademarks The ENERGY STAR Imaging Equipment Program is a team effort between U S European Union and Japanese governments and the office equipment industry to promote energy efficient copiers printers fax multifunction machine personal computers and monitors Reducing product energy consumption helps combat smog acid rain and long term changes to the climate by decreasing the emissions...

Page 178: ...Xerox 7600i User s Guide 178 ...

Page 179: ...e files 54 csv file format 106 D Delete button 43 Despeckle 147 153 Destination Application text file format 105 Destination application 39 44 54 61 71 Burn to CD 67 Email application properties 82 Event Forward STI 87 Image application properties 90 Microsoft Explorer HTML 86 OCR 42 104 Text application properties 84 Text file format 57 Transfer to Storage properties 68 Device settings 121 Disabl...

Page 180: ...racter 110 Module Configuration 156 Moiré Patterns 49 monitor 17 MRC 107 Multi stream 133 N New button 43 Normal 56 57 Normal PDF 107 nPDF 107 Nuance OmniPage Pro 30 Nuance PaperPort 30 O OCR 105 columns 115 tables 115 OCR Dictionary 110 OCR input format 115 OCR Options 108 OCR output format 115 OCR tab 109 OmniPage Pro 30 One Touch Button panel 41 icon 40 42 New settings 42 Options tab 44 Panel f...

Page 181: ...tion 95 Show all destinations 44 Show Hardware 121 Show Progress Window 45 Simple Text 106 107 Size 49 Skip Blank Originals 50 Skip blank originals 144 Software 24 30 sPDF 106 Speckles 153 spreadsheet 115 116 Sti event forwarding 44 Still Image Client 87 Storage and CD R W 44 Straighten Image 49 Straighten image 143 Summary 135 system requirements 17 T Text Documents Properties 84 Text Editors 44 ...

Page 182: ...Index Xerox 7600i User s Guide 182 ...

Reviews: