background image

Xerox Mobile Scanner

User’s Guide

45

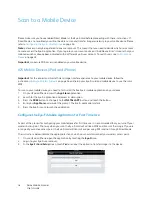
Scan to an Android Device

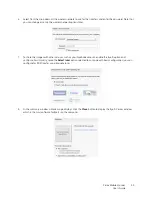
1.

Open the Eye-Fi application on your mobile device.

2.

Turn on the scanner.

3.

Tap the function button to cycle through the scan functions. Stop when the LED is lit next to the scan function 
you want to use.

4.

Insert a document 

face-up

 in the scanner.

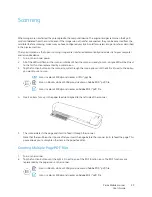
5.

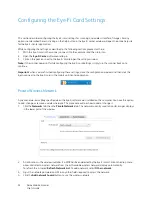
The scanner starts scanning, when finished it is saved to the Eye-Fi card and the card starts transmitting the 
file. In the Eye-Fi application on your mobile device, you will see images loading into the software.

Note: 

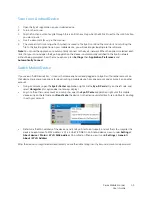
You can set the application to automatically connect to the Eye-Fi network. When the option is selected, each 

time that you scan and open the Eye-Fi application, the device is automatically switched to the Eye-Fi network 
without being prompted. From the menu options, press 

Settings

, then 

Application Preferences

, and 

Automatically Connect

.

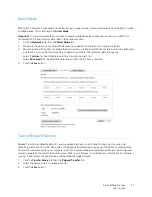
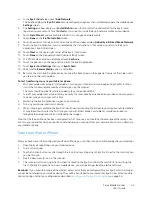
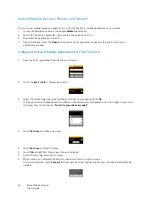
Switch Mobile Device

If you see an “Add Device Error,” it means that someone has already logged in to Eye-Fi with another account on 
that device. Here are some options for de-activating a mobile device from one account and activate it on another 
account:

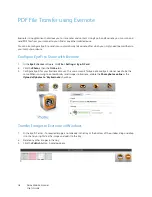
Using a computer, open the 

Eye-Fi Center

 application, right-click the 

Eye-Fi Card

 entry on the left side, and 

select 

Unregister

 (this option does not always display).

Log in to the other user account on a computer, open the 

Eye-Fi Center

 application, right-click the mobile 

device entry on the left side, and 

Deactivate

 the device. On the device, uninstall Eye-Fi, reinstall Eye-Fi, and log 

in with your account.

Determine the MAC address of the device, send it to Eye-Fi technical support, and ask them to unregister the 
device. An example of a MAC address is 01-23-45-67-89-AB. On an Android device, view it under 

Settings > 

About device > Status > Wi-Fi MAC address

. On an iPad or iPhone, view it under 

Settings > General > 

About > Wi-Fi Address

.

After the device is unregistered or deactivated, you are then able to log in with your user account and password.

Summary of Contents for XCARD-SCAN

Page 1: ...Xerox Mobile Scanner December 2011 05 0844 100 User Guide...

Page 2: ...tered trademark of ZyLAB International Inc ZyINDEX toolkit portions Copyright 1990 1998 ZyLAB International Inc Document Version 05 0844 100 December 2011 All Rights Reserved All other products mentio...

Page 3: ...Card or USB Flash Drive 22 Creating Multiple Page PDF Files 23 Retrieving the Scanned Images 23 Smartphones 25 Retrieving the Scanned Images 26 Troubleshooting Connection Issues 26 iPad 27 Other Table...

Page 4: ...ode 50 Troubleshooting and Error Messages 51 5 Maintenance Calibrating Your Scanner 54 Cleaning Your Scanner 55 Xerox Mobile Scanner Specifications 56 Windows Compatible Bonus Software 56 Xerox Mobile...

Page 5: ...es Safety Introduction on page 6 Operational Safety Information on page 7 Electrical Information on page 8 Emergency Power Off on page 9 Maintenance Information on page 10 Product Safety Certification...

Page 6: ...eet strict safety requirements These include safety agency evaluation and certification and compliance with electromagnetic regulations and established environmental standards The safety and environme...

Page 7: ...eaners they may be explosive and flammable under certain conditions Always exercise care when moving or relocating equipment Always unplug this equipment from the electrical outlet before cleaning Not...

Page 8: ...cks a ground connection terminal 6 Do not place this equipment where people might step or trip on the power cable 7 Do not place objects on the power cable 8 Do not override or disable electrical or m...

Page 9: ...the electrical outlet s Contact an authorized Xerox Service Representative to correct the problem The equipment emits unusual odors or makes unusual noises The power cable is damaged or frayed A wall...

Page 10: ...The use of cleaners that are not approved may cause poor performance of the equipment and could cause a dangerous condition 4 Use supplies and cleaning materials only as directed in this manual 5 Do n...

Page 11: ...s Guide 11 Product Safety Certification This product is certified by the following Agency using the Safety standards listed Agency Standard Underwriters Laboratories Inc UL60950 1 USA CSA 22 2 No 6095...

Page 12: ...al Health and Safety Contacts Contact Information For more information on Environment Health and Safety in relation to this Xerox product and supplies please contact the following customer help lines...

Page 13: ...bile Scanner on page 15 Insert the Battery on page 17 Connect the Scanner to Charge the Battery on page 18 Register Your Scanner on page 20 Thank you for purchasing the Xerox Mobile Scanner With this...

Page 14: ...of the box If items are missing or damaged contact the dealer where you purchased the scanner Xerox Mobile Scanner Quick Install Guide Technical Support Card Windows Installation Disc Carrying bag USB...

Page 15: ...button to cycle through the scan functions Status LEDs Indicates the scanner s current status When it is reporting an error all 3 LEDs will blink simultaneously a few times pause then blink again The...

Page 16: ...etect a storage device Make sure a USB flash drive or memory card is fully inserted into the back of the scanner Power cycle the scanner if needed 4 blinks Calibration error the scanner needs to be ca...

Page 17: ...canner If the battery is not pre installed in your unit or if you need to replace the battery for any reason please follow these instructions for installing the battery Warning Only use the battery mo...

Page 18: ...ttery at the same time Make sure the scanner power is not on if you want to charge the scanner battery Note only use the power adapter provided with the scanner ADS 5N 06 05005G made by HONOR or DSA 1...

Page 19: ...Scanner User s Guide 19 2 Plug the flat end into the power supply base 3 Plug the power supply into a wall outlet Note You can also charge the scanner battery when it is connected to a USB port in yo...

Page 20: ...er for our contact information 1 Open an Internet Explorer window or other internet browser that you have installed on your computer 2 In the web address field type www xeroxscanners com 3 Press Enter...

Page 21: ...battery charge You can scan items between 2 x2 and 8 5 x11 69 and the scanner will automatically crop the scanned image to the width and height of the item scanned Follow the instructions in this sec...

Page 22: ...e a USB flash drive you can connect it to the USB port on the back of the scanner instead of using a memory card 3 Turn on the scanner power 4 All of the LEDs will flash as the scanner initializes Whe...

Page 23: ...scans and the LED for the PDF function will flash rapidly This means that the scanner is waiting for an additional item 5 You have 10 seconds from the last page scanned to insert a another item Contin...

Page 24: ...rnatively you can copy the images directly from the scanner when the scanner is connected to a computer with its USB cable Turn on the scanner power and the scanner will be detected as a disc drive fo...

Page 25: ...r phone choose the USB connection type to mount it as a disc drive This is the same prompt you would receive when you plug your phone into a computer with a USB cable If you do not see this prompt ref...

Page 26: ...These are the same options you should see when you plug the USB cable into the scanner instead of to the computer If you do not see the prompt check your phone s USB connection settings and change it...

Page 27: ...ed by the camera icon when scanning to the iPad 1 Insert a memory card into the memory card slot on the scanner 2 Plug the small end of the scanner s USB cable into the mini USB port on the back of th...

Page 28: ...o feed it through the scanner Note that there will be a short pause after you insert the page before the scanner starts to feed the page This pause allows you to straighten the item in the paper feed...

Page 29: ...e technology platform as well as BlackBerry tablets and Windows tablets Please follow the instructions in the section on scanning to Smartphones If you are unable to scan to the tablet following those...

Page 30: ...Xerox Mobile Scanner User s Guide 30...

Page 31: ...computer or mobile device such as a tablet computer or smartphone Compatible mobile devices include the iPad iPhone and Android BlackBerry devices are not supported at this time The Eye Fi card funct...

Page 32: ...the card Install on a Computer Before you begin installing the software make sure you have an active Internet connection The Eye Fi software will look for updated software during installation and you...

Page 33: ...zard that appears If the installation fails in the window close the programs leave the scanner connected restart the computer then access the application from the Applications folder meaning installat...

Page 34: ...lication as follows Windows users open Start Eye Fi Eye Fi Center Mac users open the Applications folder access the Eye Fi folder then Eye Fi Center 2 If the create account window appears shown below...

Page 35: ...share the images with other services such as your Facebook account enable the Eye Fi option and configure For simplicity leave the Select later option selected to continue with basic configuration yo...

Page 36: ...shed configuring these settings close the configuration window and then click the Eject icon next to the Eye Fi card in the main Eye Fi Center application Private Wireless Network A private network wa...

Page 37: ...wer the network The recommended settings are Select 1 minute for Direct Mode to wait for a device to connect to it Select 30 seconds for the Direct Mode to stay on after the last item is received 4 Cl...

Page 38: ...o this computer select this option to have images transferred to your computer when the scanner is in range of the wireless network to which your computer is connected 2 Click on the Save button Uploa...

Page 39: ...on on the scanner to cycle through the scan options until the LED is lit next to the option you want to use to scan 4 Insert an item face up in the paper feed slot aligned to the left side of the scan...

Page 40: ...ed automatically The following figure shows that the Eye Fi software is running in the background second icon 1 To view the images open the Eye Fi Center application either by clicking the icon on the...

Page 41: ...ption to send items to Eye Fi View is enabled you can access your scanned images from any computer through the Eye Fi website Images are stored for seven days in the Eye Fi account using the free acco...

Page 42: ...device to use the same WAP To scan to your mobile device you need to first install the free Eye Fi mobile application on your device 1 On your iPad or iPhone access the App Store application 2 Search...

Page 43: ...transferred wirelessly to your device over WiFi 2 Turn off your wireless access point after you verify the scans have been received on your device You may want to power cycle your scanner at this tim...

Page 44: ...First Time Use 1 Open the Eye Fi application and log into your account 2 Touch the Eye Fi Card in the pairing screen 3 Select the media types you want to allow for transfer to your device Touch Ok If...

Page 45: ...ile Device If you see an Add Device Error it means that someone has already logged in to Eye Fi with another account on that device Here are some options for de activating a mobile device from one acc...

Page 46: ...he Eye Fi Center software click File Settings Eye Fi Card 2 Click the Photos then the Online tab 3 Configure Eye Fi for your Evernote account The user accounts for Evernote and Eye Fi do not need to b...

Page 47: ...Xerox Mobile Scanner User s Guide 47 4 Select Evernote and click Share Now The images are sent to your Evernote account as shown here 5 Send them by email to your computer device...

Page 48: ...cally to other services such as Facebook flickr and Picasa Setup is similar to that for Evernote previous section where you click the Photos or Videos tab in the software then the Online tab Upload no...

Page 49: ...he card manually connect the scanner to a computer and turn it on The scanner will be detected as a disc drive Open the option on your computer to display the disc drives and then open the drive for y...

Page 50: ...light is lit next to the black and white PDF icon This is the second icon on scanner represented by a black page 3 Press and hold the function button for approximately 2 seconds 4 The battery LED will...

Page 51: ...cally connect If that does not work change one of the sliders in the Direct Mode tab click Save click the Start Direct Mode Network button and repeat the Wi Fi connection Unpaired card Please pair car...

Page 52: ...Xerox Mobile Scanner User s Guide 52...

Page 53: ...udes Calibrating Your Scanner on page 54 Cleaning Your Scanner on page 55 Xerox Mobile Scanner Specifications on page 56 Xerox Mobile Scanner Spare Part List on page 57 This section contains scanner i...

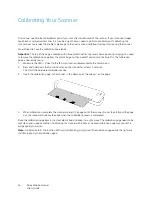
Page 54: ...re the LED is lit next to the JPG scan function represented by the camera icon 2 Press and hold down the function button on the scanner for at least 2 seconds This starts the hardware calibration rout...

Page 55: ...the scanner This button separates the glass from the rollers for cleaning Note that if you release the button the glass will be set back in place for scanning You must press and hold the button while...

Page 56: ...mm Depth 2 75 inches 70 mm Height 2 00 inches 51 mm Weight 22 5 ounces 638 g Operating temperature 68 95 F 20 35 C without condensation Relative humidity 10 85 35 C without condensation Battery EM HG0...

Page 57: ...number when ordering a replacement part for your scanner Part Name Part Number Carrying bag 88 0630 000 Battery 28 0008 000 USB Cable 35 0238 000 Memory card 51 0004 100 Power Supply 37 0096 000 Plug...

Page 58: ...Xerox Mobile Scanner User s Guide 58...

Page 59: ...Xerox Mobile Scanner User s Guide 59 A Regulatory Information This chapter includes Basic Regulations on page 60 Copy Regulations on page 62...

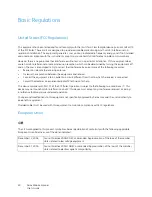
Page 60: ...uipment and receiver Connect the equipment into an outlet on a circuit different from that to which the receiver is connected Consult the dealer or an experienced radio TV technician for help This dev...

Page 61: ...your Xerox Limited representative or by contacting Environment Heath and Safety The Document Company Xerox Bessemer Road Welwyn Garden City Herts AL7 1HE England Telephone 44 0 1707 353434 Other Regul...

Page 62: ...ginal Postal Money Orders Bills Checks or Drafts of money drawn by or upon authorized officers of the United States Stamps and other representatives of value of whatever denomination which have been o...

Page 63: ...hority in Canada or of a court of law 5 Proclamations orders regulations or appointments or notices thereof with intent to falsely cause same to purport to have been printed by the Queen s Printer for...

Page 64: ...such reproductions Note This list is not inclusive and no liability is assumed for either its completeness or accuracy In case of doubt contact your legal counsel Currency notes Bank notes and cheques...

Page 65: ...Xerox Mobile Scanner User s Guide 65 B Compliance Information This chapter includes Product Recycling Disposal on page 66 Energy Star for the USA on page 67...

Page 66: ...ining devices such as batteries Special handling may apply please see http www dtsc ca gov hazardouswaste perchlorate European Union RoHS and WEEE Compliance This product is compliant with RoHS Regula...

Page 67: ...tered United States trademarks The ENERGY STAR Imaging Equipment Program is a team effort between U S European Union and Japanese governments and the office equipment industry to promote energy effici...

Page 68: ...Xerox Mobile Scanner User s Guide 68...

Reviews: