background image

28

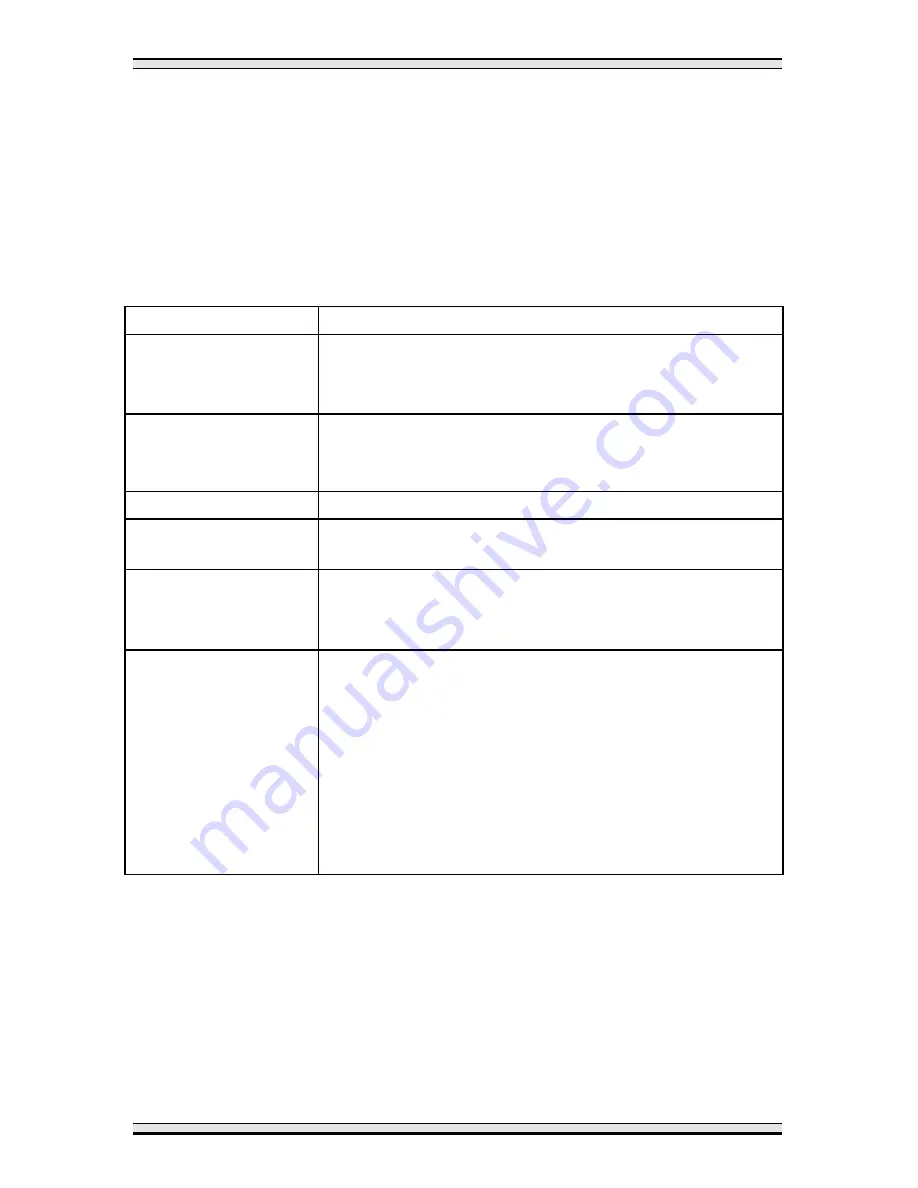
Problem Solving

Problem Solving Chart

The following chart lists some conditions that may occur and the
recommended solutions.  Follow the suggested solutions until the problem
is corrected.  Refer to the Status Code Chart in this section for status
code information.  If the problem persists, please call your local Xerox
helpline or representative for assistance.

Condition

Possible Causes

Copier does not
work.

Is the copier plugged in?
Is the power switch on?
Is the toner cartridge installed correctly?

Copier is on, but
does not copy

Are any of the indicators lit? (Refer to Status Code
Chart
.)
Is the copier out of paper?

Blank copies

Is the original face down on the document glass?

Light or dark copies

Is the exposure control adjusted correctly?  (Refer
to Copy Quality.)

Copies are striped
or lined or poor
quality.

Is the document glass or the document cover dirty?
Is the lens dirty?
(Refer to Copier Maintenance.)

Copy paper
misfeeds
frequently.

Is the paper exit blocked?
Is the paper guide adjusted to the correct paper
width?
Does the paper level in the paper tray exceed the
maximum height line? (XC353/ XC355/ XC356)
Is the copy paper damp?
Is special copy paper being used?
Is there a small piece of paper caught in the
copier?

Summary of Contents for XC353

Page 1: ...XC353 355 356...

Page 2: ...ions 11 Paper Storage 11 Specification Chart 11 Making Copies on the XC351 12 Making Copies on the XC353 XC355 and XC356 13 Copy Quality 15 Two Sided Copying 16 Setting Copy Exposure Range 17 Paper Su...

Page 3: ...ii Problem Solving 28 Problem Solving Chart 28 Status Code Chart 30 Copier Maintenance 31 Document Glass and Cover 31 Lens 31 Packing the Copier 32 Technical Data 34...

Page 4: ...leaning methods Never use supplies or cleaning materials for purposes other than what they were intended Keep all supplies and materials out of reach of children Do not use this copier near water wet...

Page 5: ...n is provided Never push objects of any kind into the slots of the copier as they may touch dangerous voltage points or short out parts which could result in a fire or electric shock Never spill liqui...

Page 6: ...nto the fuser area located just inside the exit tray area as you may be burned Ozone This product produces ozone during normal operation The ozone produced is dependent on copy volume and is heavier t...

Page 7: ...4 Unpacking IMPORTANT Save the carton and packing materials for future use Starter Toner Cartridge Power Cord Copier User Guide Packing material Carton Packing material...

Page 8: ...r Copier Document Cover Document Glass Front Cover Open Button Paper Tray XC353 XC355 XC356 Paper Feed Slot XC351 Paper Guide Front Cover Starter Toner Cartridge Control Panel Exit Tray XC353 XC355 XC...

Page 9: ...Your Copier Rear View Serial Number Power Cord Socket On Off Switch Document Glass Release Button Underside View Handle Drum Cartridge Bottom Cover Release Lever Bottom Cover Drum Cartridge Release L...

Page 10: ...to 90 F 10 to 32 C Humidity 20 to 85 Place the copier on a flat level surface Avoid locations that subject the copier to Direct sunlight Extreme changes in temperature or humidity After selecting a l...

Page 11: ...will cause a paper jam when operating the copier 3 Remove all the pieces of tape from the copier and then place the copier on a level surface XC351 skip to step 5 4 Remove the paper tray from the top...

Page 12: ...the paper feed slot 11 Open and unfold the exit tray 12 Plug the power cord into the copier and then into an earthed outlet Note Ensure that the power cord is inserted firmly 13 Turn the power on Not...

Page 13: ...change the selected exposure setting Quantity Display Copy quantity or status codes appear in this area Copy Quantity Button Select up to 9 copies or C mode for up to 20 copies Clear Stop Button Pres...

Page 14: ...ity and curled paper can cause jams and copy quality problems Specification Chart Copy Paper Input Paper Tray Paper sizes XC351 XC353 and XC355 A6 to A4 XC356 A6 to 216x356 mm Paper weights Optimum 75...

Page 15: ...ocument glass 4 Set the paper guide to the width of the copy paper 5 Insert a sheet of paper into the paper feed slot Copying will start automatically 90 seconds after the last copy is made the copier...

Page 16: ...he copier Copying will start automatically as soon as the copier is ready 1 Turn the power on 2 Open the document cover 3 Place the original face down in the upper right corner of the document glass 4...

Page 17: ...he copy quantity display 9 Press Start when the Ready indicator lights When making the first copies after turning the power switch on copying will start a few seconds after pressing Start To stop copy...

Page 18: ...Save not XC353 In Auto mode the copier automatically selects the exposure based on the original darkness and background Select Manual mode no indicators will light to cancel the Auto mode Manual is u...

Page 19: ...nt glass and make a copy 2 Place side 2 original face down on the document glass in the opposite orientation from side 1 original 3 Place the copy of side 1 face down in the paper tray paper feed slot...

Page 20: ...ximately 10 seconds 1 Press and hold the Exposure button until the indicator for the current exposure setting starts to flash approximately 10 seconds 2 Press and release the Exposure button until the...

Page 21: ...If there is no paper in the paper tray add paper and press Start to finish copying Note If you turn the power off all settings will be cleared 3 If the paper has not fed correctly carefully remove it...

Page 22: ...el surface Paper Feed Slot 1 Carefully remove the misfed paper If the misfed paper is difficult to remove remove the paper tray first XC353 XC355 XC356 2 Turn the power off and then on to clear the mi...

Page 23: ...ear of the copier and return the document glass to the centre of the copier XC351 skip to step 5 3 Fold up the exit tray 4 Remove the paper tray 5 Lift the copier by the handle and stand it on the exi...

Page 24: ...xtended period of time 7 Carefully remove the misfed paper If the paper accidentally tears be sure to remove all of the pieces 8 Close the bottom cover securely 9 Return the copier to the normal posit...

Page 25: ...r may flash and the copier may stop even though toner remains in the cartridge If this occurs turn the power off and on again and restart copying Note A few more copies may be made by using the follow...

Page 26: ...it locks in place 5 Close the front cover 6 Turn the power on After installing a new toner cartridge and pressing the start button the document glass will move back and forth and the toner cartridge r...

Page 27: ...t being copied Dark backgrounds Leaving the platen cover open Double sided copying High humidity To get the most from your toner cartridge Always copy with the document cover closed Leave the copier o...

Page 28: ...cator will go out the Toner Save and Contrast Indicators will flash and the copier will stop operating until the cartridge is replaced 1 Turn the power off 2 Press the front cover open button and open...

Page 29: ...on both sides 12 Rotate the drum cartridge in until it clicks into position 13 Remove the black cover from the drum cartridge 14 Reinstall the bottom cover by placing the tab at the lower left into t...

Page 30: ...posure button turn the power on All indicators except the Ready indicator will light 21 Release and then press and hold the exposure button until the three exposure indicators light Note If the three...

Page 31: ...is on but does not copy Are any of the indicators lit Refer to Status Code Chart Is the copier out of paper Blank copies Is the original face down on the document glass Light or dark copies Is the ex...

Page 32: ...ies from the toner cartridge than expected Originals contain pictures solids or heavy lines Originals are forms newsletters books etc The copier is being turned on and off frequently The document cove...

Page 33: ...inues call for service Copy paper has misfed Refer to Misfeed Removal When the toner cartridge replacement indicator appears the toner cartridge will need to be replaced soon Refer to Toner Cartridge...

Page 34: ...cover with a soft clean cloth Note If necessary dampen the cloth with water or glass cleaner DO NOT use thinner benzene or any other volatile cleaning agents Lens Note If the copies have streaks or bl...

Page 35: ...off 2 Disconnect the power cord 3 Open the cover and remove the toner cartridge Reinstall the cover on the toner cartridge and place it in the box 4 Close the front cover XC351 skip to step 7 5 Remove...

Page 36: ...use toner to leak Tape the bottom cover closed 9 Lower the copier Place the paper tray on top of the copier XC353 XC355 XC356 10 Tape the document cover paper tray and exit tray closed Only the XC353...

Page 37: ...osure System Slit exposure with moving Document Glass Paper Capacity XC351 Single copy XC353 30 sheets 90 gsm XC355 XC356 50 sheets 75 gsm Multicopy XC351 Single copy XC353 XC355 XC356 1 to 9 copies C...

Page 38: ......

Page 39: ...Xerox Limited Multimedia Professional Services P O Box 17 Bessemer Road Welwyn Garden City Hertfordshire AL7 1HE UK 602P24430...

Reviews: