background image

Quick Use Guide

Page 31

Maintenance

Maintenance

Further Assistance

For any additional help visit our customer web site at 

www.xerox.com

 or contact the 

Xerox 

Welcome and Support Centre

 quoting the machine serial number.
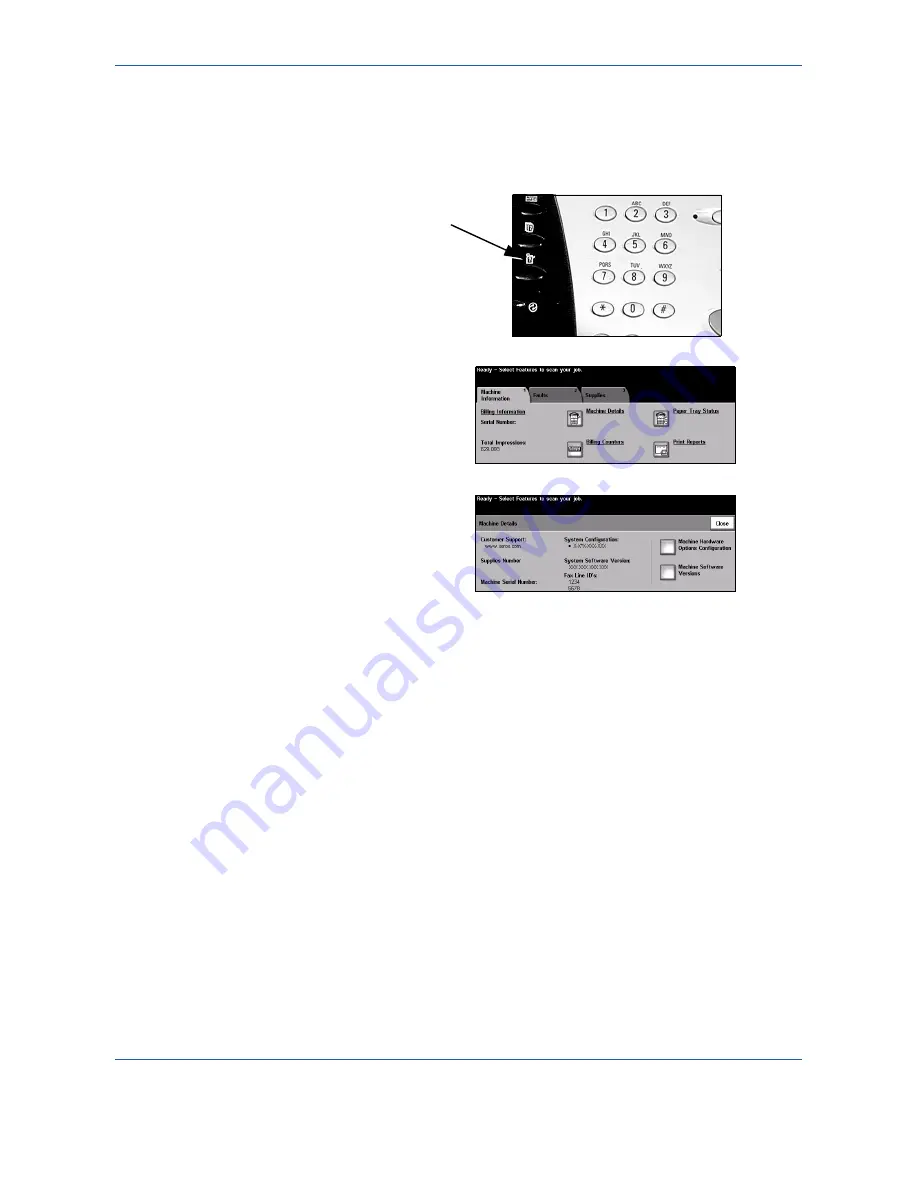
1

¾

Press the 

[Machine Status]

 button on 

the control panel.

2

¾

The Machine Information screen 
displays.

¾

Select 

[Machine Details]

.

3

¾

The Customer Support Number 
for the 

Welcome and Support 

Centre

 and the Machine Serial 

Number are displayed.

Summary of Contents for WorkCentre 5632

Page 1: ...tive User Guide CD is supplied with your product The CD provides animated tutorials and interactive screens When installed on your network it will always be available to everyone or load it on your hard drive for easy access WorkCentre 5632 5638 5645 5655 5665 5675 5687 Quick Use Guide 604P19210C ...

Page 2: ...poration All rights reserved Xerox and the sphere of connectivity design are trademarks of Xerox Corporation in the United States and or other countries Product names and trademarks of other companies are hereby acknowledged Changes technical inaccuracies and typographical errors will be corrected in subsequent editions ...

Page 3: ...Card 15 Saving for Reprint 16 Reprinting Saved Jobs 17 Sending an Embedded Fax 18 Sending a Server Fax 19 Sending an Internet Fax 20 Scanning a Document to a File 21 Sending an E mail 22 Printing from a PC 23 Sending a LAN Fax 24 Printing with Internet Services 25 Logging On Logging Off 26 Customising your Machine 27 Further Assistance 28 Maintenance 29 Consumables 29 Cleaning the Machine 30 Furth...

Page 4: ...Page ii Quick Use Guide Table of Contents ...

Page 5: ...r machine for network printing and instructions on installing any of the optional features The System Administration CD CD1 is intended for System Machine Administrators Interactive User Guide CD CD2 For detailed information on any of the features or functions available on your machine please refer to the Interactive User Guide CD CD2 contained in the CD Pack delivered with your machine The Intera...

Page 6: ...ocess Use the Build Job feature to divide a copy or embedded fax job into different segments and apply different settings to each of the segments This allows you to Combine originals from the document glass and the document handler into a single job Create a single job using different programming features for each original Feed more than the maximum number of originals through the document handler...

Page 7: ...onal Internet Fax service allows users to transmit and receive documents as an e mail attachment This type of fax travels over the internet or intranet Overview of Features at the Workstation If your machine is connected to a network you can use the following features Refer to the System Administration CD CD1 for connection details CentreWare Print Drivers The Print Driver extends the productivity...

Page 8: ...tion as described in the customer documentation supplied with the product The power cable is the disconnect device for this equipment It is attached to the back of the machine as a plug in device To remove all electrical power from the equipment disconnect the power cable from the electrical outlet Use of controls adjustments or performance of procedure other than those specified in the customer d...

Page 9: ...ger capacity than trays 3 and 4 further reducing the number of times you need to replace paper in the machine Paper Tray 6 Inserter Optional inserter tray available with the High Volume Finisher and High Volume Finisher with Booklet Maker Designed to hold special stock for example covers that is inserted into a job Offset Catch Tray Delivers output either face up or face down collated or uncollate...

Page 10: ...ion Basic Fax also referred to as Embedded Fax will scan your documents and send them to most types of fax machine connected to a telephone network The images are sent from your machine directly to the fax number entered Extended Fax Kit Embedded Enables two telephone lines to be attached to the machine This provides all the features of the Basic Fax kit plus the capability to send and receive fax...

Page 11: ...ser provided these services are installed on the machine Usage limits can be applied to users and the administrator can print a report which contains all Xerox Standard Accounting data Foreign Interface Device Enables the attachment of a third party access and accounting device such as a card swipe or coin operated unit 256MB Electronic Pre Collation EPC Memory Additional temporary storage area fo...

Page 12: ...nisher Professional Finisher with Booklet Maker Stacker Tray Booklet Maker Tray Top Tray Stacker Trays Top Tray Stacker Tray Top Tray Stacker Tray Top Tray High Volume Finisher Stacker Tray Top Tray High Volume Finisher with Booklet Maker Booklet Maker Tray Stacker Tray Top Tray Tray 6 Inserter C Z Folder tri fold ...

Page 13: ... Finisher Holds up to 250 sheets of paper in the Top Tray and up to 1500 sheets in the Stacker Tray The Professional Finisher can collate stack staple and hole punch your output depending on the features selected The Professional Finisher also incorporates a Booklet Maker which can fold and staple your output The Booklet Maker stapler requires 2 staple cartridges each containing 2000 staples The f...

Page 14: ...Page 10 Quick Use Guide Product Overview ...

Page 15: ...k Use to start a DTMF Dual Tone Multi frequency operation Language Changes text to an alternative language Start Starts the job Touch Screen Displays and selects all the available programming features plus fault clearance procedures and general machine information Access Accesses Tools used to adjust the defaults of the machine Clear All Resets all the features to their default settings Job Status...

Page 16: ...d pop up screen displays NOTE To re activate the machine when in this mode touch a button on the Touch Screen or control panel If Quick Restart is selected and confirmed the machine will restart A pop up screen will appear warning that any jobs in the queue will be deleted NOTE Any copy jobs in the queue will be deleted print jobs in the queue are recovered If Cancel is selected the power down opt...

Page 17: ...the fill line Close the tray NOTE For paper trays 1 and 2 ensure the guides are just touching the paper otherwise the size automatically detected may be incorrect 3 Select Confirm OR select Change Size and or Change Type and Colour to reprogramme the tray if the paper size type or colour has changed NOTE Ensure the Size Type and Colour are all correct For standard copy paper the following should a...

Page 18: ...he number of copies required Press Start Producing stapled or hole punched sets if there is a finisher available Image Quality adjustment Auto Reduce Enlarge Copying mixed size originals Adding printed or blank separators into transparency sets Arranging multiple images on a page Adding printed or blank covers Adding Annotations Inserting printed or blank sheets or tabs Image Shift Erasing edges a...

Page 19: ... the control panel 3 Select the required side 1 Image Quality features on the Touch Screen Press Start NOTE Side 1 of the card is only scanned once 4 Load side 2 of the ID card on the document glass Select the required side 2 Image Quality features on the Touch Screen Select the number of copies required Press Start NOTE Side 2 of the card is scanned and both sides are printed to a single side out...

Page 20: ...s the Save Job for Reprint screen if necessary select the Features button on the control panel 3 Select the required option Select Save Only if you want to store your document without printing Select Copy and Save if you want to print a copy and store your document Select the folder where you want to store your document Select the required features on the Touch Screen Press Start ...

Page 21: ...lect the folder where you stored your document Select the document from the list Select the required features on the Touch Screen Select the required option Select Print if you want to print and then delete your document Select Print and Save if you want to print and then save changes to your document settings Select Save to save changes to your document settings Press Start ...

Page 22: ...ax features include Adjusting the Resolution Faxing double sided originals Programming the size of the originals being scanned Image Quality adjustment Delaying the start time of a fax Adding a Cover Letter Sending to more than one recipient Mailbox storage and polling to and from your machine Setting the transmission speed 1 Load the documents either in the document handler or on the document gla...

Page 23: ...WorkCentre at the same time however only one service can be enabled for use Fax features include Adjusting the Resolution Faxing double sided originals Programming the size of the originals being scanned Image Quality adjustment Delaying the start time of a fax 1 Load the documents either in the document handler or on the document glass NOTE Documents are only scanned once 2 Select Fax NOTE You ma...

Page 24: ...originals Programming the size of the originals being scanned Image Quality adjustment Changing the default file format setting 1 Load the documents either in the document handler or on the document glass NOTE Documents are only scanned once 2 Select Internet Fax NOTE You may need to select All Services first to access the Internet Fax option Select To enter the recipient e mail details and select...

Page 25: ...e sided originals Programming the size of the originals being scanned Changing the destination for the scanned image 1 Load the documents either in the document handler or on the document glass NOTE Documents are only scanned once 2 Select Network Scanning NOTE You may need to select All Services first to access the Network Scanning option 3 Select the template required Select the required feature...

Page 26: ...inals Programming the size of the originals being scanned Image Quality adjustment 1 Load the documents either in the document handler or on the document glass NOTE Documents are only scanned once 2 Select E mail NOTE You may need to select All Services first to access the e mail option 3 Select To enter the recipient e mail details and select Enter Select Edit Subject enter a subject and select S...

Page 27: ...for printing Print features include Printing 1 or 2 sided Producing stapled or hole punched sets if available Changing the printing Resolution Adding a Banner Sheet Adding a front cover Adjusting the Image Quality Adding a Watermark Reprint Saved Jobs 1 Select Print in your application Select your machine as the printer 2 Select Properties make your selections and click OK Click OK to print your d...

Page 28: ... a Phone book Confirmation Sheet Send Speed Resolution Send Time Cover sheet 1 Select Print in your application Select your machine as the printer 2 Select Properties Select Job Type and then Fax from the pull down menu Enter the recipient details and select the features required Click OK to send your document NOTE Instructions may vary depending on the application being used ...

Page 29: ...ying and deleting scan templates if Network Scanning is available Promoting deleting or releasing a job in the Print Queue Reviewing the status of your machine Reprint Saved Jobs 1 Open your Web Browser then enter http and the printer TCP IP address Press the Enter key on your workstation keyboard The default Status window displays HINT If you do not have the TCP IP address for your machine Refer ...

Page 30: ...n the local network you will not be authenticated using this mode Guest Access Requires a generic passcode that is set up by the System Administrator You will need to obtain the passcode from the System Administrator Xerox Secure Access Requires a configured card and card reader that is set up by the System Administrator You will need to obtain the access details from the System Administrator 1 In...

Page 31: ...to ensure you get optimum performance from your machine The Tools facility is accessed using the Access button on the control panel Some of the settings within Tools are critical to the operation of the machine therefore the screens are password protected so they cannot be accidently changed or corrupted Full instructions for accessing and customising the System Management Tools are located in the...

Page 32: ...nal information 3 Press the Machine Status button on the control panel Select Machine Details to display the machine serial number NOTE The serial number can also be found on a metal plate inside the front door For additional Help If you need any additional help on using your machine you can Refer to the Interactive User Guide CD CD2 contained in the CD Pack delivered with your machine Refer to th...

Page 33: ...ring the end of its life Only replace the unit when a message actually instructs you to do so To replace a Replaceable Unit follow the instructions on the User Interface or refer to the Maintenance section of the Interactive User Guide CD CD2 contained in the CD Pack delivered with your machine CAUTION When replacing consumables DO NOT remove the covers or guards that are fastened with screws You ...

Page 34: ... are not suitable for use in electrical applications Use of such cleaners can result in a risk of explosion and fire For more information about maintaining other areas of your machine please refer to the Interactive User Guide CD CD2 contained in the CD Pack delivered with your machine 1 Document Glass and Constant Velocity Transport Glass Apply Xerox Cleaning Fluid or Xerox Anti Static Cleaner to...

Page 35: ...www xerox com or contact the Xerox Welcome and Support Centre quoting the machine serial number 1 Press the Machine Status button on the control panel 2 The Machine Information screen displays Select Machine Details 3 The Customer Support Number for the Welcome and Support Centre and the Machine Serial Number are displayed ...

Page 36: ...Page 32 Quick Use Guide Maintenance ...

Page 37: ...E Any printed sheets removed will automatically be reprinted once the paper jam is cleared 2 Paper Jams The fault screen will indicate the location of the jam Use the green handles and knobs indicated in the instructions displayed on the screen to remove the jammed paper Ensure that all jam clearance handles and levers are returned to their correct positions The red flashes behind the jam clearanc...

Page 38: ... of your company Locating the Serial Number NOTE The serial number can also be found on a metal plate inside the front door 3 Document Jams Remove all the documents from the document handler and document glass as instructed Re order the documents as at the start of the job and reload The documents will be recycled automatically to recover the job 1 Press the Machine Status button on the control pa...

Reviews: