background image

The press contains one waste bottle located at the front of the press behind the Dry
Ink/Toner Waste Bottle Door. When removing a full Dry Ink/Toner Waste bottle, SLOWLY
pull it out of the press. This will prevent any dry ink/toner from spilling out of the bottle.

Note

After you replace the Dry Ink/Toner Waste Bottle, the system automatically resets the
usage counter to zero (0) for this CRU component. Check the Consumables Supply screen
to verify the reset.

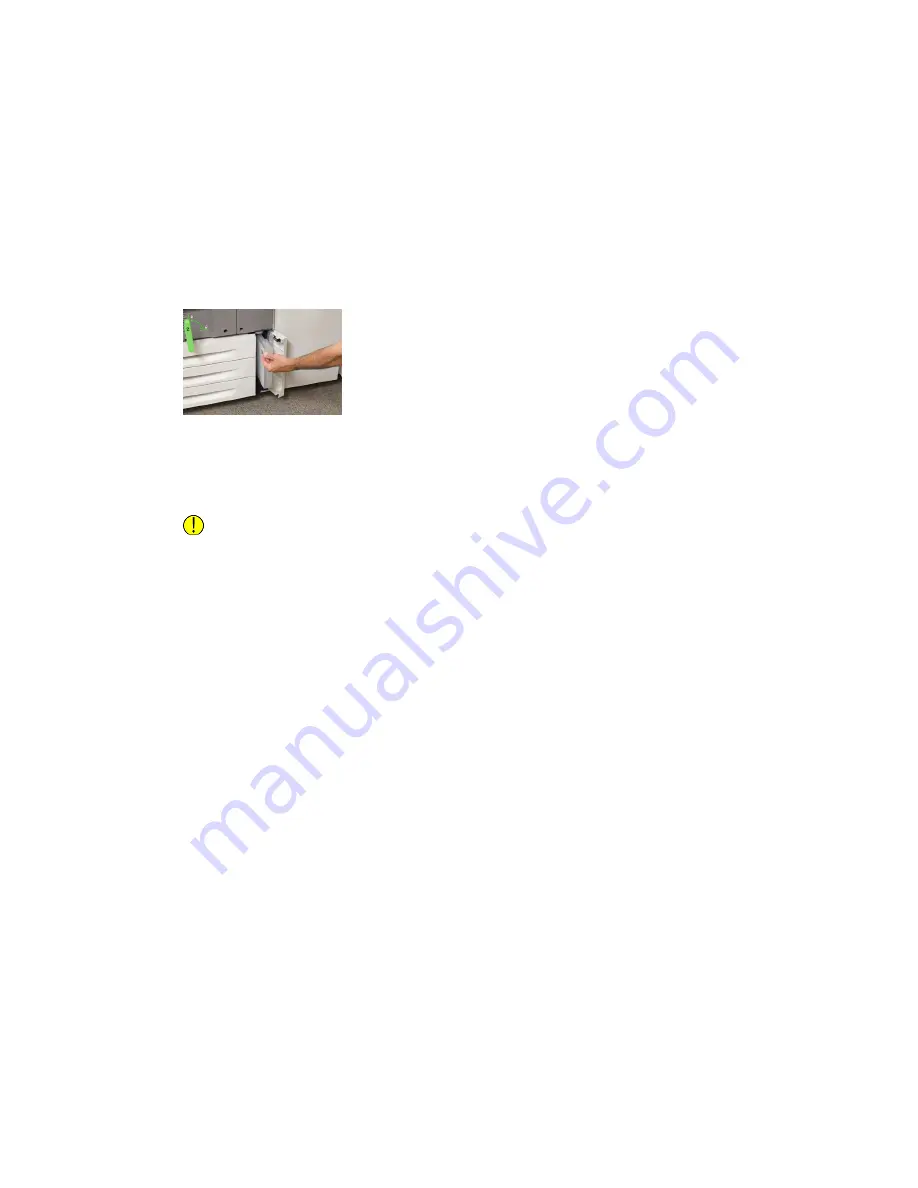
1. Ensure that the press is stopped (not running any jobs).
2. Open the front door of the press.
3. Open the Dry Ink/Toner Waste Bottle Door.

4. Grasp the handle of the Dry Ink/Toner Waste bottle and pull it halfway out of the

press.

5. Support the underside of the bottle with your other hand and continue pulling it out

from the press.

Caution

Never use a vacuum cleaner when cleaning up spilled dry ink/toner. Use a broom or
a cloth moistened with a neutral detergent.

6. Use both hands to place the old used Dry Ink/Toner Waste Bottle into the provided

plastic bag.

7. Remove a new, empty waste bottle from the packaging.
8. Hold the center part on the top of a new bottle and insert it evenly and gently into

the press until it comes to a stop.

9. Close the waste bottle door.

10. Close the press front door.

Replacing a Drum Cartridge

Other than replacing a drum cartridge after 348,000 prints, you may need to replace a
drum cartridge if it is damaged by light or you are experiencing spots and streaks on
your output.

Note

All four Drum cartridges are interchangeable.

Note

After replacing the drum cartridge, the system automatically resets the usuage counter
of this CRU component to zero (0). Check the Consumables screen for the reset and new
status.

Xerox

®

Versant

®

180 Press

5-4

Quick Start Guide

Maintenance

Summary of Contents for Versant 180

Page 1: ...Xerox Versant 180 Press Quick Start Guide Book Version 1 0 April 2017 702P04574...

Page 2: ...dobe PostScript Interpreter the Adobe page description language and other Adobe products Fiery and EFI are trademarks or registered trademarks of Electronics For Imaging Inc GBC and AdvancedPunch are...

Page 3: ...3 3 1 4 Copy 4 1 Basic Copying with the Document Glass 4 1 5 Maintenance 5 1 Ordering Supplies 5 1 Checking the Status of Consumables 5 2 Replacing a Dry Ink Toner Cartridge 5 3 Replacing the Dry Ink...

Page 4: ...Xerox Versant 180 Press ii Quick Start Guide Table of Contents...

Page 5: ...personal injury Hot Warning This symbol alerts users to areas where there are heated surfaces which should not be touched Laser Warning This symbol indicates a laser is being used and alerts the user...

Page 6: ...er Cartridge Always refer to the recycling instructions for your region marketplace for correct disposal information and procedures Do Not Incinerate the Toner Waste Bottle Do Not Incinerate the Drum...

Page 7: ...ead Projector Sheets with a White Strip Do Not Use Envelopes with Open Flaps Do Not Use Folded Creased Curled or Wrinkled Paper Do Not Use Ink Jet Paper Do Not Load Postcards in the Indicated Dir ecti...

Page 8: ...ndby position Do Not Dispose in Normal Household Waste Stream Application of this symbol is confirmation that you should not dispose of items such as Customer Replaceable Units CRUs in the normal hous...

Page 9: ...Definition Symbol point of sale where you purchased the items 1 5 Xerox Versant 180 Press Quick Start Guide Product Symbols...

Page 10: ...Xerox Versant 180 Press 1 6 Quick Start Guide Product Symbols...

Page 11: ...ing on 8 5 x 11 inch A4 paper Base Configuration The system base system configuration consists of the following components 1 Bypass Tray Other optional feeding devices are available 2 Color Press 3 Of...

Page 12: ...y OCT This tray receives the completed print job Output print sheets can be offset for easy separation The maximum capacity of the OCT is determined by the tray sensor as well as stock weight but is a...

Page 13: ...after the Low Power Mode begins Exiting Power Saver The press exits Power Saver mode by doing one of the following Pressing the Power Saver button on the press UI Receiving print data for an incoming...

Page 14: ...llows the fuser to begin cooling 2 Switch Off the Main Power switch behind the Front Door Note Allow the press to remain off for a minimum of 10 seconds before switching on the power again Xerox Versa...

Page 15: ...e Edge Guide until it lightly touches the edge of the material in the tray Do not load materials above the MAX line located on the rear Edge Guide 7 Gently push in the tray until it comes to a stop If...

Page 16: ...djustment c Select Save until you are returned to the Paper Tray settings Tray Properties window d Select Confirm or OK to save the information and close the Paper Tray settings Tray Properties window...

Page 17: ...on on the press UI 4 Select Copy on the Home window 5 Select the desired Copy features options Paper Supply Reduce Enlarge Output Color 2 Sided Copying Original Type Lighten Darken The features displa...

Page 18: ...Xerox Versant 180 Press 4 2 Quick Start Guide Copy...

Page 19: ...ional cleaning pads Approximate Print Yield Full Color 8 5x11 A4 Prints Reorder Quantity CRUs Supply Item 50 000 2 per box Black Dry Ink Toner Cartridge 55 000 1 per box Cyan Dry Ink Toner Cartridge 5...

Page 20: ...s reaching the time it needs to be replaced a message is displayed on the press UI This indicates when it is time to order and or install a new consumable item With some CRUs the screen indicates that...

Page 21: ...regulations In the United States also refer to the Electronic Industries Alliance website www eiae org For more information about Xerox environmental programs go to www xerox com environment 6 Remove...

Page 22: ...he press Caution Never use a vacuum cleaner when cleaning up spilled dry ink toner Use a broom or a cloth moistened with a neutral detergent 6 Use both hands to place the old used Dry Ink Toner Waste...

Page 23: ...cartridges while the press is powered ON 1 Ensure that the press is stopped and is not currently printing jobs 2 Open the press Front Door 3 Rotate and turn the R1 R4 Drum Drawer Handle to the unlock...

Page 24: ...ovided at the both ends of the drum cartridge and gently lifting up Caution Drums are light sensitive Do not leave the Drum Cartridge Drawer open for more than one minute when replacing cartridges Exp...

Page 25: ...ontact the system administrator who will log into administrator mode and reset the counter to zero 0 for this CRU Caution Make sure the press is powered off before performing this procedure 1 At the b...

Page 26: ...tab c Select System Settings Common Service Settings Maintenance d Use the up down arrow buttons to access the next Maintenance screens Note After selecting the icon in following step there is a 4 sec...

Page 27: ...top cover until it is completely open 2 Open the left cover until it comes to a stop 3 If the document is not caught in the entry of the document feeder then remove it 4 If instructed to open the inne...

Page 28: ...nt feeder 9 If indicated raise the feeder tray area and remove the document 10 Gently return the feeder tray to its original position 11 After removing the jammed document follow the instructions to r...

Page 29: ...re are not any torn wrinkled or folded documents in the document set To scan torn wrinkled or folded documents use the Document Glass only The already scanned document sheets are automatically skipped...

Page 30: ...e 2b to its original position 7 Move Handle 2e and remove any jammed paper 8 Return Handle 2e to its original position 9 Pull down Handle 2f and remove the jammed paper 10 Return Handle 2f to its orig...

Page 31: ...hecking the paper jam position This may cause a malfunction Check where the paper jam occurred before clearing the problem 1 Open the tray where the paper jam occurred 2 Remove the jammed paper 3 Push...

Page 32: ...Xerox Versant 180 Press 6 6 Quick Start Guide Press Jam Clearance...

Page 33: ......

Page 34: ......

Reviews: