background image

Printing on Specialty Media

Phaser® 7760 Color Laser Printer

3-45

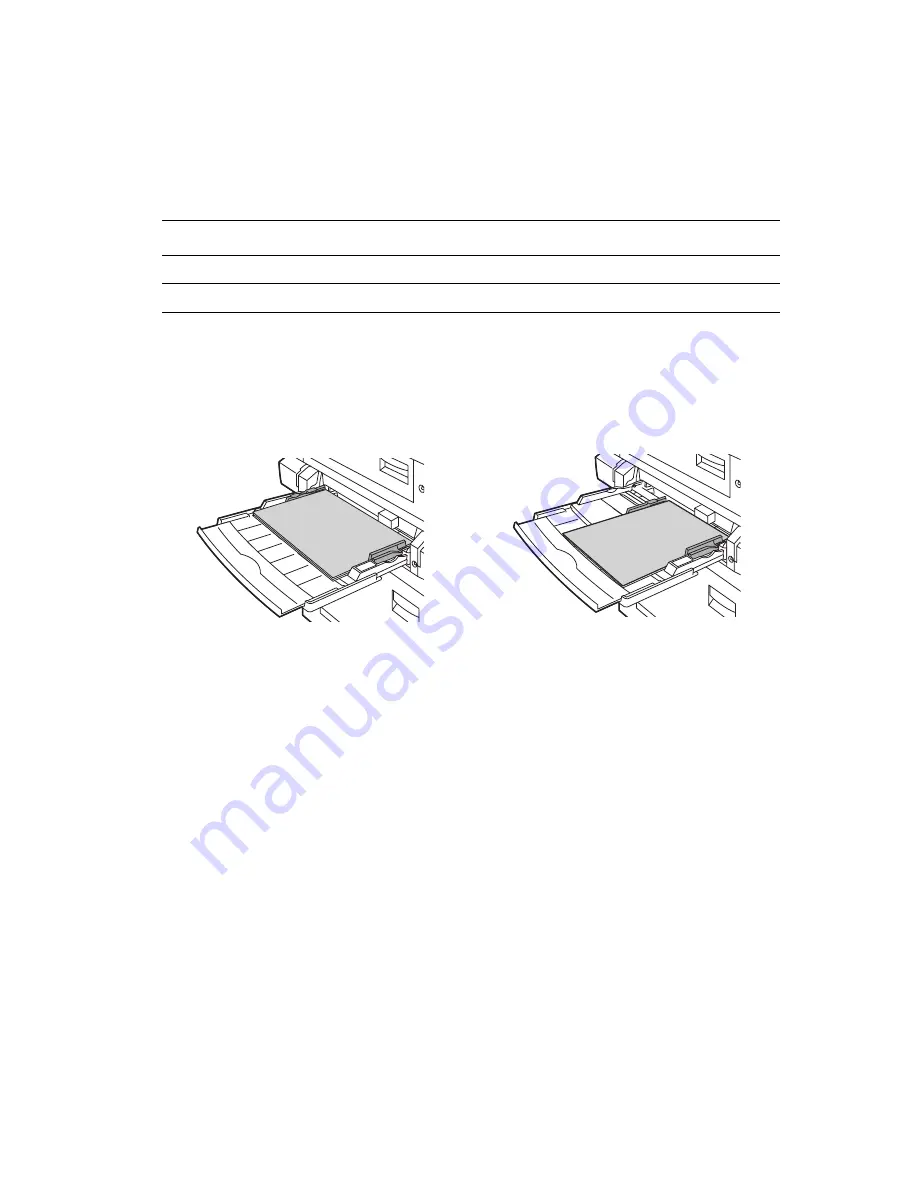
Printing Custom Size Paper

In addition to the wide variety of standard paper sizes that you can use for printing, you can 
also print on custom size paper within the following dimensions.

Printing Custom Size Paper from Tray 1 (MPT)

1.

Open Tray 1 (MPT).

2.

Insert custom size paper in Tray 1 (MPT) and adjust the guides to fit the paper.

3.

When the control panel prompts you to confirm the type and size of paper in the tray:

a.

Select 

Change setup

, and then press the 

OK

 button.

b.

Select the appropriate paper type, and then press the 

OK

 button.

c.

Select 

New Custom Size

, and then press the 

OK

 button.

d.

If the measurement shown for the short edge of the paper is correct, press the 

OK

button. Otherwise, select 

Change

, press the 

OK

 button, use the 

Up Arrow

 or 

Down Arrow

 button to scroll to the correct measurement, and then press the 

OK

button.

e.

If the measurement shown for the long edge of the paper is correct, press the 

OK

button. Otherwise, select 

Change

, press the 

OK

 button, use the 

Up Arrow

 or 

Down Arrow

 button to scroll to the correct measurement, and then press the 

OK

button.

f.

If the control panel prompts you for the paper orientation, select 

Long-Edge Feed

 if 

you loaded the long edge of the paper to enter the printer first or select 

Short-Edge Feed

 if you loaded the short edge to enter the printer first.

4.

In the printer driver, select 

Tray 1 (MPT)

 as the paper source.

Tray 1 (MPT)

Tray 2

Short Edge

100–305 mm (3.95–12.00 in.)

140–297 mm (5.5–11.70 in.)

Long Edge

140–1200 mm (5.5–47.25 in.)

182–432 mm (7.15–17.00 in.)

Long-Edge Feed

Short-Edge Feed

7760-166

7760-167

Summary of Contents for Phaser 7760

Page 1: ...darhandbok Gebruikershandleiding Guia do Usu rio Gu a del usuario Benutzerhandbuch Guida dell utente Guide d utilisation c o l o r l a s e r p r i n t e r UserGuide www xerox com office support Phaser...

Page 2: ...ned by the Hoefler Type Foundry IBM and AIX are trademarks of International Business Machines Corporation in the United States and or other countries ITC Avant Guard Gothic ITC Bookman ITC Lubalin Gra...

Page 3: ...rces 1 13 Xerox Support Centre 1 14 2 Network Basics Overview of Network Setup and Configuration 2 2 Setting Up the Network 2 3 Choosing a Connection Method 2 3 Connecting via USB 2 3 Connecting via E...

Page 4: ...Options 3 24 Selecting Printing Preferences Windows 3 24 Selecting Options for an Individual Job Windows 3 25 Selecting Options for an Individual Job Macintosh 3 27 Printing on Both Sides of the Paper...

Page 5: ...4 Colors Vary Between Computers 4 15 Colors Do Not Match 4 15 Printed Colors Do Not Match Monitor Colors 4 16 PANTONE Colors Do Not Match 4 16 Color Settings Not Applied 4 16 Print Area Is Not Centere...

Page 6: ...ubleshooting Clearing Paper Jams 6 2 Preventing Jams 6 2 Jams in the Printer 6 2 Jams in the Finisher 6 17 Getting Help 6 23 Control Panel Messages 6 23 PrintingScout Alerts 6 23 PhaserSMART Technical...

Page 7: ...Phaser 7760 Color Laser Printer 1 1 This chapter includes Parts of the Printer on page 1 2 Printer Configurations on page 1 6 Control Panel on page 1 9 More Information on page 1 13 Printer Features...

Page 8: ...rinter This section includes Front Right View on page 1 2 Rear Left View on page 1 3 Internal Components on page 1 4 Options on page 1 5 Front Right View 1 Tray 1 Multi Purpose Tray 2 Front door 3 Tra...

Page 9: ...0 Color Laser Printer 1 3 Rear Left View Front Left View 1 USB connection 2 Ethernet 10 100 1000 Base Tx connection 3 Circuit breaker 4 Power cord connection 1 Door A 2 Door D 3 Tray 1 MPT 4 Door B 77...

Page 10: ...Printer Phaser 7760 Color Laser Printer 1 4 Internal Components 1 Transfer Roller 2 Fuser 3 Accumulator Belt Cleaner 4 Imaging Units 5 Waste Cartridge 6 Toner Cartridges 7 Accumulator Belt 7760 100 6...

Page 11: ...her Upper Output Tray 4 Finisher Stacker Output Tray 5 Cover 5 Finisher Door 5 6 Finisher Booklet Output Tray 7 Door B 8 Door C 9 Trays 3 5 1500 Sheet High Capacity Feeder 10 Horizontal transport top...

Page 12: ...ppm monochrome Connections USB Ethernet 10 100 1000 Base Tx Internal Hard Drive which enables the following job types Personal prints Personal saved prints Proof prints Saved prints Secure prints Prin...

Page 13: ...and two Letter A4 size trays Trays 4 and 5 Finishers Two types of finishers are available Both provide stapling and hole punching for a variety of paper and media Advanced Finisher Professional Finish...

Page 14: ...mum calibration and can be used to create custom TekColor Corrections for your Phaser 7760 printer PhaserCal software is a subset of PhaserMatch and comes standard on all Phaser 7760 Color Laser Print...

Page 15: ...11 Sample Pages on page 1 11 Control Panel Features The control panel Displays the printer s operating status for example Printing Ready to Print printer errors and warnings Prompts you to load paper...

Page 16: ...2 Graphic display indicates status messages and menus 3 Cancel button Cancels the current print job 4 Back button Returns to the previous menu item 5 Up Arrow button Scrolls upward through the menus 6...

Page 17: ...also print information pages from CentreWare Internet Services IS and from the printer driver Menu Map The Menu Map helps you navigate the control panel menus To print the Menu Map 1 On the control p...

Page 18: ...sed Note Before you print the sampler pages select the appropriate PostScript Setup settings for the default print quality mode and color correction from the Printer Setup menu on the control panel To...

Page 19: ...mentation CD ROM Advanced Features Guide PDF Quick Start Tutorials Video Tutorials Recommended Media List Printer Management Tools Knowledge Base PhaserSMART Technical Support www xerox com office 776...

Page 20: ...torials Solutions to troubleshooting problems Printer and supplies status Supplies ordering and recycling Answers to frequently asked questions Default printer driver settings Windows only To start th...

Page 21: ...page 2 2 Setting Up the Network on page 2 3 Configuring the Network Address on page 2 5 Installing the Printer Drivers on page 2 9 This chapter provides basic information about setting up and connect...

Page 22: ...n CD ROM to automatically set the printer s IP address if the printer is connected to an established TCP IP network You can also manually set the printer s IP address on the control panel Macintosh sy...

Page 23: ...ncluded with your printer and must be purchased separately Connecting via USB If you are connecting to one computer a USB connection offers fast data speeds However a USB connection is not as fast as...

Page 24: ...cabling is required for Ethernet If you are connecting to one computer an Ethernet RJ 45 crossover cable is required If you are connecting to one or more computers with a hub an Ethernet hub and two t...

Page 25: ...e your computer has the address 192 168 1 3 Another device can have the address 192 168 1 4 Generally Macintosh computers use either TCP IP or the EtherTalk protocol to talk to a networked printer For...

Page 26: ...our desktop using an embedded web server For complete information about CentreWare IS click the Help button in CentreWare IS to go to the CentreWare IS Online Help After setting the printer s IP addre...

Page 27: ...Dynamic DNS through DHCP You must have DHCP enabled on the printer for DDNS to function Your network s DHCP server must also support Dynamic DNS updates through option 12 or option 81 support See you...

Page 28: ...the IP address overrides DHCP and AutoIP Alternatively if you are in a small office with a single PC and use a dialup modem connection you can manually set the IP address 1 On the control panel selec...

Page 29: ...stScript driver is recommended to take full advantage of your system s custom features and genuine Adobe PostScript Default printer driver PCL Driver Web only The Printer Command Language driver can b...

Page 30: ...CD ROM drive If the installer does not launch do the following a Click Start and then click Run b In the Run window type CD drive INSTALL EXE 2 Select your desired language from the list 3 Select Inst...

Page 31: ...also Advanced Features Guide at www xerox com office 7760support Knowledge Base at www xerox com office 7760support EtherTalk Note If you use EtherTalk Macintosh computers do not require IP addresses...

Page 32: ...into the CD ROM drive and select the VISE installer to install the printer software 2 When installation is complete select one of the following options Open the Print Center utility for Mac OS X versi...

Page 33: ...installer to install the printer software 2 Once installation is complete select one of the following options Open the Print Center utility for Mac OS X version 10 2 x Open the Printer Setup Utility...

Page 34: ...opriate printer from the list of available printers 8 Click the Add button USB Connection To install the printer driver from the Software and Documentation CD ROM 1 Insert the CD ROM into the CD ROM d...

Page 35: ...he printer software 2 Once installation is complete open the Printer Setup Utility Note To locate utilities on the Macintosh hard drive open the Applications folder and then open the Utilities folder...

Page 36: ...and Media on page 3 3 Loading Paper on page 3 9 Selecting Printing Options on page 3 24 Printing on Both Sides of the Paper on page 3 30 Printing on Specialty Media on page 3 33 Choosing Output Option...

Page 37: ...prompted by the control panel either confirm the paper type and size or change it as required 3 From the software application access the Print dialog box and then select printing options in the printe...

Page 38: ...her specialty media is not covered by the Xerox warranty service agreement or Total Satisfaction Guarantee The Total Satisfaction Guarantee is available in the United States and Canada Coverage may va...

Page 39: ...ng good storage conditions for your paper and other media contributes to optimum print quality Store paper in dark cool relatively dry locations Most paper items are susceptible to damage from ultravi...

Page 40: ...the printer trays For more detailed information about paper and other media print the Paper Tips page 1 On the control panel select Information and then press the OK button 2 Select Information Pages...

Page 41: ...in Custom Sizes Short Edge 100 305 mm 3 95 12 00 in Long Edge 140 1200 mm 5 5 47 25 in Executive 7 25 x 10 5 in Letter 8 5 x 11 in US Folio 8 5 x 13 in Legal 8 5 x 14 in Tabloid 11 0 x 17 0 in Tabloid...

Page 42: ...Paper and Media Phaser 7760 Color Laser Printer 3 7 10 Commercial 4 12 x 9 5 in Monarch 3 87 x 7 5 in A7 5 25 x 7 25 in DL 110 x 220 mm C6 114 x 162 mm C5 162 x 229 mm C4 229 x 324 mm B5 176 x 250 mm...

Page 43: ...Trays 2 5 75 216 g m2 18 57 lb Bond 22 80 lb Cover Statement 5 5 x 8 5 in Custom Sizes Tray 2 only Short Edge 140 297 mm 5 5 11 70 in Long Edge 182 432 mm 7 15 17 00 in Letter 8 5 x 11 in US Folio 8 5...

Page 44: ...1 MPT the following paper types Plain Colored Preprinted and Prepunched paper 75 90 g m2 20 24 lb Bond Heavy plain paper letterhead 91 105 g m2 25 28 lb Bond Thin card stock 106 169 g m2 50 60 lb Cov...

Page 45: ...r with a booklet maker you must load paper short edge feed to print booklets see Short Edge Feed on page 3 13 To load paper or other media in Tray 1 MPT 1 Open Tray 1 MPT 2 Load the paper or other med...

Page 46: ...printing place side one faceup with the top of the page towards the front of the printer Prepunched holes should enter the printer first Caution Do not load paper or media above the fill line indicat...

Page 47: ...following a Select Change setup and then press the OK button b Select the appropriate paper type and then press the OK button c Select the appropriate paper size and then press the OK button For some...

Page 48: ...305 mm 12 0 in Note If your printer has a finisher with a booklet maker you must load paper short edge feed to print booklets 1 Open Tray 1 MPT 2 Load the paper or other media with the short edge agai...

Page 49: ...e faceup with the top of the page entering the printer last Place prepunched paper with the holes toward the front of the printer Caution Do not load paper or media above the fill line indicated on th...

Page 50: ...OK button b Select the appropriate paper type and then press the OK button c Select the appropriate paper size and then press the OK button For some sizes that can be loaded in either direction you ne...

Page 51: ...ic Tray and then select Tray 1 MPT from the list 3 Select Manual Feed and then click OK to save the driver settings 4 Submit your print job 5 When prompted by the control panel remove the paper from T...

Page 52: ...rhead 91 105 g m2 25 28 lb Bond Thin card stock 106 169 g m2 50 60 lb Cover Thick card stock 170 220 g m2 65 80 lb Cover Thin glossy paper 120 169 g m2 50 60 lb Cover Thick glossy paper 170 220 g m2 6...

Page 53: ...dge feed to print booklets see Short Edge Feed on page 3 21 To load paper or other media in Trays 2 5 1 Pull out the tray 2 Fan the paper to release sheets that are stuck together 3 Load the paper wit...

Page 54: ...rinted facedown with the top of the paper at the front of the tray Prepunched holes should be on the left side of the tray Caution Do not load paper or media above the fill line indicated on the tray...

Page 55: ...tup and then press the OK button b Select the appropriate paper type and then press the OK button c For Tray 2 select the paper size and then press the OK button Note If you loaded custom size paper s...

Page 56: ...u must load paper short edge feed to print booklets 1 Pull out the tray 2 Fan the paper to release sheets that are stuck together 3 Load the paper with the long edge of the paper facing the front of t...

Page 57: ...th the top of the paper towards the right side of the tray Prepunched holes should be towards the front of the tray Caution Do not load paper or media above the fill line indicated on the tray Overloa...

Page 58: ...button b Select the appropriate paper type and then press the OK button c For Tray 2 select the paper size and then press the OK button Note If you loaded custom size paper select New Custom Size for...

Page 59: ...ple if you want to use automatic 2 sided printing for most jobs set this option in printer settings To select printer preferences 1 Select one of the following options Windows 98 SE Windows 2000 Windo...

Page 60: ...ve current printing options with a distinctive name and apply them to other print jobs Select either the Paper Quality Output Options or TekColor tab and then select a Saved Setting Click the Help but...

Page 61: ...Automatic 2 sided printing Print quality End of job notification Output Options tab Stapling Hole punching Secure prints proof prints and saved prints Separation pages Cover pages TekColor tab Color c...

Page 62: ...using specific printer settings click the applicable saved preset in the Presets list 3 Click Print to print the job See the following table for specific printing options Macintosh PostScript Driver...

Page 63: ...set collated sets Job Types Secure prints personal prints proof prints and saved prints Image Quality Print quality RGB color corrections neutral grays Image smoothing Printer Features Paper types Sep...

Page 64: ...Advanced Options Paper destination Paper types Offset collated sets Separation pages Finishing Options Stapling Hole punching Destination Offset collated sets Macintosh PostScript Driver Settings Con...

Page 65: ...ded Printing Guidelines To use the printer s automatic 2 sided printing duplex feature The paper must have a length of 148 457 mm 5 83 18 in The paper must have a weight of 75 169 g m2 20 40 lb Bond T...

Page 66: ...ceup with the short edge entering the printer first and the top of the page towards the left side of the printer Prepunched holes are at the back of the tray Trays 2 5 Long Edge Feed Insert side one f...

Page 67: ...Select or deselect Bind On Top Edge Windows 2000 Windows XP or Windows Server 2003 1 Select the Layout tab 2 Select either Flip On Long Edge or Flip On Short Edge under Print On Both Sides Duplex Mac...

Page 68: ...o to www xerox com office supplies Caution Damage caused by using unsupported paper transparencies and other specialty media is not covered by the Xerox warranty service agreement or Total Satisfactio...

Page 69: ...and size of paper in the tray a Select Change setup and then press the OK button b Select Xerox Transparency and then press the OK button c Select the transparency size and then press the OK button N...

Page 70: ...nd size of paper in the tray a Select Change setup and then press the OK button b Select the Xerox Transparency and then press the OK button c Select the transparency size and then press the OK button...

Page 71: ...which can affect print quality and cause wrinkling Excessive moisture can cause the envelopes to seal before or during printing Avoid padded envelopes purchase envelopes that lie flat on a surface Rem...

Page 72: ...confirm the type and size of paper in the tray a Select Change setup and then press the OK button b Select Envelope as the paper type and then press the OK button c Select the appropriate envelope si...

Page 73: ...Do not use any sheet where labels are missing it may damage the printer Store unused labels flat in their original packaging Leave the sheets of labels inside the original packaging until ready to use...

Page 74: ...t the paper guides to match the size of the sheets 4 When the control panel prompts you to confirm the type and size of paper in the tray a Select Change setup and then press the OK button b Select La...

Page 75: ...com office supplies Guidelines Do not open sealed packages of glossy paper until you are ready to load them into the printer Leave glossy paper in the original wrapper and leave the packages in the sh...

Page 76: ...nting on Specialty Media Phaser 7760 Color Laser Printer 3 41 Printing Glossy Paper from Tray 1 MPT 1 Open Tray 1 MPT 2 Fan the glossy paper to release sheets that may be stuck together 7760 027 7760...

Page 77: ...to match the size of the paper 5 When the control panel prompts you to confirm the type and size of paper in the tray a Select Change setup and then press the OK button b Select Thin Glossy Paper or...

Page 78: ...sert glossy paper with the long edge along the left side of the tray For single sided printing place the side to be printed faceup For automatic 2 sided printing place side one facedown Note Do not lo...

Page 79: ...over 170 g m2 as the paper type and then press the OK button c If you loaded the glossy paper in Tray 2 select the appropriate paper size and then press the OK button Note For some sizes that can be l...

Page 80: ...aper is correct press the OK button Otherwise select Change press the OK button use the Up Arrow or Down Arrow button to scroll to the correct measurement and then press the OK button e If the measure...

Page 81: ...on Otherwise select Change press the OK button use the Up Arrow or Down Arrow button to scroll to the correct measurement and then press the OK button e If the measurement shown for the long edge of t...

Page 82: ...size paper The tray guides are then used by the printer to determine the paper size in the tray On the control panel 1 Select Printer Setup and then press the OK button 2 Select Paper Handling Setup...

Page 83: ...tray Note If you select stapling or hole punching in the printer driver the output automatically goes to a finisher output tray Selecting an Output Tray from the Printer Driver To select an output tr...

Page 84: ...ed job Note If a finisher is installed the top output tray no longer offsets Selecting Offsetting from the Printer Driver To select offsetting for a specific print job Operating System Steps Windows 2...

Page 85: ...er None default The prints are not stapled Front Inserts one staple in each set of copies For portrait long edge feed paper staples the upper left corner Rear Inserts one staple in each set of copies...

Page 86: ...transparencies labels and envelopes are not punched If you select Quadruple for stapling and 4 Holes for hole punching the paper is not punched Hole Punching Options None default Holes are not punche...

Page 87: ...ndows Server 2003 1 Select the Output Options tab 2 Select the number of holes from the Hole Punching drop down list 3 Select Finisher Output Tray from the Paper Destination drop down list Mac OS 9 or...

Page 88: ...Phaser 7760 Color Laser Printer 4 1 This chapter includes Controlling the Quality of Your Prints on page 4 2 Solving Print Quality Problems on page 4 5 Print Quality...

Page 89: ...directly control the print speed You can change these settings in the printer driver or on the control panel Note Driver settings override the settings selected on the control panel The following tabl...

Page 90: ...Select a print quality mode from the Print Quality drop down list TekColor Correction Description Automatic Applies the best color correction to each graphic element text artwork and photographs Offic...

Page 91: ...The color correction can be set in the printer using either the control panel or the CentreWare software if available Operating System Steps Windows 98 SE Windows 2000 Windows XP or Windows Server 200...

Page 92: ...ear Mottled or Blotchy Blacks Appear Blue on page 4 12 Poor Transparency Print Quality on page 4 13 All Colors Are Too Light or Too Dark on page 4 14 Grays Are Not Neutral on page 4 14 Colors Vary Bet...

Page 93: ...laser window cleaner wand See Cleaning the Laser Window on page 5 3 Note The laser window cleaner wand is located inside the front door Insert the wand until the arrow aligns with the front plate of t...

Page 94: ...Several cleaning pages are printed 2 Repeat Step 1 until no toner appears on the pages If the problem is not resolved by removing the toner print smears follow these steps 1 On the control panel sele...

Page 95: ...re the distance between the defects and identify the item causing the defects 5 Replace the item causing the defects Note If the Transfer Roller is replaced on the control panel select Information sel...

Page 96: ...er Printer 4 9 Colors Align Incorrectly Problem Solution 1 Open and close the front door The printer performs an automatic registration calibration with the next print Color has shifted outside the de...

Page 97: ...s 1 Do one of the following Tray 1 MPT Remove and re insert the paper Tray 2 5 Open and close the selected paper tray The control panel prompts you to confirm or change the paper type 2 On the control...

Page 98: ...ay 1 MPT Remove and re insert the paper Tray 2 5 Open and close the selected paper tray The control panel prompts you to confirm or change the paper type 2 On the control panel select Change press the...

Page 99: ...or the paper type being used 1 Load paper into Tray 1 MPT The control panel prompts you to change the paper type 2 On the control panel do one of the following Press the OK button to confirm the paper...

Page 100: ...tal Satisfaction Guarantee is available in the United States and Canada Coverage may vary outside these areas please contact your local representative for details To order paper transparencies or othe...

Page 101: ...r Calibration Tutorial page a On the control panel select Troubleshooting and then press the OK button b Select Print Quality Problems and then press the OK button c Select Calibrate Colors and then p...

Page 102: ...s different from the color that it must match Solution For help with color matching problems go to www xerox com office 7760support If the problem continues follow these steps to ensure that the color...

Page 103: ...on the document do not match the Phaser 7760 Color Laser Printer PANTONE color chart Solution For information about PANTONE color matching go to www xerox com office 7760support Color Settings Not Ap...

Page 104: ...rgins page to shift the print area on the paper The print area appears as a dashed rectangle on the Calibrate Margins page the printer does not print outside this rectangle a On the control panel sele...

Page 105: ...g Staples on page 5 6 Emptying the Punch Waste Box on page 5 12 Ordering Supplies on page 5 14 Moving and Repacking the Printer on page 5 16 See also Maintenance video tutorials at www xerox com offic...

Page 106: ...ng the Outside of the Printer To remove stains clean the outside of the printer using a soft damp cloth moistened with a mild neutral detergent Do not spray detergent directly onto the printer Warning...

Page 107: ...0 Color Laser Printer 5 3 Cleaning the Laser Window 1 Open the front door 2 Open the waste cartridge door 3 Remove the waste cartridge Note Be careful not to spill the toner by tipping the waste cartr...

Page 108: ...abeled one through four 6 Push the wand all the way into the printer until you hear a click or the arrow on the wand aligns with the front of the printer Note If you fail to insert the laser cleaning...

Page 109: ...Cleaning the Printer Phaser 7760 Color Laser Printer 5 5 9 Reinsert the waste cartridge and close the waste cartridge door 10 Close the front door 7760 026 7760 008...

Page 110: ...on page 5 9 Note The staple cartridges used in the booklet stapler are different from the staple cartridges used in the regular stapler Adding Staples to the Regular Stapler When the control panel dis...

Page 111: ...ing Staples Phaser 7760 Color Laser Printer 5 7 3 Remove the stapler by the handle 4 If present remove the empty staple cartridge 5 Insert a new staple cartridge 2c 3 R4 XE R1 7760 077 7760 080 7760 0...

Page 112: ...Adding Staples Phaser 7760 Color Laser Printer 5 8 6 Insert the stapler in the finisher 7 Close the finisher door 7760 078 2c 3 R4 XE R1 7760 003...

Page 113: ...Printer 5 9 Adding Staples to the Booklet Stapler When the control panel displays a message that staple cartridge R2 or R3 needs to be replaced follow these steps 1 Open the finisher door 2 Pull out...

Page 114: ...er 5 10 3 Remove the empty staple cartridges Note Usually both cartridges are empty at the same time You may need to replace both of them 4 Insert the new staple cartridges 5 Push the booklet stapler...

Page 115: ...Adding Staples Phaser 7760 Color Laser Printer 5 11 6 Close the finisher door 7760 003...

Page 116: ...aste Box Phaser 7760 Color Laser Printer 5 12 Emptying the Punch Waste Box 1 Open the finisher door 2 Remove the punch waste box 3 Empty the waste 4 Insert the punch waste box into the finisher 7760 0...

Page 117: ...Emptying the Punch Waste Box Phaser 7760 Color Laser Printer 5 13 5 Close the finisher door 7760 003...

Page 118: ...ing Units Cyan Magenta Yellow Black Fuser Transfer Roller Accumulator Belt Belt Cleaner Assembly Waste Cartridge Feed Roller Kit When to Order Supplies The control panel displays a warning when the su...

Page 119: ...ents and Total Satisfaction Guarantee do not cover damage malfunction or degradation of performance caused by use of non Xerox supplies or the use of Xerox supplies not specified for this printer The...

Page 120: ...er over a raised door threshold or across a parking lot can damage the printer Preparing the Printer for Shipment Caution Do not remove the toner cartridges leave them locked in the normal operating p...

Page 121: ...or Laser Printer 6 1 This chapter includes Preventing Jams on page 6 2 Getting Help on page 6 23 See also Troubleshooting video tutorials at www xerox com office 7760support Print Quality on page 4 1...

Page 122: ...d instructions in Printing Basics which includes information about supported paper and other media guidelines for paper and media usage and instructions for properly loading paper and media in the tra...

Page 123: ...he Fuser Follow these steps to clear the jam 1 Push up on the latch on the left side of the printer to open Left Door A Warning Use caution components behind the left door may be hot 2 Lift the releas...

Page 124: ...earing Paper Jams Phaser 7760 Color Laser Printer 6 4 3 Remove the jammed paper Confirm that all paper fragments are removed 4 Push down the release latch 5 Close Left Door A 7760 041 7760 042 7760 01...

Page 125: ...earing Paper Jams Phaser 7760 Color Laser Printer 6 5 Jam at the Duplex Unit Follow these steps to clear the jam 1 Open Tray 1 MPT 2 Open Left Door D 3 Remove the jammed paper 7760 027 7760 028 7760 0...

Page 126: ...Clearing Paper Jams Phaser 7760 Color Laser Printer 6 6 4 Close Left Door D 7760 030...

Page 127: ...1 MPT Confirm that all paper fragments are removed 2 Remove the jammed paper from Tray 1 MPT Confirm that all paper fragments are removed 3 If you did not find paper in Step 2 push up the latch on the...

Page 128: ...7760 Color Laser Printer 6 8 4 Remove the jammed paper Confirm that all paper fragments are removed 5 Close Left Door A 6 Replace the paper in the tray Note Do not load paper above the fill line 7760...

Page 129: ...haser 7760 Color Laser Printer 6 9 Jam at Tray 2 Follow these steps to clear the jam 1 Open Left Door B 2 Remove the jammed paper Confirm that all paper fragments are removed 3 Close Left Door B 7760...

Page 130: ...Pull Tray 2 out of the printer 5 Remove any crumpled paper from the tray 6 Verify that the paper is loaded correctly in the tray and that the guides are pressed firmly against the paper 7 Push Tray 2...

Page 131: ...r 7760 Color Laser Printer 6 11 Jam at Tray 3 4 or 5 Follow these steps to clear the jam 1 Open Left Door C 2 Remove the jammed paper Confirm that all paper fragments are removed 3 Close Left Door C 7...

Page 132: ...r Printer 6 12 4 Pull out the tray specified on the control panel 5 Remove crumpled paper from the tray Note If you have a high capacity feeder lift the cover on the left side of the tray and remove t...

Page 133: ...ams Phaser 7760 Color Laser Printer 6 13 6 Verify that the paper is loaded correctly in the tray and that the guides are pressed firmly against the paper 7 Push the tray completely into the printer 77...

Page 134: ...Jams Phaser 7760 Color Laser Printer 6 14 Jam at Left Door A B or C Follow these steps to clear the jam 1 Open the left door A B or C specified on the control panel Door A Door B Door C 7760 010 7760...

Page 135: ...Clearing Paper Jams Phaser 7760 Color Laser Printer 6 15 2 Remove the jammed paper Confirm that all paper fragments are removed Door A Door B Door C 7760 041 7760 051 7760 044...

Page 136: ...Clearing Paper Jams Phaser 7760 Color Laser Printer 6 16 3 Close the left door Door A Door B Door C 7760 015 7760 052 7760 045...

Page 137: ...Jam at the Finisher Area 3 on page 6 19 Jam at the Finisher Area 4 on page 6 20 Jam at Finisher Cover on page 6 21 Finisher Stacker Output Tray Jammed on page 6 22 Jam Under the Top Output Tray Follow...

Page 138: ...pen the finisher door 2 Open the handle 2a or 2b specified on the control panel 3 If necessary rotate knob 2c counterclockwise 4 Pull the jammed paper out of the finisher Confirm that all paper fragme...

Page 139: ...nisher Area 3 Follow these steps to clear the jam 1 Open the finisher door 2 Open handle 3 by pulling it down 3 Pull the jammed paper out of the finisher Confirm that all paper fragments are removed 4...

Page 140: ...20 Jam at the Finisher Area 4 Follow these steps to clear the jam 1 Open the finisher door 2 Pull out the booklet drawer labeled 4 3 Remove the jammed paper Confirm that all paper fragments are remove...

Page 141: ...s Phaser 7760 Color Laser Printer 6 21 Jam at Finisher Cover Follow these steps to clear the jam 1 Lift the finisher cover Door 5 2 Remove the jammed paper 3 Close the finisher cover Door 5 7760 031 5...

Page 142: ...Color Laser Printer 6 22 Finisher Stacker Output Tray Jammed Follow these steps to clear the jam 1 Pull the jammed paper out of the stacker output tray 2 Open the finisher door 3 Close the finisher d...

Page 143: ...essage informing you of the problem In many cases the control panel also displays an animated graphic showing the location of the problem such as the location of a paper jam Press the Help button on t...

Page 144: ...ivers on your computer The Troubleshooting tab in your Windows printer driver also includes useful links Use the following websites to obtain more information Resource Link PhaserSMART Technical Suppo...

Page 145: ...that is capable of providing the correct voltage and power Review the printer s electrical specification with an electrician if necessary Warning Avoid the potential of electrical shock by ensuring th...

Page 146: ...exposed to water If any of these conditions occur do the following 1 Turn off the printer immediately 2 Disconnect the power cord from the electrical outlet 3 Call an authorized service representativ...

Page 147: ...lowing humidity range Optimal Print Quality 50 70 Operating 20 80 Printer Clearance Place the printer in an area where there is adequate space for ventilation operation and servicing The recommended m...

Page 148: ...s Wait 10 15 seconds between turning the printer off and on Keep hands hair neckties etc away from the exit and feed rollers When the printer is printing Do not remove the paper source tray that you s...

Page 149: ...rinter from the designated lift points Do not place any food or liquids on the printer Caution Damage to the printer resulting from improper moving or failure to repackage the printer properly for shi...

Page 150: ...ticular component See the manual s for information Avoid pinching fingers in the printer Use caution to avoid personal injury Hot surface on or in the printer Use caution to avoid personal injury Do n...

Page 151: ...IP address dynamically 2 6 changing the IP address using CentreWare IS 2 6 choosing a network connection 2 3 cleaning laser window 5 3 printer 5 2 color correction selecting in the printer driver 4 3...

Page 152: ...ed printing 3 31 selecting hole punching 3 52 selecting stapling 3 51 setting the default output tray 3 48 UNIX 2 9 Windows 2000 or later 2 10 Windows 98 SE or later 2 10 Xerox Support Centre 1 14 dup...

Page 153: ...Tips page 3 5 inside the printer 1 4 installing printer drivers 2 9 Mac OS 9 x 2 11 Mac OS X version 10 2 and 10 3 2 12 Mac OS X version 10 4 2 14 Windows 98 SE or later 2 10 IP address changing or mo...

Page 154: ...es print quality 4 2 modifying the IP address using CentreWare IS 2 6 monitor colors do not match printed color 4 16 moving the printer precautions 5 16 preparing for shipment 5 16 within the office 5...

Page 155: ...mode 4 2 print quality modes 4 2 solving problems 4 5 print speed maximum 1 6 printer advanced features 1 7 available configurations 1 7 caution symbols A 6 changing or modifying the IP address using...

Page 156: ...lor settings not applied 4 16 colors align incorrectly 4 9 colors do not match 4 15 colors vary between computers 4 15 dark lines smudges or streaks 4 7 fusing incomplete 4 10 grays not neutral 4 14 l...

Page 157: ...manually feeding paper 3 16 paper and media types 3 6 paper jam 6 7 printing envelopes 3 37 printing glossy paper 3 41 printing labels 3 39 printing transparencies 3 34 supported paper sizes and weigh...

Page 158: ...pplies 5 14 waste punch box emptying 5 12 web links 6 24 website resources 6 24 Windows install printer drivers for Windows 2000 or later 2 10 install printer drivers for Windows 98 SE or later 2 10 m...

Reviews: