


User Guide
5-1
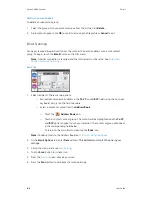
5. Scan Settings and Preview
For each standalone filing option,
, you can define specific scan
settings. Alternatively, you can create File Profiles in
.
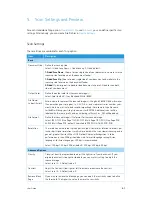
Scan Settings
These settings are available for each filing option.
Item
Description
Basic
Document Side
Define the scanning side.
Select: 1-Sided Face Down, 1-Sided Face up, 2-Sided (default)
1-Sided Face Down
: Choose to scan single side of your document and make sure the
scanning side faces down on the document feeder.
1-Sided Face Up
: Choose to scan single side of your document and make sure the
scanning side faces up on the document feeder.
2-Sided
: If your original is a double-sided document, choose 2-Sided to scan both
sides of your document.
Output Color
Define the output color for the scanned image(s).
Select: Color (default), Gray, Black and White (B&W)
File Name/
Subject (Email)
Enter a name to represent the scanned image(s). Using #n #Y #M #D #h #m #s makes
file name change as time goes. (n, Y, M, D, h, m, and s represent series number, year,
month, date, hour, minute, and second respectively.) For example, type file name:
test#n#D will bring your filing file name as test000105. Additional scans will be
labeled with the same prefix, and a numbering suffix such as _001 will be added.
File Format
Define the scanned image(s) file format for the scanned image.
Select: JPEG, TIFF (One-Page TIFF), M-TIFF (Multi-Page TIFF), PDF (One-Page PDF),
M-PDF (Multi-Page PDF - default), Searchable PDF, PDF/A-1b (M-PDF), PNG
Resolution
The resolution is measured in pixels per inch (ppi) (sometimes referred to as dots per
inch or dpi). Higher resolutions result in more detail in the scan, slower scanning and in
general, greater file sizes. When OCR (Optical Character Recognition) is to be
performed on a scan, 300dpi should be used for most languages except Asian
languages. For Asian languages, 400 dpi is recommended.
Select: 100 dpi, 150 dpi, 200 dpi (default), 300 dpi, 400 dpi, 600 dpi.
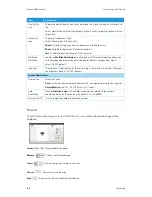
Advanced Options
Density
7 levels of density are provided to adjust the lightness of your document. If your
original document is too light or too dark, you can use this setting to adjust the
scanned image.
Select: Level -3~3. Default value: 0
Contrast
Adjust the Contrast slider right or left to increase or decrease the contrast.
Select: Level -3~3. Default value: 0
Remove Blank
Page
If you wish to remove the blank page, you can adjust the sensitivity value to define
the threshold. The higher the value, the more the sensitivity.
Summary of Contents for N60w
Page 1: ...Xerox N60w Scanner Scanner User Guide for Microsoft Windows AUGUST 2020 05 0987 000...
Page 14: ...Xerox N60w Scanner Welcome 2 4 User Guide...
Page 26: ...Xerox N60w Scanner LCD Buttons and Shortcuts 6 4 User Guide...
Page 28: ...Xerox N60w Scanner Cloud 7 2 User Guide...
Page 34: ...Xerox N60w Scanner Email 8 6 User Guide...
Page 36: ...Xerox N60w Scanner File 9 2 User Guide...
Page 40: ...Xerox N60w Scanner OneTouch 11 2 User Guide...
Page 42: ...Xerox N60w Scanner Hotspot 12 2 User Guide...
Page 84: ...Xerox N60w Scanner Maintenance 16 26 User Guide...
Page 92: ...Xerox N60w Scanner PC Installation 17 8 User Guide...


