

III
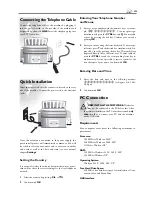
Connecting the Telephone Cable
Connect the telephone cable to the machine by plugging it
into the outlet located on the rear side of the machine and
designated by the word
LINE
. Insert the telephone plug into
your PTT line outlet.
Quick Installation
Insert the power cord into the connection located on the rear
side of the machine. Connect the power cord to the electrical
outlet.
Once the machine is connected to the power supply, the
quick install process will immediately commence. You will
be asked to select your country and to enter your number
and name as well as the date and time (see user manual
chapter
Settings
).
Setting the Country
It is essential to select the country because otherwise your ma-
chine will not have the correct settings for the local telephone
network.
1
Select the country by pressing
[
or
]
.
2
Confi rm with
OK
.
Entering Your Telephone Number
and Name
1
Enter your fax number with the number keys, for exam-
ple,
00 44 123 45
… To enter a plus sign,
simultaneously press the
CTRL
key and
Q
. You may add
a space by pressing the
½
key. Confi rm your entry by
pressing
OK
.
2
Enter your name using the letter keyboard. To enter capi-
tal letters, press
+
and the desired key simultaneously. You
may add a space by pressing the
½
key. Th
e symbols are
displayed directly above the letter keys. To enter symbols,
press the
CTRL
key and the corresponding letter key si-
multaneously. It is not possible to insert a symbol as the
fi rst character of your name. Confi rm with
OK
.
Entering Date and Time
1
Enter the date and time in the following manner:
08 08 05 14 00
for August 8th, 2005,
2:00 pm.
2
Confi rm with
OK
.
PC Connection
Æ
FIRST INSTALL THE SOFTWARE.
Th
e device
may not be connected to the PC before this. After
the software installation, the PC must be restarted,
only
then
should you connect your PC and the machine
with a USB cable.
Requirements
Your computer must meet the following minimum re-
quirements:
Processor:
500 MHz for Windows 98 SE®
800 MHz for Windows 2000 · ME®
1 GHz for Windows XP®
RAM:
128 MB for Windows 98 SE · 2000 · ME®
192 MB for Windows XP®
Operating System:
Windows 98 SE · 2000 · ME · XP®
Free Hard Drive Space:
260 MB of free hard drive space for installation of C-
S and P P.
USB Interface


