44
2 Basic Operation
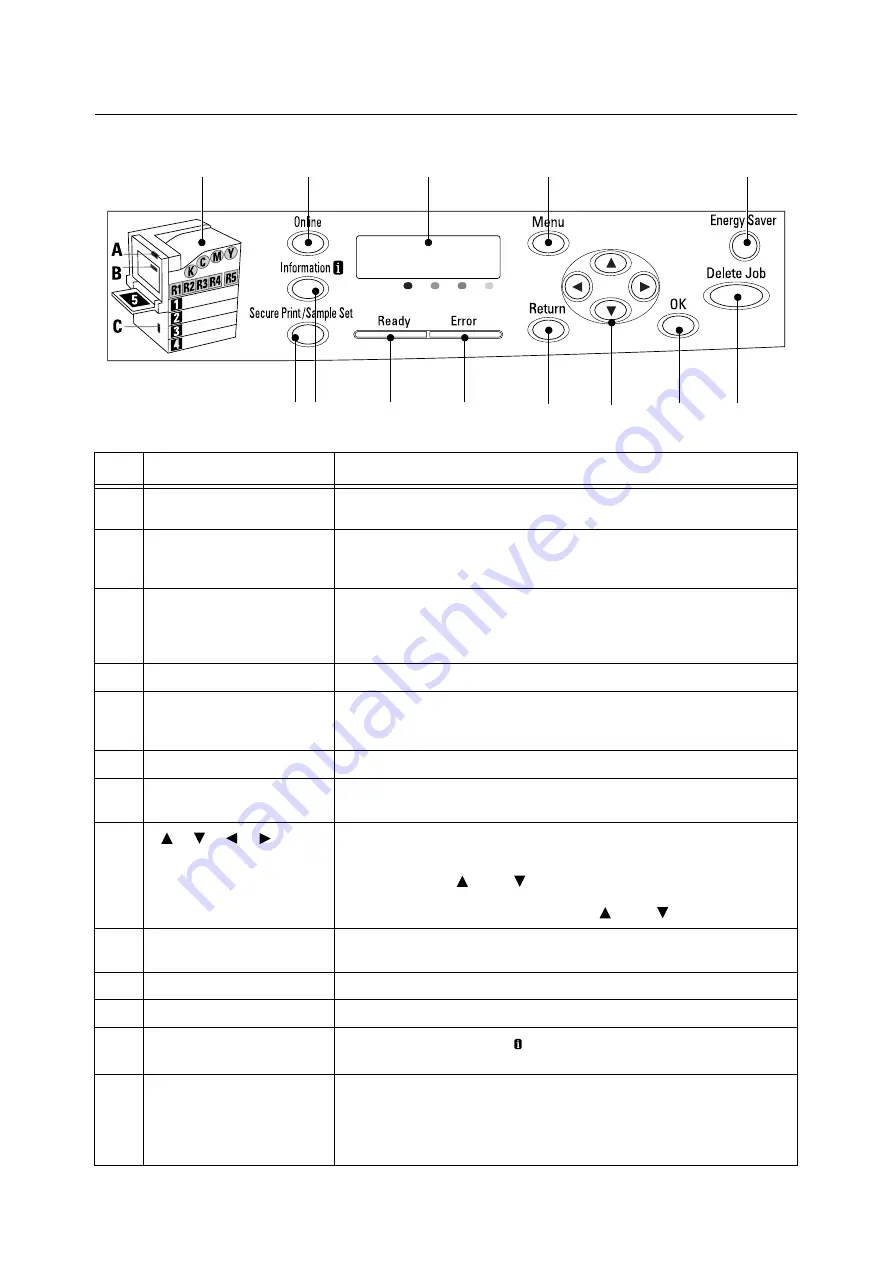
Control Panel
No.
Name
Description
1
Indicators
In the event of an error, use this to verify the location indicated in an error
message displayed on the display.
2
<Online> button
Pressing the <Online> button takes the printer offline. The <Ready> lamp is off
and printing is not done while the printer is offline. Pressing the <Online> button
again takes the printer back online (printing enabled).
3
Display
Displays the status of the printer, menu options, and messages.
Refer to
• “Control Panel Display” (P. 45)
4
<Menu> button
Pressed to display the menu screen.
5
<Energy Saver> button/lamp
Pressed to exit Energy Saver mode.
The lamp lights while the printer is in Energy Saver mode. The lamp flashes
while the hard disk (option) is being accessed.
6
<Delete Job> button
Pressed to stop printing.
7
<OK> button
Pressed to confirm the menu option selected on the menu screen. This button
is used also when printing reports/lists.
8
<
> <
> <
> <
> buttons
Pressed to advance to the next menu, item, or option.
Note
• When using the <
> and <
> buttons to change the current setting,
holding down either button cycles through available settings at high speed.
To display a setting’s default value, press <
> and <
> at the same time.
9
<Return> button
Press this button while the menu screen is displayed to return to the previous
item.
10
<Error> lamp
Blinks or lights when an error occurs.
11
<Ready> lamp
Lights when the printer is ready to print.
12
<Information> button
Pressing this button while the mark is on the display will display detailed
information about some current event.
13
<Secure Print/Sample Set>
button
Press to perform Secure Print/Sample Set operation.
Note
• To use the Secure Print/Sample Set feature, the hard disk (optional) must be
installed.
1
2
3
4
5
13 12
11
10
9
8
7
6
Summary of Contents for DocuPrint C2255
Page 1: ...DocuPrint C2255 User Guide ...
Page 176: ...176 6 Troubleshooting 2 Remove the jammed paper 3 Gently close cover C ...
Page 210: ...210 7 Maintenance 12 Close the front cover ...
Page 266: ...266 7 Maintenance 7 Rotate the lever to the right to lock it 8 Close the front cover ...
Page 313: ...Index 313 WSD 26 129 X XeroxStdAccounting 147 XPS 113 XPS file 309 ...


