


Loading Paper
27
IE
IE
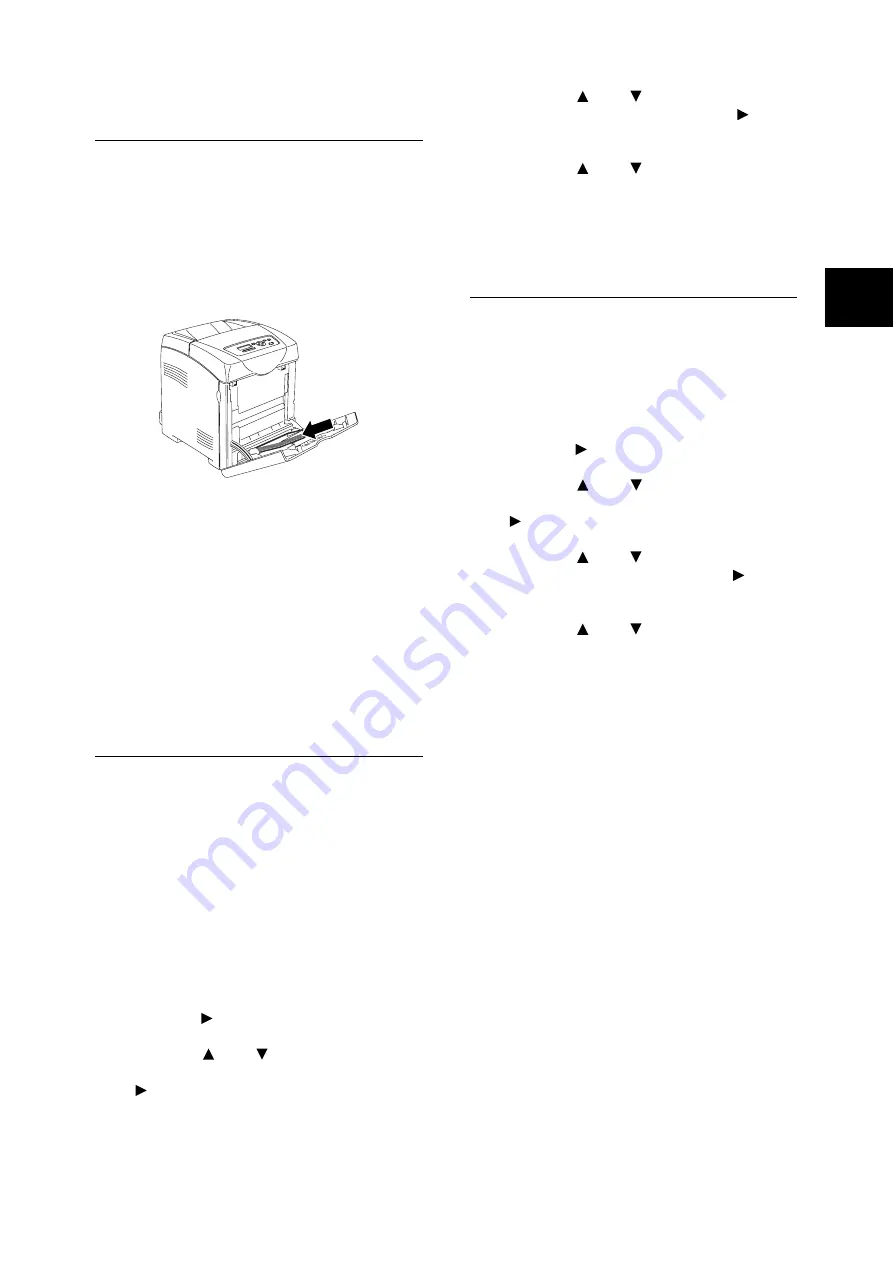
Loading Envelopes in the
Bypass Tray
To load envelopes in the bypass tray, insert the
envelopes with the flaps closed. The print side
must be facing down. You can load envelopes up
to the maximum fill line in the tray at one time.
Sometimes the wrinkle might be generated on
envelopes. In that case it is likely to be improved
by changing the position of the flap.
Important
• For best performance, do not use envelopes that:
• Have excessive curl or twist
• Are stuck together or damaged in any way
• Contain windows, holes, perforations, cutouts,
embossing
• Use metal clasps, string ties, or metal folding bars
• Have an interlocking design
• Have postage stamps attached
• Have any exposed adhesive when the flap is in the
sealed or closed position
• Have nicked edges or bent corners
• Have rough, cockle, or laid finishes
Setting Paper Types
Important
• Paper type settings must match those of the actual
paper loaded in the trays. Otherwise, image quality
cannot be processed accurately. Toner may not fuse
properly on the paper, resulting in dirty and poor quality
printouts.
Refer to
• “Usable Paper” (P. 22)
1.
Press the <Menu> button to display the
Menu screen.
2.
Check that [Tray Settings] is displayed, then
press the < > or <Eject/Set> button.
3.
Press the < > or < > button until the
required tray is displayed, then press the
< > or <Eject/Set> button.
4.
Press the < > or < > button until [Paper
Type] is displayed, then press the < > or
<Eject/Set> button.
5.
Press the < > or < > button until the
correct paper type is displayed for the loaded
paper, then press the <Eject/Set> button.
6.
Press the <Menu> button.
Setting Paper Sizes
Refer to
• “Usable Paper” (P. 22)
1.
Press the <Menu> button to display the
Menu screen.
2.
Check that [Tray Settings] is displayed, then
press the < > or <Eject/Set> button.
3.
Press the < > or < > button until the
required tray is displayed, then press the
< > or <Eject/Set> button.
4.
Press the < > or < > button until [Paper
Size] is displayed, then press the < > or
<Eject/Set> button.
5.
Press the < > or < > button until the
correct paper size and direction are
displayed for the loaded paper, then press
<Eject/Set> button.
Note
• When using custom sized paper, select [Custom Size]
and specify the X and Y sizes.
6.
Press the <Menu> button.
Summary of Contents for DocuPrint C2100
Page 1: ...DocuPrint C2100...
Page 2: ......
Page 3: ...IE IE DocuPrint C2100 Product ID KEB 1 Quick Reference Guide...
Page 6: ...4 Features in Brief Features in Brief...
Page 52: ......
Page 53: ...DocuPrint C2100...
Page 55: ...3 DocuPrint C2100 A Class I 57 B TV TV Fuji Xerox NEMKO IEC60950 1 Edition 1 2001 ISO9001...
Page 56: ...4...
Page 58: ...6 26kg 100mm...
Page 59: ...7 10 110 127Vac 10 50 60 Hz 220 240 V 50 60 Hz 600mm 100mm 100mm 150mm...
Page 60: ...8 IEC60825 1 Class 1 Class 1...
Page 61: ...9 CD ROM CD 30...
Page 65: ...13 5 Enter Adjust Number 6 7 8 6 7 9 10 11 Y M C 0 0...
Page 72: ...20 3 Windows 1 2 Windows OS A B A B PCL...
Page 73: ...21 Windows Delete...
Page 77: ...25 1 2 Letter Legal 8 5 8 5 3 4 5 6 7...
Page 78: ...26 4 OHP 150 15 mm 60 g m2 216 g m2 76 2 mm 220 0 mm 98 0 mm 355 6 mm 355 6 mm P 22 1 2 3 4...
Page 83: ...31 6 550 1 2 P 34 P 31 P 33 P 32 P 35...
Page 84: ...32 6 3 4 5 6 7 8 1 2...
Page 85: ...33 3 4 5 6 7 1 2...
Page 86: ...34 6 3 4 5 1 2 3 4 5 6...
Page 87: ...35 1 2 3 4 5 6...
Page 89: ...37 P 25 4 2 OHP P 25 P 25 P 22 P 25...
Page 90: ...38 6 P 6 P 22 P 22 P 22...
Page 91: ...39 P 22 P 22 P 22 P 22 1 P 12 30 mm...
Page 92: ...40 6 P 22 P 22 P 25 P 22 6 8 6 9...
Page 104: ......
Page 105: ...DocuPrint C2100...
Page 107: ...3 DocuPrint C2100 CNS13438 Class B NEMKO IEC60950 1 Edition 1 2001 ISO9001...
Page 108: ...4...
Page 110: ...6 26 kg 2 100 mm 100 mm...
Page 111: ...7 10 110 127 Vac 10 50 60 Hz 220 240 V 50 60 Hz 110V 15A 600mm 100mm 100mm 150mm...
Page 112: ...8 IEC60825 1 Class 1...
Page 113: ...9 Fuser Safety 30...
Page 117: ...13 5 Enter Adjust Number 6 7 8 6 7 9 10 11 Y M C 0 0...
Page 124: ...20 3 Windows 1 2 Windows A B A B PCL...
Page 125: ...21 Windows Delete...
Page 129: ...25 1 2 8 5 Letter Legal 8 5 3 4 5 6 7...
Page 130: ...26 4 OHP 150 15mm 60 g m2 216 g m2 76 2 mm 220 0 mm 98 0 mm 355 6 mm 355 6 mm P 22 1 2 3 4...
Page 135: ...31 6 550 1 2 P 34 P 31 P 33 P 32 P 35...
Page 136: ...32 6 3 4 5 6 7 8 1 2...
Page 137: ...33 3 4 5 6 7 1 2...
Page 138: ...34 6 3 4 5 1 2 3 4 5 6...
Page 139: ...35 1 2 3 4 5 6...
Page 141: ...37 P 25 4 2 OHP P 25 P 25 P 22 P 25...
Page 142: ...38 6 P 6 P 22 P 22 P 22...
Page 143: ...39 P 22 P 22 P 22 P 22 1 P 12 30 mm...
Page 144: ...40 6 P 22 P 22 P 25 P 22 6 8 6 9...
Page 154: ......
Page 155: ...DocuPrint C2100...
Page 158: ...4...
Page 160: ...6 26 kg 2 100 mm 100 mm 100 mm...
Page 161: ...7 10 110 127Vac 10 50 60 Hz 220 240 V 50 60 Hz 600mm 100mm 100mm 150mm...
Page 162: ...8 IEC60825 1 CLASS 1...
Page 163: ...9 CD ROM CD Fuser Safety 30...
Page 167: ...13 5 Enter Adjust Number 6 7 8 6 7 9 10 11 Y M C 0 0...
Page 174: ...20 3 Windows 1 2 Windows A B A B PCL...
Page 175: ...21 Windows Delete...
Page 179: ...25 1 2 8 5 Letter Legal 8 5 3 4 5 6 7...
Page 180: ...26 4 150 15mm 60 g m2 216 g m2 76 2 mm 220 0 mm 98 0 mm 355 6 mm 355 6 mm P 22 1 2 3 4...
Page 185: ...31 6 550 1 2 P 34 P 31 P 33 P 32 P 35...
Page 186: ...32 6 3 4 5 6 7 8 1 2...
Page 187: ...33 3 4 5 6 7 1 2...
Page 188: ...34 6 3 4 5 1 2 3 4 5 6...
Page 189: ...35 1 2 3 4 5 6...
Page 191: ...37 P 25 4 2 P 25 P 25 P 22 P 25...
Page 192: ...38 6 P 6 P 22 P 22 P 22...
Page 193: ...39 P 22 P 22 P 22 P 22 1 P 12 30mm...
Page 194: ...40 6 P 22 P 22 P 25 P 22 6 8 6 9...
Page 204: ......
Page 206: ...July 2006 604E23141 DE3642Z4 2...


