background image

Getting to Know Your Product

Product Orientation Guide

5

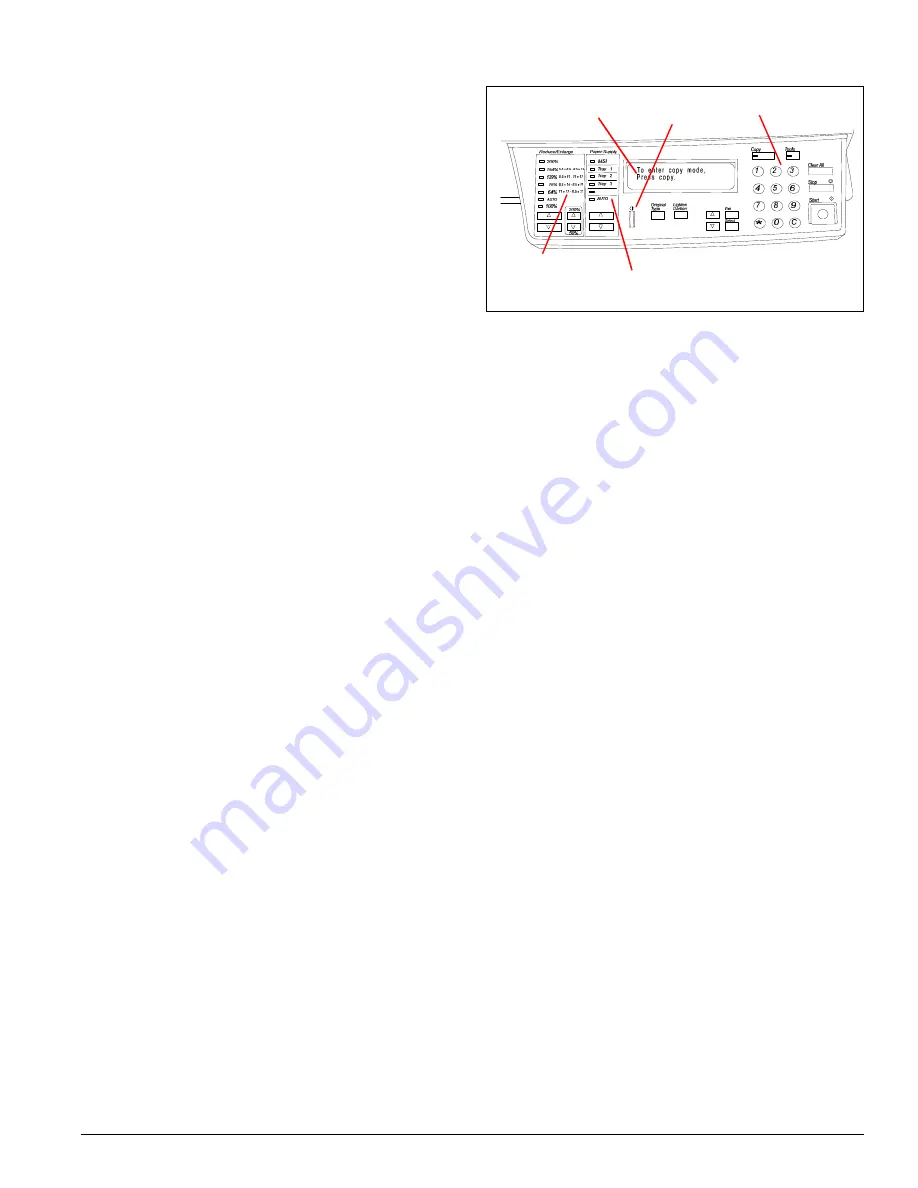
The Scanner/ADF control panel

Identify the components of the Scanner/ADF control 
panel.  

Point out

 each item as you discuss it. See 

Figure 6.

1. The 

display

 shows status messages and indicates 

the selections made during copying.

2. The 

Contrast Dial

 is used to adjust the bright-

ness of the display.

3. The 

Control Panel Buttons 

provide control of 

the copier functions.

• The 

Keypad

 buttons 

0

 through 

and


*


are 

used to enter the number of copies or a pass-
word.  The 

C

 button clears an incorrect entry.

Copy

 places the machine into the copy mode.

Tools

 is used to confirm or change functions 

and settings of the machine. The Tools button 
is for use by System Administrators and is 
password protected.

Clear All 

clears all programming and copy 

quantities.  Places all settings at their default 
values.

Stop

 allows you to temporarily stop a job.

Start

 initiates a scanning or copying job.

Exit

 cancels the selected function.

Select

 confirms the selection of a function.

s

 moves to the previous item in a list, or the 

function before this one.

t

  moves to the next item in a list, or the 

function following this one.

• Lighten Darken

 adjusts the copy contrast.

• Original Type 

allows selection of color or 

black and white copies.

4. The 

Paper Supply

 buttons allow a specific paper 

tray to be selected for a copy job. The selected 
paper tray indicator lights and the paper size 
appears in the display.

5. The 

Reduce/Enlarge

 buttons allow a specific 

reduction or enlargement ratio to be selected.  
The zoom buttons may be used to select reduc-
tion or enlargement in 1% increments.

1

2

3

5

4

Figure 6

Summary of Contents for DocuColor DocuColor 4

Page 1: ...Getting to Know Your Product DocuColor 4 Copier Printer Carrier Product Orientation Guide August 1999 701P31130 Note to Carriers Open this document and review it page by page with your Customer...

Page 2: ...tory or judicial law or hereinafter granted including without limitations material generated from the software programs which are displayed on the screen such as icons screen displays looks etc Printe...

Page 3: ...Scanner ADF control panel 5 Performing routine tasks 6 Loading paper in the paper trays 6 Loading paper in the bypass tray 7 Making copies using the Automatic Document Feeder 8 Making a copy from the...

Page 4: ...Getting to Know Your Product iv Product Orientation Guide...

Page 5: ...entation to your colleagues if you wish QuickStart Practice Guide This Guide contains a series of self guided activities designed to increase your product knowledge It can be used at your own pace As...

Page 6: ...buttons and the liquid crystal display LCD for the printer only functions 3 The Bypass Tray is used for transparencies and non standard paper up to 13 x 19 in 330 x 483 mm 4 Paper Tray 1 holds up to...

Page 7: ...e printer Power Switch is located at the left rear of the printer Press the switch up to turn on the power and press the switch down to turn off the power This switch should be left on at all times Lo...

Page 8: ...ons 3 Menu steps from one top level screen to the next 4 Online switches the printer between being online and offline 5 End menu cancel job stops printing and returns to the ready or offline status 6...

Page 9: ...istrators and is password protected Clear All clears all programming and copy quantities Places all settings at their default values Stop allows you to temporarily stop a job Start initiates a scannin...

Page 10: ...ee Figure 8 Move the paper guides toward the outer edges of the paper drawer 6 Place the stack of paper in the drawer with the cor ners under the fluke at the front right side Add paper up to the Max...

Page 11: ...e 10 Open the bypass tray by swing ing the door down 2 Ensure the guide at the front of the tray is flipped up unless 13 x 19 in 330 x 483 mm paper is being used 3 See Figure 11 Set the paper guide to...

Page 12: ...reen indi cator lights indicating the document is inserted correctly 3 Adjust the side guide to the size of the paper The guide should just touch the side of the docu ment 4 Press the Copy button on t...

Page 13: ...own Tray stacks the copies face down Access areas for jam clearance Clearing a jam in the scanner ADF Show how to open the ADF to clear jams See Figure 17 1 Open the ADF left cover by lifting it to th...

Page 14: ...ide and press the Start button to con tinue copying Clearing a jam in a paper tray Clear a jam in a paper tray by 1 See Figure 17 Slowly pull the paper tray out until it stops 2 Remove the jammed or c...

Page 15: ...ill go Clearing a jam in the bypass tray Show how to clear a jam in the bypass tray 1 See Figure 20 Pull the jammed paper out of the tray Be sure no torn pieces of paper are left inside Clearing a jam...

Page 16: ...over 7 See Figure 23 Push the lower right unit back into the printer 8 Reload paper into the bypass tray Clearing a jam in the fuser WARNING The fuser surface is very hot Do not touch the fuser or you...

Page 17: ...n a flat surface to set the oil roll cartridge on when you remove it 4 See Figure 25 Remove the oil roll cartridge and set it aside 5 Removed the jammed paper in the direction of the arrow Be sure no...

Page 18: ...sure no torn pieces of paper remain inside the printer 3 See Figure 28 Close the top left cover Clearing a jam in the two tray module Show how to clear a jam in the two tray module 1 See Figure 29 Op...

Page 19: ...code and telephone number SD 1 Strongly disagree N 3 Neither way A 4 Agree D 2 Disagree SA 5 Strongly agree A The Carrier SD 1 D 2 N 3 A 4 SA 5 B The Quick Start Guide SD 1 D 2 N 3 A 4 SA 5 1 Was pre...

Page 20: ...ed States BUSINESS REPLY MAIL First Class Mail Permit No 229 El Segundo CA Postage will be paid by Addressee Xerox Corporation Customer Education Services Attn GTKYP CSMS Suite 2000 ESL2 211 360 N Sep...

Reviews: