background image

Taking Care of Your Digital Drum Set

Thank you for purchasing this digital drum module. The drum module has been
developed to act and play like a drum set but with greater ease. Before you use
the instrument, we recommend you to read through this manual. 

2

Location

Power Supply

Make sure to sure use the suitable AC 
adaptor, and also make sure the AC 
o u t l e t   v o l t a g e  a t   y o u r  c o u n t r y  
matches the input voltage specified 
on the AC adaptor`s label.
Turn the power switch OFF when the 
instrument is not in use.
An AC adaptor should be unplugged 
from the AC outlet if the instrument is 
not be used for an extended period of 
time.
Unplug the AC adaptor during electric 
storms.
Avoid plugging the AC adaptor into 
the same AC outlet as appliance with 
high power consumption, such as 
electric heaters or ovens. Also avoid 
using multi-plug adaptors since these 
can result in reducing the sound 
quality, operation errors, and possibly 
damage.

Turn Power OFF When Making 
Connections

To avoid damage to the instrument 
and other devices to which it is 
connected, turn the power switches of 
a l l   r e l a t e d  d e v i c e   O F F  p r i o r   t o 
connecting or disconnecting cables.

Handling and Transport

Cleaning

Electrical Interference

Never apply excessive force to the 
controls, connectors or other parts of 
the instrument.
Always unplug cables by gripping the 
plug firmly, but not pulling on the 
cable.
Disconnect all cables before moving 
the instrument.
Physical shocks caused by dropping, 
bumping, or placing heavy objects on 
the instrument can result in scratches 
and more serious damage.

Clean the unit with a dry soft cloth.
A slightly damp cloth may be used to 
remove stubborn grime and dirt.
Never use cleaners such as alcohol 
or thinner.
Avoid placing vinyl object on top of 
the unit (vinyl can stick to and 
discolor the surface). 

T h i s   i n s t r u m e n t  c o n t a i n s   d i g i t a l 
circuitry and may cause interference 
i f   p l a c e d  t o o   c l o s e  t o   r a d i o  o r  
television receivers. If this occurs, 
move the instrument further away 
from the affected equipment. 

Do not expose the unit to the following 
c o n d i t i o n s   t o  a v o i d   d e f o r m a t i o n , 
d i s c o l o r a t i o n ,   o r  m o r e   s e r i o u s 
damage.
Direct sunlight.
H i g h   t e m p e r a t u r e  ( n e a r   a  h e a t  
source, or in a car during the day 
time).
Excessive humidity.

Congratulatons!

THIS DEVICE COMPLIES WITH PART 15 OF THE FCC RULES.
OPERATION IS SUBJECT TO THE FOLLOWING TWO CONDITIONS:
(1) THIS DEVICE MAY NOT CAUSE HARMFUL INTERFERENCE, AND
(2) THIS DEVICE MUST ACCEPT ANY INTERFERENCE RECEIVED,
INCLUDING INTERFERENCE THAT MAY CAUSE UNDESIRED OPERATION.

Summary of Contents for DD-505

Page 1: ...00023429 Version 01 2010 DD 505 E Drum Set Users manual...

Page 2: ...ng and Transport Cleaning Electrical Interference Never apply excessive force to the controls connectors or other parts of the instrument Always unplug cables by gripping the plug firmly but not pulli...

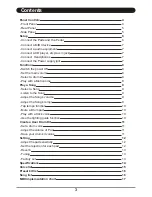
Page 3: ...et a drum voice Adjust the volume of Pad Save your drum kit voices Setting Adjust the pad sensitivity Set the rejection for each pad Reverb Tuning Factory set Voice list Preset kit list Song list MIDI...

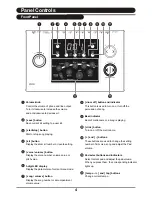
Page 4: ...urrent menu mode song volume button Display the song number or accompaniment volume value drum off button and indicator This button is used to turn on or turn off the percussion of song Beat indicator...

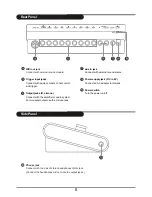
Page 5: ...use the L mono jack MIDI out jack Connect with external sound module Aux in jack Connect with external sound source Power supply jack DC in 9V Connect an AC adaptor to this jack Power switch Turn the...

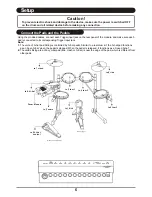
Page 6: ...n the pedal is released it functions as a closed hi hat 2 The valid striking area of a cymbal pad ride crash or hi hat is near the edge of the pad which is different from other pads Caution To prevent...

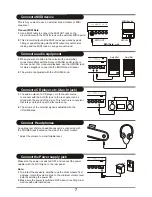
Page 7: ...ith the AUX IN jack on the rear panel can be mixed with the sound of the drum This function is convenient that lets you play along with a favourite song 2 The volume of the external signal is adjusted...

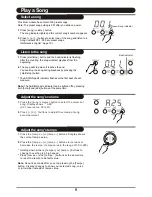
Page 8: ...ect the drum kit number 001 020 you want to use 1 Press the click button to start the metronome The beat indicator is flashing and the click sound begins to play 2 Press the tempo or tempo buttons to...

Page 9: ...ad s indicator can be lighted off by pressing both hi hat and kick buttons at the same time Song indicator 1 Press the song volume button to select the volume of song Display shows A XX XX level value...

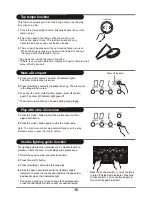
Page 10: ...s off The drum mute function can be used during song playing 1 Press the click button to start the metronome It will be played with tempo 2 Press the click button again to stop the metronome Note The...

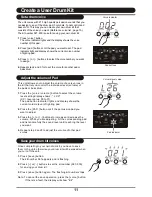
Page 11: ...2 Press or buttons to set the kit number 021 030 for saving your drum kit 3 Press save button again The flashing kit number stops Note To cancel the save operation press the voice button If there is a...

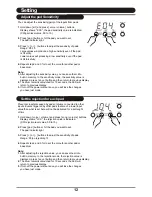
Page 12: ...the power without save you will lose the changes you have just made Setting Adjust the pad Sensitivity Prevents crosstalk caused by pads or drums connected to other inputs Events triggered by other pa...

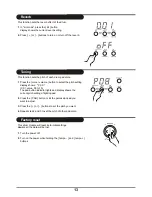
Page 13: ...ing display shows P XX XX value 00 to 15 The pad button indicator lights and display shows the current pitch setting of lighting pad 2 Press the PAD button or kit the percussion pad you want to adjust...

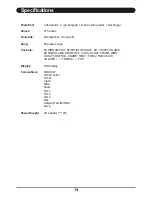
Page 14: ...voices 20 preset kits 10 user kits 50 preset songs POWER SWITCH START STOP SAVE SONG VOLUME DRUM OFF CLICK HI HAT CRASH RIDE HI HAT CONTROL SNARE TOM 1 TOM 2 TOM3 KICK VOLUME TEMPO TAP LED display Ou...

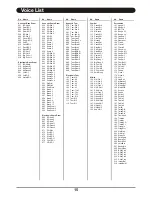
Page 15: ...Cymbl 2 134 S Cymb 2 M 135 SmalGong Hi Hat 136 H H Cls 1 137 H H Cls 3 138 H H Cls 4 139 H H Opn 1 140 H HCNor 1 141 RK HHcls 142 H H Opn 3 143 Open HH 2 144 Open HH 3 145 Open HH 4 146 RK HHOpn 147...

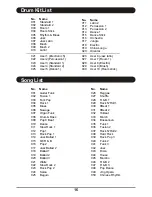
Page 16: ...1 036 Fusion 2 037 Rock N Roll 2 038 Hard Rock 039 Rock Pop 3 040 Funk 2 041 Funk 3 042 Jazz 043 Disco 044 House 045 Mambo 046 R B 2 047 R B 3 048 Pop Dance 049 Jing Opera 050 Chinese Rhythm No Name 0...

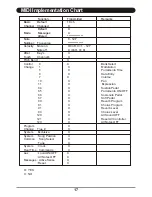
Page 17: ...Portamento Time 6 X Data Entry 7 X Volume 10 X Pan 11 X Expression 64 X Sustain Pedal 65 X Portamento ON OFF 66 X Sostenuto Pedal 67 X Soft Pedal 80 X Reverb Program 81 X Chorus Program 91 X Reverb L...

Reviews: