background image

EN

12

Caution

1.  Only replace with a side brush supplied by XCLEA, otherwise, it may lead to damage to the main unit.
2. To avoid scratching yourself, be careful when using a screwdriver to replace the side brush.
3. Install the left and right side brushes correctly onto their respective pins.

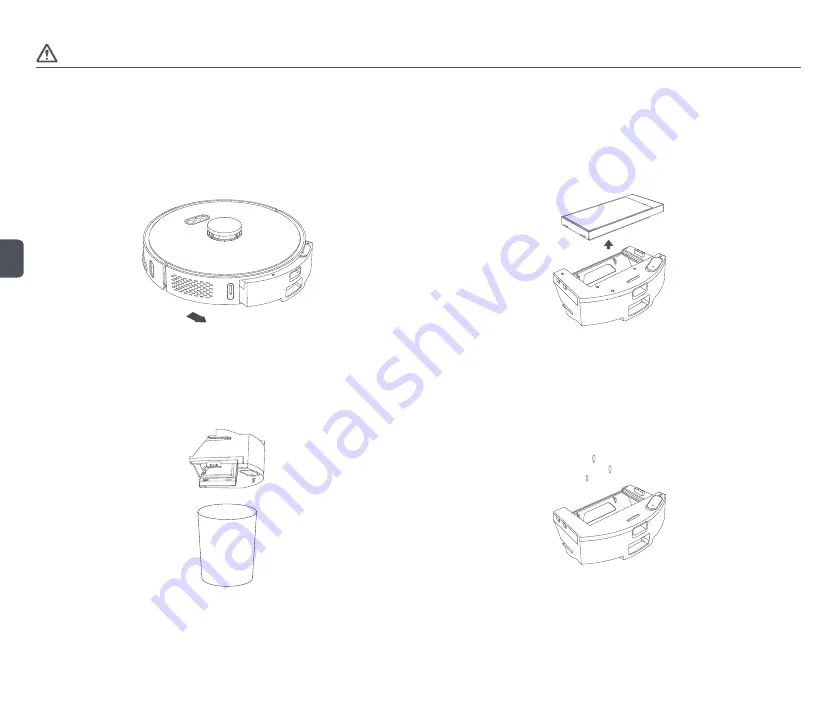
Disassembling and installing the dust box and filter

Step 1: Disassemble the dust box + water tank (2 in 1)
Press the dust box + water tank (2 in 1) release button to remove the dust box + water tank (2 in 1).

Step 2: Disassemble the filter
Press the filter release button on the right of the dust box + water tank (2 in 1) to remove the filter.

Step 3: Empty the dust box + water tank (2 in 1)
Align the dust box with the opening of a trash can and empty the dust. Use the cleaning brush to 
clean the dust box corners that are hard to reach.

Step 4: Clean the dust box + water tank (2 in 1)
Rinse the dust box + water tank (2 in 1) with clean water. Air-dry completely for at least 24 hours 
before reinstalling to prevent dust from clumping during the next use.

Summary of Contents for QYSDJ01

Page 1: ...Robot Vacuum and Mop Cleaner Operation Manual Read this operation manual carefully before using the product and store the manual safely Scan the QR code for manuals in multiple languages ...

Page 2: ...modes 9 Turning on off and operating the dust collector optional 10 Dust collector status indicator 10 Cleaning and maintenance 11 Disassembling and installing the main brush 11 Disassembling and installing the side brush 11 Disassembling and installing the dust box and filter 12 Disassembling and installing the mop 13 Cleaning the replacement parts 13 Clean the charging dock optional 14 Clean the...

Page 3: ... fire 10 In the event of an abnormal fault cut off the power immediately and stop using the product to avoid smoke fire or electric shock 11 When charging or using the product if the product s body becomes deformed or is unusually hot gives off a burning smell or emits abnormal noises while operating immediately cut off the power and unplug the plug Then place the product in an open area away from...

Page 4: ...uct body 6 Do not drop the product bump it against other objects or apply pressure to the product so as to avoid fire or electric shock due to product failure 7 Be sure to install the main brush and filter before use so as not to cause damage to the motor or product body 8 Check if the power cable is in good condition before charging the product 9 Before using the robot vacuum and mop cleaner for ...

Page 5: ...leaning Short press while operating to pause Reset button Short press to automatically restart Power button Short press to start a cleaning cycle The robot automatically docks after cleaning Press and hold to turn the robot on or off Short press while operating to pause Dock button Short press to dock Edge sensor x4 Charging plates Side brush x2 Driving wheel x2 Main brush Main brush cover release...

Page 6: ...ust collector optional Flip cover LED display Infrared lens Charging contact Dust inlet Air outlet Transparent cover of dust channel Charging port Charging dock optional Charging dock indicator Signal emission area Charging contact Charging port Cord storage slot ...

Page 7: ...dren keep it away from infants and young children 3 When the main unit is docked at the dust collector do not let children or pets approach it or collide with the main unit to avoid danger 4 In order to facilitate the smooth return of the main unit to the dust collector after cleaning it is recommended to start the appliance from the dust collector and that you do not move the dust collector durin...

Page 8: ...om infants and young children 3 When the main unit is docked on the charging dock do not let children or pets approach it or collide with the main unit to avoid danger 4 In order to facilitate the smooth return of the main unit to the charging dock after cleaning it is recommended to start the appliance from the charging dock and that you do not move the charging dock during the cleaning process I...

Page 9: ...d to reset 3 If you have any question please contact our service personnel or visit our official website This product only supports 2 4G WiFi Smart devices can be interconnected via HUAWEI HiLink app Devices which support HUAWEI HiLink app can be managed and controlled via Huawei SmartHome app Installing Huawei SmartHome app Scan the QR code or search for Huawei SmartHome in the app store to downl...

Page 10: ... press while operating to pause Power button Short press to start a cleaning cycle The robot automatically docks after cleaning Press and hold to turn the robot on or off Short press while operating to pause Dock button Short press to dock 4 Cleaning a localized area When the main unit is in Standby mode or paused press the Spot button to start cleaning a localized area The cleaning area is a 1 6 ...

Page 11: ...888 Main unit in place dust collector functions well Main unit absent dust collector functions well Collecting dust 012 001 Normal suction during dust collection Abnormal suction during dust collection 001 Dust bag full main unit in place Dust bag full main unit absent Dust bag not installed main unit in place 000 Dust bag not installed main unit absent 000 Communication is abnormal host is in pla...

Page 12: ...o replace the main brush every 3 6 months Caution 1 Turn off the product before replacing the main brush 2 The cleaning brush has a sharp blade which is used to cut away entangled objects that are difficult to clean Keep the cleaning brush away from children Disassembling and installing the side brush Step 1 Disassemble the side brush Turn the robot vacuum and mop cleaner over remove the screw wit...

Page 13: ...box water tank 2 in 1 release button to remove the dust box water tank 2 in 1 Step 2 Disassemble the filter Press the filter release button on the right of the dust box water tank 2 in 1 to remove the filter Step 3 Empty the dust box water tank 2 in 1 Align the dust box with the opening of a trash can and empty the dust Use the cleaning brush to clean the dust box corners that are hard to reach St...

Page 14: ...to remove and clean the mop to prevent dirty water flowing back 3 It is recommended to replace the mop every 3 6 months to ensure effective cleaning Cleaning the replacement parts Step 1 Clean the sensors Use a soft clean cloth to wipe and clean the charging plates on the back the laser distance sensor on the top the edge sensors the infrared docking sensors and the TOF wall tracking sensor Step 2...

Page 15: ...sensors and charging contacts Do not use a wet cloth to prevent water from entering the appliance and causing damage 2 To avoid scratching yourself be careful when using a screwdriver to replace the replacement parts Clean the dust collector optional Step 1 Replace the dust bag When the dust bag is full the dust full indicator on the LED display of the dust collector becomes constant on replace th...

Page 16: ...free of debris Fan filter bracket Caution 1 Use a dry cloth to clean Do not use a wet cloth to prevent water from entering the appliance and causing damage 2 To avoid scratching yourself be careful when using a screwdriver to replace the replacement parts Troubleshooting When an error occurs while the robot vacuum and mop cleaner is operating the Power button indicator flashes quickly and a voice ...

Page 17: ... low please charge Battery is low charge it before use Error 9 Cannot charge Check if the main unit is correctly connected to the dust collector Use a dry clean cloth to wipe the charging contacts on the dust collector and the charging plates on the main unit Error 10 Battery pack temperature is too high or too low try it again later If battery temperature is too high or too low use the appliance ...

Page 18: ...i signal is poor place the main unit within the coverage of WiFi signal If WiFi connection is abnormal reset WiFi download the latest mobile client and try again If the APP does not support the current device model follow the prompts to check the models supported Cannot connect to WiFi suddenly If the router settings are incorrect contact the customer service Scheduled cleaning does not start Insu...

Page 19: ...ing dock Product model QYHCZ01 Rated operating voltage 24 V Rated power 30 W Rated input 24 V 1 2 A Rated output 24 V 1 2 A Net weight ca 0 4 kg Dimensions 145 x 140 x 99 mm Product name Power adapter Power adapter Rated input 100 240V 50 60 Hz 0 9 A 100 240V 50 60 Hz max 1 0 A Rated output 24 V 1 2 A 28 8 W 24 V 1 2 A 28 8 W Product model System requirements Android 5 0 or later iOS 10 0 or later...

Page 20: ...struction manual Cosmetic damage including scratches dents or any other element Damage caused by any intervention carried out by an unauthorised person Defects caused by normal wear and tear or due to normal ageing of the product Software updates due to a change in network settings Product failures due to the use of third party software to modify change or adapt the existing software Product failu...

Page 21: ...275 2008 2008 12 17 Amended by EC 278 2009 2009 04 06 EC 642 2009 2009 07 22 EU 617 2013 2013 06 26 EU 801 2013 2013 08 22 EN 55014 1 2017 EN 55014 2 2015 EN IEC 61000 3 2 2019 EN 61000 3 3 2013 A1 2019 Robot vacuum and mop cleaner EN 60335 1 2012 A2 2019 EN 60335 2 2 2010 A1 2013 EN 62233 2008 EC 1275 2008 2008 12 17 Amended by EC 278 2009 2009 04 06 EC 642 2009 2009 07 22 EU 617 2013 2013 06 26 ...

Reviews: