


2 of 3
APPLICATION WIRING
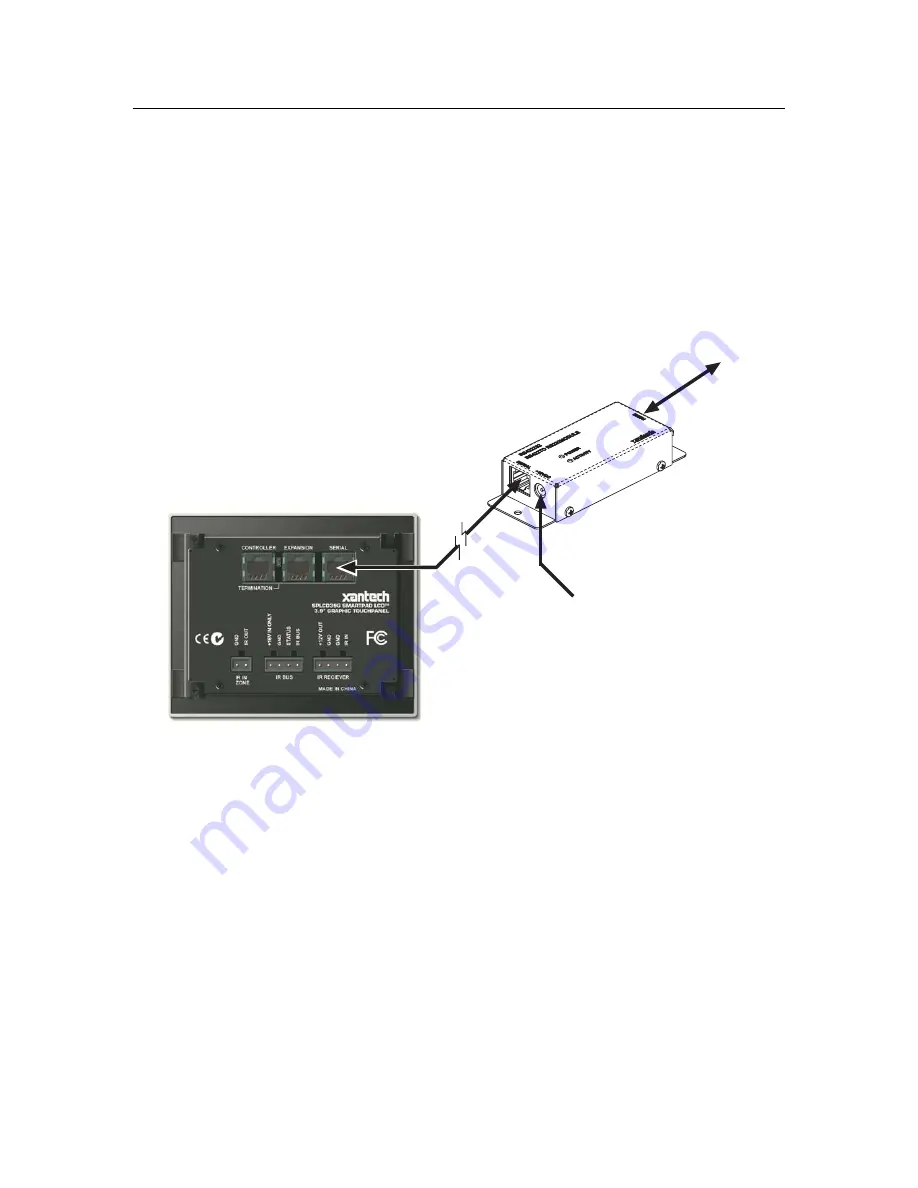
Application #1: Use with SmartPad LCD™ Touch Screen Panel
Note
1
:
This RJ45 Terminated CAT5 cable needs to be wired in a
pin-to-pin
configuration.
Note
2
:
The RS422232 may be placed at a maximum distance of 4000ft. from the SmartPad
LCD™ Display.
Note
3
:
Some Serial devices require the use of a ‘Null Modem’ cable or connector for proper
communication. You will need to consult the products instruction manual to see if this is
required. Refer to
Table 1A
for Xantech Model RS422232 Pin Out information.
See
Figure 2
for reference.
Xantech Model RS422232
RS4
22 to
RS
232
Co
nve
rtor
CAT5 Wire
Up to 4000
(Terminate in RJ45)
Requires 12VDC Power Supply
(Xantech Model 781RG)
DB9 IO for local Control of RS232
Devices (i.e. Projector, Lighting
Control Systems, PC Control etc.)
Figure 2: RS422232 Wiring to SmartPad LCD™
1. Connect one end of an RJ45 terminated CAT5 cable to the connector labeled SERIAL on
the rear of the SmartPad LCD™ Display.
2. Connect the other end of this CAT5 cable to the connector labeled SERIAL on the
RS422232 converter located at the remote location within close proximity (less than 50ft
for bi-directional communication) to the Serial device to be controlled.
3. Connect a Female DB9 terminated serial cable to the RS422232 connector labeled
RS232.
4. Connect the other end of this cable to the Serial device being communicated to. (See
Note
3
above)
5. Connect the included 781RG 12VDC power supply to the 2.1mm Coaxial Power jack on
the RS422232 Converter.
Application #2: Use as a standalone device to increase standard Serial communication
distance between two (2) Serial RS232 Devices.
Note
4
:
This will require the use of two (2) RS422232 Units. One placed at one Serial Device
location and another placed at the other Serial Device location.


