background image

17

GB

•   If you have doubts on the function or questions, please 

contact your local dealer or our service center.

8.  Getting started

The MAINS plug is used as the disconnect device, the  
disconnect device shall remain readily operable

Mounting

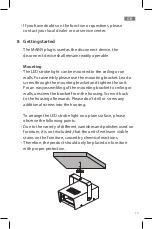
The LED strobe light can be mounted to the ceiling or on 
walls. For assembly please use the mounting bracket. Lead a 
screw through the mounting bracket and tighten the unit.
For an easy assembling of the mounting bracket to ceiling or 
walls, unscrew the bracket from the housing. Screw it back 
to the housing afterwards. Please don’t drill or screw any 
additional screws into the housing. 

To arrange the LED strobe light on a plain surface, please 
observe the following points: 

•   Due to the variety of different varnishes and polishes used on 

furniture, it is not excluded, that the units feet leave visible 
stains on the furniture, caused by chemical reactions. 

•   Therefore, the product should only be placed on furniture 

with proper protection.

Summary of Contents for 701111

Page 1: ...DE GB BEDIENUNGSANLEITUNG USER MANUAL Stroboskop Strobe Light Art Nr 701111...

Page 2: ...2 Stroboskop...

Page 3: ...6 7 Sicherheitshinweise 6 8 Anschluss und Inbetriebnahme 8 9 Reinigung und Pflege 10 10 Entsorgung 10 11 Technische Daten 11 1 Information on this user manual 13 Contents 2 Checking the contents 13 3...

Page 4: ...cken Sie den Lieferumfang aus und berpr fen Sie ihn auf Vollst ndigkeit und Unversehrtheit Wenn Sie einen Mangel feststellen wenden Sie sich umgehend an Ihren Fachhandler Heben Sie die Verpackung und...

Page 5: ...ne Haftung f r einen entstandenen Schaden bernommen und es erlischt der Garantieanspruch Haftung wird f r Folgesch den nicht bernommen Der Inhalt kann von dieser Bedienungsanleitung abweichen Beachten...

Page 6: ...es sondern auch dem Schutz Ihrer Gesundheit Sie finden auch spezifische Hinweise in den folgenden Kapiteln dieser Beschreibung Lesen Sie bitte alle Punkte aufmerksam durch Lesen Sie bitte alle Punkte...

Page 7: ...achten Sie dass das Kabel nicht geknickt gequetscht oder durch scharfe Kanten besch digt wird Sollte das Ger t oder das Netzkabel Besch digungen auf weisen benutzen Sie das Ger t nicht Trennen Sie es...

Page 8: ...t werden Sollten w hrend des Betriebs Symptome wie Schwindelgef hl Sehst rungen Augen oder Muskelzucken Bewusstseinsverlust Desorien tiertheit oder jegliche Art von unfreiwilligen Bewegungen bzw Kr mp...

Page 9: ...en beachten Sie bitte die folgenden Punkte Angesichts der Vielfalt der verwendeten Lacke und Polituren bei M beln ist es nicht auszuschlie en dass die Ger tef e hervorgerufen durch eine chemische Reak...

Page 10: ...s Sp lmittel verwendet werden Achten Sie darauf dass keine Fl ssigkeit ins Geh useinnere gelangt Verwenden Sie zum Reinigen keine starken L sungsmittel wie Alkohol Benzin oder Verd nner da diese das G...

Page 11: ...indigkeitsregler Netzkabel Montageb gel Geh use Scheibe Blitzr hre Montageloch 11 Technische Daten Blitzr hre 5 W L nge 63 mm 3 6 mm Geschwindigkeitsregler Betriebsspannung 220 240 V AC 50 Hz Abm 125...

Page 12: ...12 Handle Speed Knob Power cable Main Unit Transparent Film Hanging Hole Flash tube Strobe Light...

Page 13: ...compo nents are there and intact If any components are missing or damaged please contact a specialist or your local dealer immediately Keep the packing and user manual in a safe place for future trans...

Page 14: ...differ from the product If so please consult additional manuals in the packing Keep this user manual in a safe place If you give this product away to a third party make sure that you also pass on the...

Page 15: ...a toy and should not be handled by infants and small children Children cannot assess the dangers connected with electrical devices Do not leave the packaging material lying around Children might play...

Page 16: ...imate If the product is brought in from the cold to a warm area e g during transport condensation can occur within the unit Let the device reach room temperature before you use it Only use the power s...

Page 17: ...ket and tighten the unit For an easy assembling of the mounting bracket to ceiling or walls unscrew the bracket from the housing Screw it back to the housing afterwards Please don t drill or screw any...

Page 18: ...se any abrasive or harsh cleaning agents e g alcohol petrol or thinners as these could damage the controls casing or any markings and labels found on the device 10 Disposal Electrical and electronic d...

Page 19: ...19...

Page 20: ...20 8 2013...

Reviews: