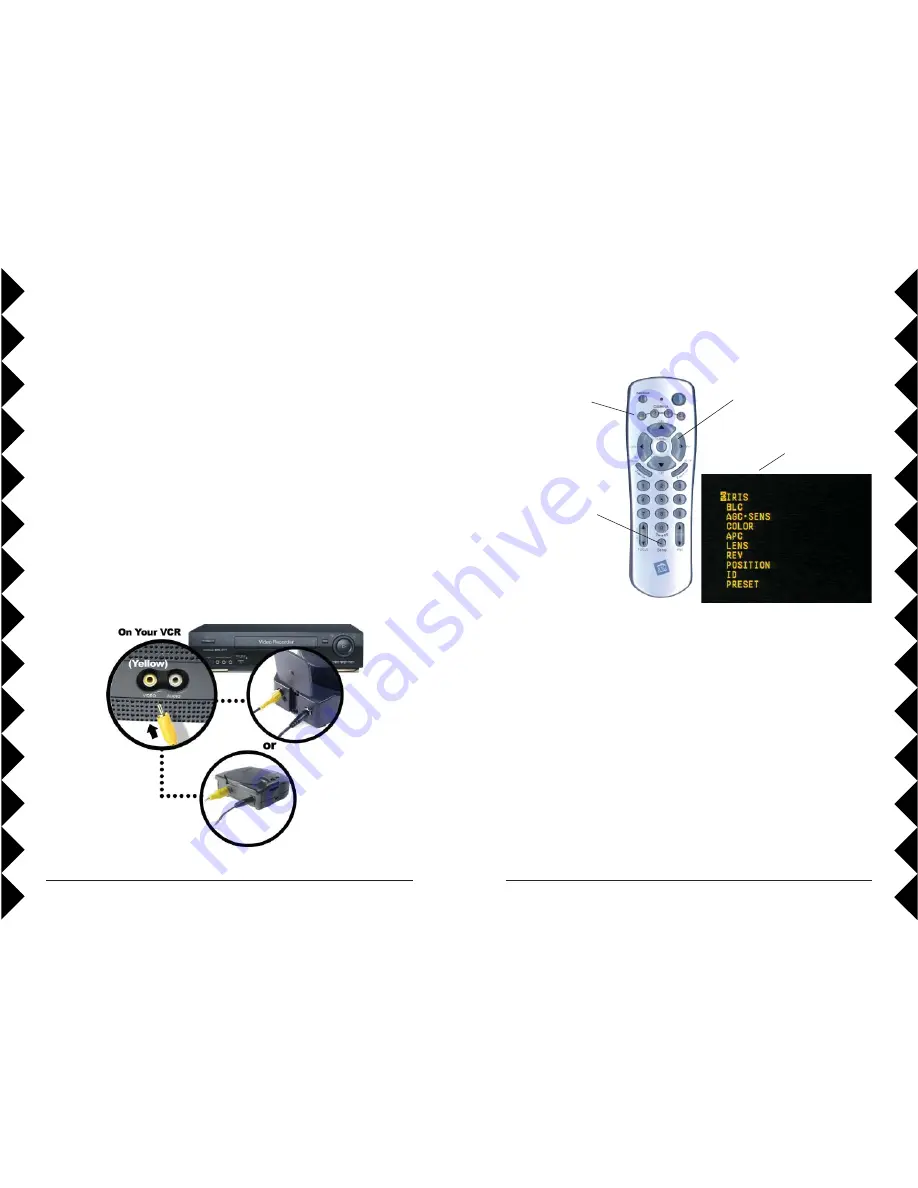
X10 SentinelPro  CR15A Owner'S Manual Download Page 14

26

27

1.

  Press C1, C2, 

C3, or C4 
to select the 
camera you 
want to control. 

3.

  Press the Right 

arrow button 
to bring up the 
onscreen menu.

2.

  Press and hold 

Setup until the 
camera button 
light stays on. 
Press and hold 
setup again until 
the camera button 
stays on again.

A

DVANCED

 O

NSCREEN

 M

ENU

 O

PTIONS


Advanced Setup Options

Recording with a VCR

Whether you have set up your camera to use the wireless receiver or the 
secure video connection, you can confi gure your SentinelPro Camera so 
that you can record its video signal on your VCR. It’s easy:

1.  Make sure your VCR is connected to play back on your TV.

2.  Set up your camera according to the instructions on pages 4 thru 11 (for 

wireless transmission) or pages 13 and 14 (for secure connection).

3.  Connect the video cable from the camera or video receiver into the 

Video In jack on your VCR.

With the camera connected to the VCR, you will be able record surveillance 
video while watching on your TV. Check your VCR owner’s manual if you 
aren’t sure how to select the 

SentinelPro

 Camera as the video source.

The onscreen menu is displayed over the picture from the camera. 

1. Use the Up and Down arrow buttons to select items from the main menu.
2. Use the Right arrow button to select a menu item and move into its 

submenu. 

3. Use the Up or Down arrow buttons to select a submenu item.
4. Use the Right arrow button to select a submenu item.
5. Use the Right arrow button to save the new setting.
6. To exit the onscreen menus, press the Left arrow button repeatedly until 

the menu disappears. Then press Setup to exit the menu mode.

To discard all changes made in the onscreen menus and restore the default 
settings to the camera, select the PRESET submenu, and change the 
PRESET option to ON. See page 37 for more details.

If you leave the onscreen menu open for a while without pressing any 
buttons on the remote, you will stop being able to control the menu. Follow 
the steps 1 through 3 above to enter the menu mode again. You can then 
close the menu by pressing the Left arrow button, or continue working with 
menu options.

The onscreen menus change the low-level, technical operation of the 
SentinelPro camera. In most cases you do not need to change any of these 
settings.

Summary of Contents for SentinelPro CR15A

Page 1: ...NER S MANUAL Please keep for future reference MODEL VK84A INCLUDES SENTINELPRO PAN TILT ZOOM CAMERA XC35A AND DOME WITH REMOTE CONTROL CR15A SENTINELPRO OUTDOOR PROFESSIONAL PAN TILT ZOOM CAMERA SYSTE...

Page 2: ...Pro Pan Tilt Zoom Camera has superior image quality a high powered zoom and pan and tilt motion You can operate the camera through walls using the supplied remote control It comes with a weather resis...

Page 3: ...s power supply the camera remote the camera mounting bracket a weather resistant dome and the screws to install the bracket A wireless video receiver and it s video cable and power supply shown above...

Page 4: ...Plug its power supply into a standard wall outlet and the other end into the video receiver Basic Camera Setup Insert batteries into the remote Remove the battery cover and put four 4 AAA batteries in...

Page 5: ...re the power switch on the video receiver is set to ON Basic Camera Setup Connect the video receiver to your TV Connect the video cable into the video out jack on the video receiver and into the video...

Page 6: ...e picture on your TV Basic Camera Setup Fine tune the antennas Turn on your TV Turn on your TV and select its video input Use the Video or Select buttons on your TV remote control or try channel 0 and...

Page 7: ...Plug the other end into the camera Remove the protective cover from the camera s lens Select Transmit Disable BASIC CAMERA OPERATION Once you have the camera set up you re ready to start using it It s...

Page 8: ...positions in the camera press the desired number button on the remote to move to that position If you press Sweep the camera will automatically switch through all the positions you ve stored Press an...

Page 9: ...t amount of light for your subject If you want to brighten the picture press the Iris Up button to open the iris wider and let more light in To limit the amount of light in the picture press Iris Down...

Page 10: ...the outside of the base 4 Attach the camera to the base of the dome using the brass screw on the outside of the dome s base 5 Plug the power and video cables into the camera Mounting the Camera cont M...

Page 11: ...brass screw on the outside of the dome s base 5 Plug the power and video cables into the camera 7 Pass the cables through the hole in the mounting bracket and attach the bracket to a wall Mounting the...

Page 12: ...irror image Up and Down arrows flip the image from top to bottom Picture Orientation Vertical Orientation If you choose not to mount the camera upside down Here s how to flip the picture vertically in...

Page 13: ...Units 5 8 press C3 for Units 9 12 or press C4 for Units 13 16 Once you have changed the group Unit Codes on the remote control you have to reprogram the cameras Follow the Multiple Camera Setup instr...

Page 14: ...t the SentinelPro Camera as the video source The onscreen menu is displayed over the picture from the camera 1 Use the Up and Down arrow buttons to select items from the main menu 2 Use the Right arro...

Page 15: ...in lighting conditions Your options are PEAK This setting controls the reaction of the automatic iris adjustment in relation to the average light level in the picture A higher level of peak sets the...

Page 16: ...AGC affect the brightness and picture levels of the video produced by the camera AGC amplifies existing video to help the camera reproduce a video signal at low light levels Sensitivity controls adjus...

Page 17: ...low the camera to focus on objects any distance away or a short focal length NEAR if you are using the camera only to view objects relatively close In Manual mode the camera will set focus automatical...

Page 18: ...uces Or you can do both H REV Reverses the picture horizontally or from left to right Set this to ON if you want to use the camera like a mirror for viewing objects behind you V REV When set to ON thi...

Page 19: ...the Up and Down arrows to select the desired position on the screen up top or down bottom Then use the Up and Down arrows to select characters from the screen above selecting each character with the...

Page 20: ...and turned on Press C1 on the remote to turn it on 4 Check that the mode switch on the bottom of the camera is set to Transmit Enable Bottom of camera 5 Follow the setup instructions again pages 4 th...

Page 21: ...devices can distort the Camera s picture If you are experiencing interference between X10 Cameras and some other equipment that uses 900 MHz check the other device s owner s manual for the frequencie...

Page 22: ...X10 Why enter a dark room when there is a simple and affordable solution that can keep you safe and secure From a simple remote control that can turn on a lamp to a full blown automation system X10 p...

Page 23: ...o correct the interference by one or more of the following measures Reorient the antenna of the radio TV experiencing the interference Relocate the equipment with respect to the radio TV Move the equi...

Reviews: