X10 SENTINEL VK79A Owner'S Manual Download Page 12

23

22

M

ULTI

-C

AMERA

 S

YSTEMS

The Sentinel Camera System is designed so that you can use up to four
cameras together. Follow the steps in this section to set up and use your
additional cameras.

Setting Up Multiple Cameras

Each camera comes pre-programmed as camera 1 (C1). The first camera
you set up will stay C1. Program the additional cameras as C2, C3, and C4:
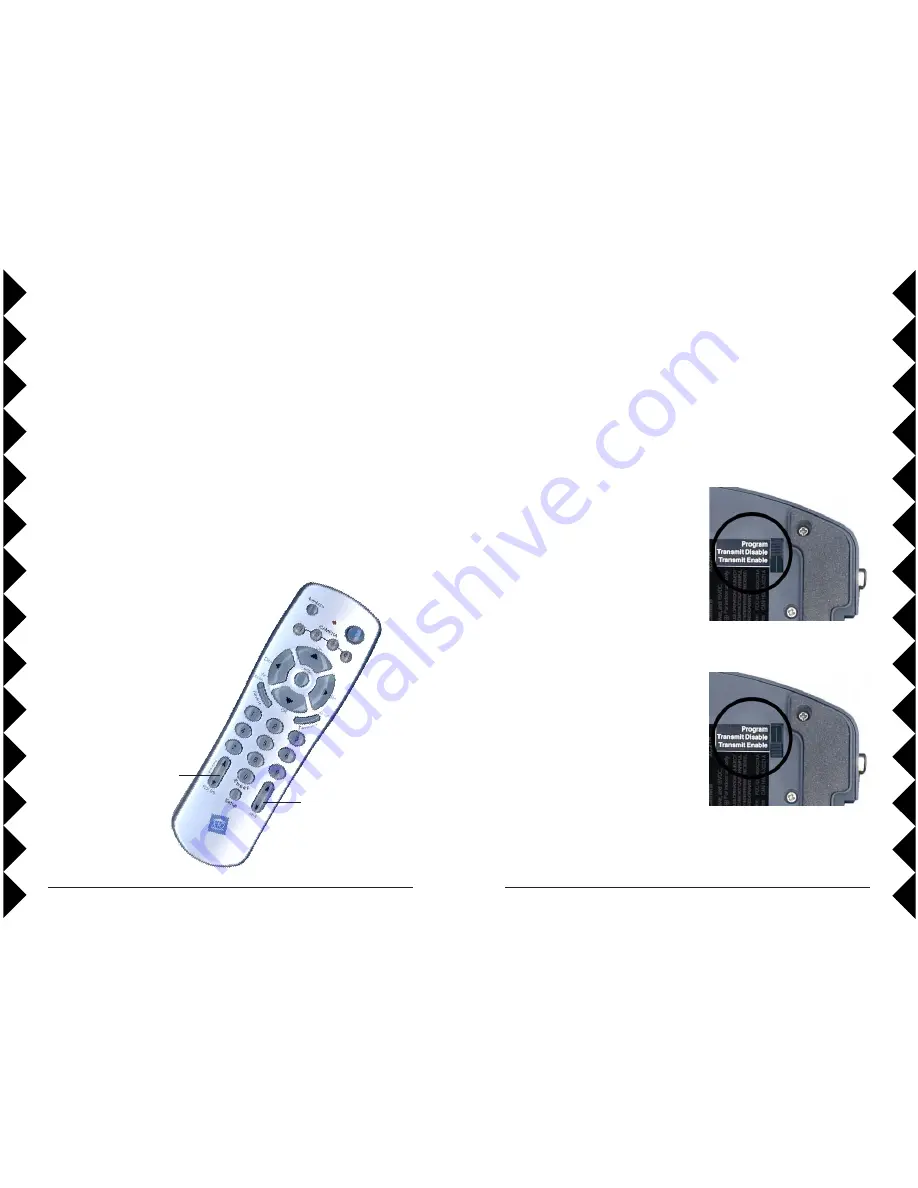
Bottom of
camera

1. Pick the camera to use as C2.

Follow the instructions at the
beginning of the manual to set it up.

2. Set the mode switch on the bottom

of that camera to 

Program

.

3. Press C2 on your remote control to

set this camera to C2.

4. Set the mode switch back to

Transmit Enable.

Repeat these steps for the rest of the cameras, using C3 for the third camera
and C4 for the fourth camera.

Up and Down arrows flip
the camera image from
left to right (mirror
image).

Up and Down arrows
flip the image from
top to bottom.

Picture Orientation

Vertical Orientation:

 If you choose not to mount the camera upside down.

Here’s how to flip the picture 

vertically 

in the camera so that the display on

the TV is the right way up:

1. Press and release C1.

2. Press and hold Setup on the remote until the C1 button lights green.

3. Press Iris Up to flip the picture. Press Iris Down to flip it back.

4. Press Setup again to save this setting.

Horizontal Orientation:

 You can also use the camera like a rearview

mirror by reversing the picture 

horizontally 

from left to right:

1. Press and release C1.

2. Press and hold Setup on the remote until the C1 button lights green.

3. Press Focus Up to reverse the picture.

Press Focus Down to reverse it back.

4. Press Setup again to save this setting.

Additional Setup Options

Note, if you flip the picture vertically,
you also need to flip it horizontally.
This also makes the left and right
movement buttons work the correct
way for upside down mounting.

Summary of Contents for SENTINEL VK79A

Page 1: ...OWNER S MANUAL Please keep for future reference MODEL VK79A INCLUDES SENTINEL PAN TILT ZOOM CAMERA XC24A AND DOME WITH REMOTE CONTROL CR15A SENTINEL OUTDOOR PROFESSIONAL PAN TILT ZOOM CAMERA SYSTEM...

Page 2: ...lt Zoom Camera has superior image quality a high powered zoom and pan and tilt motion You can operate the camera through walls using the supplied remote control It comes with a weather resistant dome...

Page 3: ...power supply the camera remote the camera mounting bracket a weather resistant dome and the screws to install the bracket A wireless video receiver and it s video cable and power supply shown above bu...

Page 4: ...Plug its power supply into a standard wall outlet and the other end into the video receiver Basic Camera Setup Insert batteries into the remote Remove the battery cover and put four 4 AAA batteries in...

Page 5: ...re the power switch on the video receiver is set to ON Basic Camera Setup Connect the video receiver to your TV Connect the video cable into the video out jack on the video receiver and into the video...

Page 6: ...e picture on your TV Basic Camera Setup Fine tune the antennas Turn on your TV Turn on your TV and select its video input Use the Video or Select buttons on your TV remote control or try channel 0 and...

Page 7: ...Plug the other end into the camera Remove the protective cover from the camera s lens Select Transmit Disable BASIC CAMERA OPERATION Once you have the camera set up you re ready to start using it It s...

Page 8: ...sitions in the camera press the desired number button on the remote to move to that position If you press Sweep the camera will automatically switch through all the positions you ve stored Press any o...

Page 9: ...ht amount of light for your subject If you want to brighten the picture press the Iris Up button to open the iris wider and let more light in To limit the amount of light in the picture press Iris Dow...

Page 10: ...the outside of the base 4 Attach the camera to the base of the dome using the brass screw on the outside of the dome s base 7 Attach the base of the dome to a ceiling by inserting three screws into th...

Page 11: ...brass screw on the outside of the dome s base 8 Attach the base of the dome to the mounting bracket Then tightly fasten the dome assembly to the bracket by fixing the brass screw inside the dome 7 Pas...

Page 12: ...rror image Up and Down arrows flip the image from top to bottom Picture Orientation Vertical Orientation If you choose not to mount the camera upside down Here s how to flip the picture vertically in...

Page 13: ...5 8 press C3 for Units 9 12 or press C4 for Units 13 16 Once you have changed the group Unit Codes on the remote control you have to reprogram the cameras Follow the Multiple Camera Setup instruction...

Page 14: ...mera you want to control 3 Press the Right arrow button to bring up the onscreen menu 2 Press and hold Setup until the camera button light stays on Press and hold setup again until the camera button s...

Page 15: ...n lighting conditions Your options are PEAK This setting controls the reaction of the automatic iris adjustment in relation to the average light level in the picture A higher level of peak sets the ca...

Page 16: ...the video produced by the camera Set this to higher levels to correct for low levels of blue in your picture or vice versa Advanced Onscreen Menu Options Advanced Onscreen Menu Options Freeze Automat...

Page 17: ...ow the camera to focus on objects any distance away or a short focal length NEAR if you are using the camera only to view objects relatively close In Manual mode the camera will set focus automaticall...

Page 18: ...s Or you can do both H REV Reverses the picture horizontally or from left to right Set this to ON if you want to use the camera like a mirror for viewing objects behind you V REV When set to ON this s...

Page 19: ...e the Up and Down arrows to select the desired position on the screen up top or down bottom Then use the Up and Down arrows to select characters from the screen above selecting each character with the...

Page 20: ...on the bottom of the camera is set to Transmit Enable Bottom of camera 5 Follow the setup instructions again pages 4 through 11 and check that you have done each step correctly 6 Make sure that the AB...

Page 21: ...ep 0 and Setup again This will turn off the label Repeat these same steps to turn the label on again For more help with setup please visit http www x10 com support Troubleshooting Troubleshooting If t...

Page 22: ...dable solution that can keep you safe and secure From a simple remote control that can turn on a lamp to a full blown automation system X10 provides you with all the products you need CAMERA C2 C3 C1...

Page 23: ...correct the interference by one or more of the following measures Reorient the antenna of the radio TV experiencing the interference Relocate the equipment with respect to the radio TV Move the equip...

Reviews: