


35
34
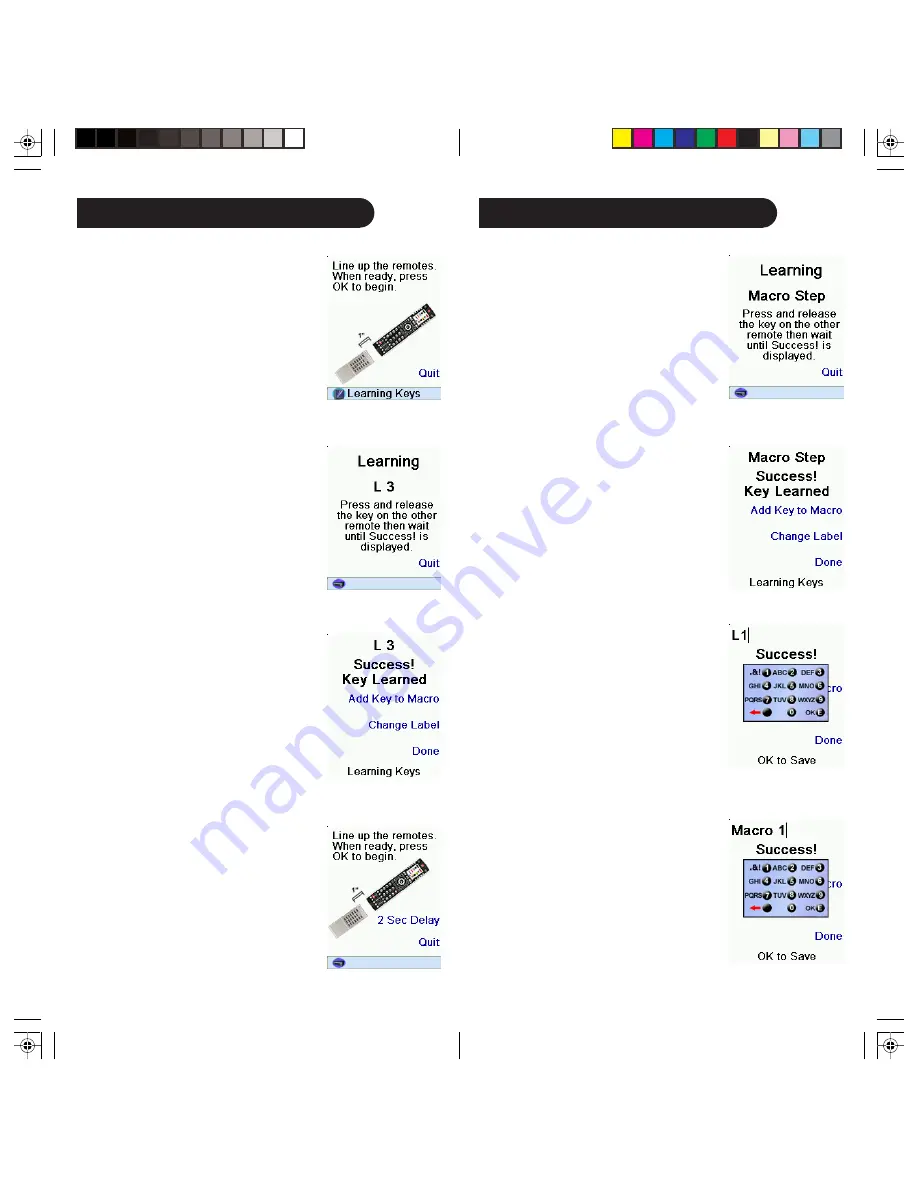
Learning Macros, cont.
Point your existing remote at the bottom
of the IR32A IconRemote, and press OK
when you’re ready. Then press your next
key.
After adding more keys, you can keep
the label for the key (in this example L1)
or select Change Label by pressing Side
Key K9.
If you select Change Label, you can
change the name to anything you want.
For example you could call it My Macro
or Macro 1.
After you select Change Label, you see
the screen below to the right.
You enter the new name for the key using
the numeric keys in a similar fashion to
typing in text on a cell phone. E.g., in
this example we pressed the 6 key on the
remote to enter the letter “M.” Press the
2 key repeatedly until the letter “a” is
displayed. Wait a second and repeatedly
press 2 to select “c.” Then, wait a second
and repeatedly press the number 7 key
until “r” is selected. Then the 6 key to
select “o.” Then the 0 (zero) key twice to
select a space, and then 1 to select 1.
Macro 1 is then displayed.
Press Done to save the new label for the
Macro you learned and stored under the
L1 key.
The next time you select the Mode that
the Macro was learned in (DVR in this
case), you’ll see that you can press the
Side Key next to “Macro 1” to activate
the Macro.
Line up the remotes and press OK when
you’re ready.
Learning Macros, cont.
Press Side Key K8 next to “Add Key to
Macro” to add more keys.
You can set a delay (1-10 sec) after which
the command stored in the Macro will be
sent. (Repeatedly press Side Key K9 next
to Set Delay, or enter the delay directly
with the numeric keys, 0-9).
In this case we set a 2-second delay.
Next press the key (on the other remote)
for the function you want to learn. Hold
the key pressed until the screen says that
the command was successfully learned.
Note: For some types of keys you might
need to hold the key pressed, but for
other types a quick press is sufficient.
Experiment a bit. If keys you learn are
sent multiple times try learning them with
just a quick press.
Summary of Contents for IconRemote IR32A
Page 1: ...Model IR32A IconRemote Owner s Manual ...
Page 28: ...55 54 Notes Notes ...


