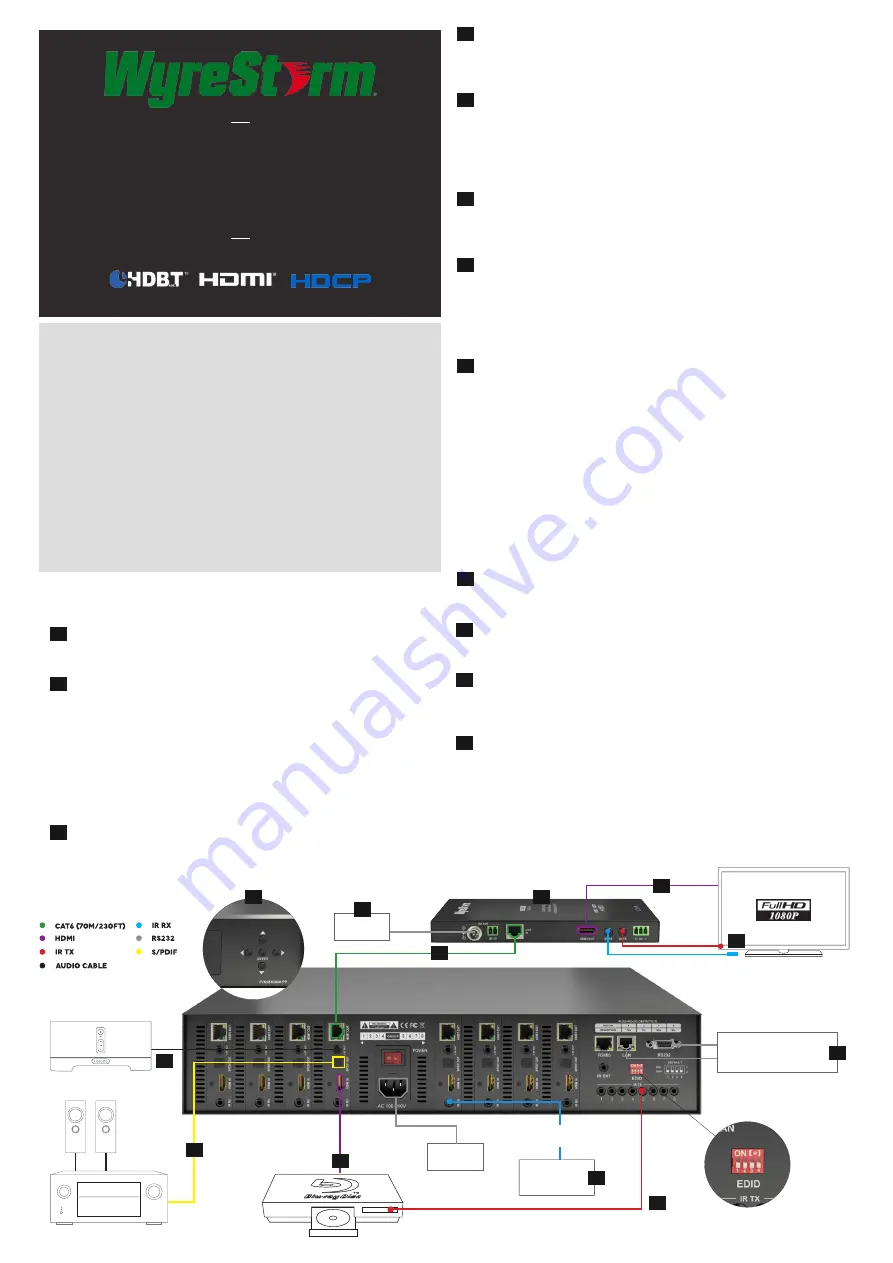
For connection to third party amplification, connect an optical cable
from the S/PDIF Out port of the transmission module to selected AV
receiver or power amplifier
Connect HDMI display devices to the HDMI OUT ports of display
receivers. Connect the matrix to a mains power supply using the
power cable included and power on the matrix.
Check the front panel LED display is lit to indicate the matrix is
powered.
Receivers are not powered remotely via PoH from the matrix so
mains power is required at display locations. Insert the 12v mains
power adaptors included.
Check POWER, STATUS & LINK lights are illuminated on the receiver
to indicate successful connection.
NOTE: STATUS and HDCP LEDs should blink, POWER and
LINK are static LEDs.
Basic I/O switching is via the matrix front panel. OUTPUTS are
selected by pressing the LEFT and RIGHT arrow buttons to scroll
forwards and backwards numerically through the displays connected
to the matrix. The corresponding OUTPUT channel number will blink
on the display when reached.
UP and DOWN arrow buttons scroll numerically through any INPUT
sources connected. When the desired OUTPUT and INPUT is
reached, push the ENTER button to confirm the selection. The
display will stop blinking to confirm matrix I/O has been set.
Basic Signal IR/RS232 Control
Connect IR emitters from the matrix IR TX ports to the IR receiving
areas of sources, firmly attaching emitter eyes onto sources.
For use with a control system, IR Link cables (sold separately) should
be connected from the matrix IR RX ports to the controller used.
For an RS232-based control system, RS232 cables should be used
from matrix to control system and between receivers and display
device.
At display locations, connect IR emitters from the display receiver
IR TX ports to the IR receiving areas of the display devices and IR
receivers from IR RX ports on/near the device with clear line of sight
to the handset used to control.
NOTE: Emitter eye position on device IR receiving areas may
need to be adjusted later to achieve best IR performance.
Quickstart Guide
WyreStorm 8x8 HDBaseT Matrix Switcher with S/PDIF
Optical and Stereo Audio Outputs and 2-Way IR
MX-0808-PP-AUD
Before Installation
Do Not Hotplug! - insert and extract cables carefully with the
power SWITCHED OFF. Connecting/disconnecting while the unit
is powered can result in damage to circuitry.
We recommend using the supplied mounting brackets to secure
the matrix and display receivers as sudden movement of these
devices could lead to loss of picture or sound if connections
become loose or strained, resulting in unnecessary service call
backs
Remember, always switch off the matrix before unplugging any
inputs or outputs – follow last on, first off protocol.
Basic Connection and Operation
Connect HDMI sources to HDMI Inputs 1-8 of the matrix using HDMI
cable from quality brand such as WyreStorm Express.
Connect a good quality, well-terminated Cat6 cable of no more than
70m/230ft from matrix HDBT output ports 1-8 to UTP IN ports of
connected display receivers.
NOTE: Although WyreStorm products are tested with Cat5e,
we recommend Cat6 as standard due to increased bandwidth
and improved capacity for handling large transmissions along
a single cable.
If connecting to additional Audio Outputs, connect the a 3.5mm
cable from the L/R OUT port to your chosen device (such as multi-
room audio system)
1
2
3
4
5
6
7
8
9
10
11
12
ir rx
ir link cable
Power
Source Device
LAN / Serial based
Control System
See full manual
for details
on EDID
Management
and DIP settings.
Power
Control
System
9
Key
1
2
3
4
5
6
7
8
9
10
11
12


