APO-VX20-UC
Apollo Series Conference Video Bar & Switcher
Quickstart Guide
WyreStorm recommends reading through this document in its entirety to become familiar with the product’s features prior to starting the
installation process.
IMPORTANT! Installation
• Visit the product page to download the latest firmware, document version,
additional documentation, and configuration tools.
Copyright © 2022 WyreStorm Technologies ProAV Corporation
| Apollo
VX20
Quickstart Guide | 220727
INT: +44 (0) 1793 230 343 | US: 844.280.WYRE (9973)
1 of 3
In the Box
1x APO-VX20-UC Video Bar
1x 24V 5A Power Supply (UK/US/EU/AU)
1x 5m HDMI Cable
1x 5m USB-B 3.0 Host Cable
1x Wall Mount Kit
1x Bluetooth Remote
1x Magnetic Lens Cap
1x Quickstart Guide (This Document)
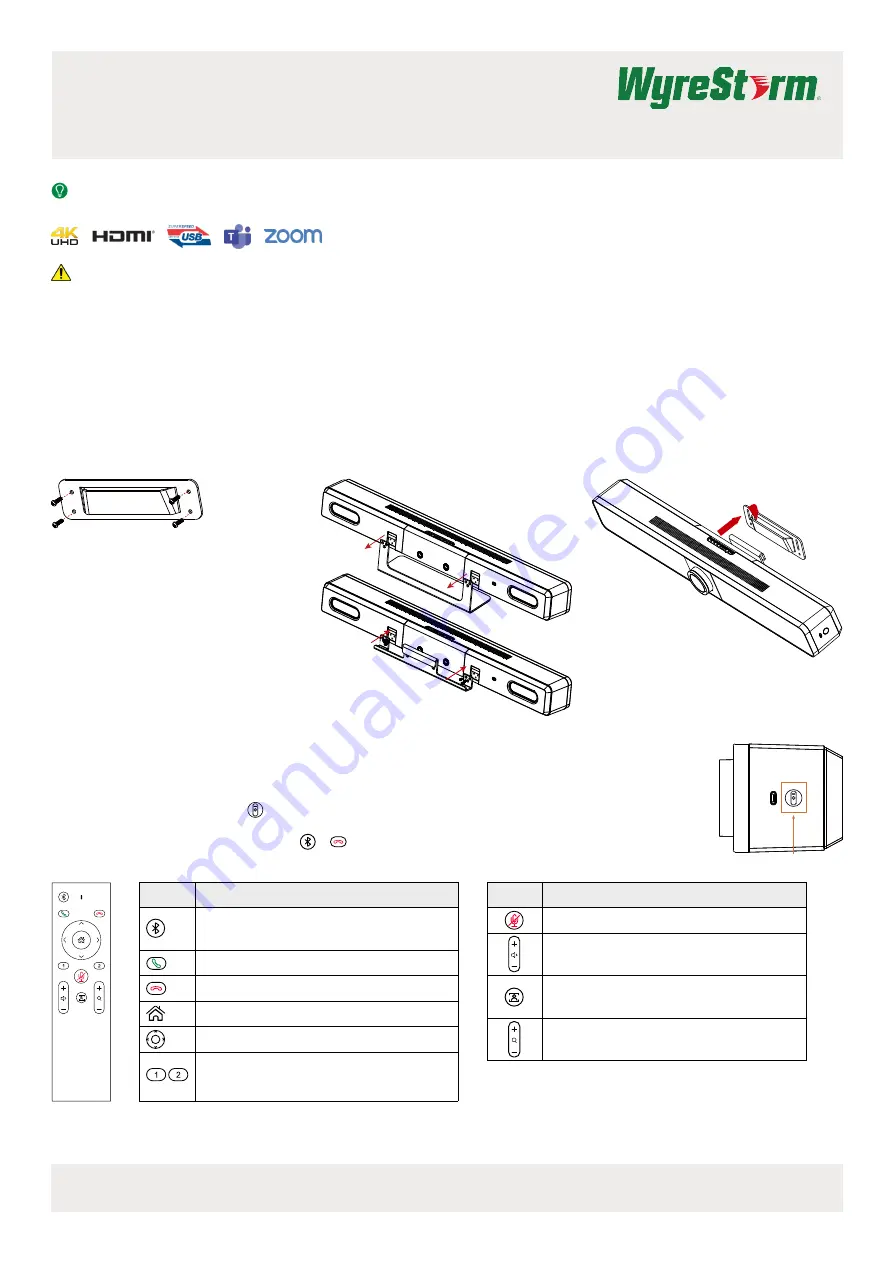
Wall Mounting Installation
1.
Attach Bracket A to the wall with the
provided screws, ensuring the mount is level.
3.
Insert the lip of Bracket B onto Bracket A
2.
Remove the table stand from the VX20 and
attach Bracket B to the device.
Wall Bracket A
Wall Bracket B
Wall Bracket B
Bluetooth Remote Pairing and Button Guide
The VX20 includes a Bluetooth remote. By default, the remote is already paired with the video bar. However, follow the below steps
if the remote should need to be re-paired or a replacement remote is acquired.
1.
Press and hold the pairing button
on the VX20’s right side for 2 second, the status LED will blink blue, which indicates
that the device enters Bluetooth pairing mode.
2.
On the Bluetooth remote, press and hold the
+
buttons until the red LED flashes. The remote will then automatically
pair to the video bar.
*Function only available when connected to a mobile device via Bluetooth.
**Function only available when Tracking mode is turned off.
Button
Description
Button to make the device pair with Apollo VX20. See
Bluetooth Remote Pairing
for more information.
Press to answer calls*
Press to disconnect calls.*
Press to revert back to the default camera view.**
Press to perform ePTZ functions.**
Press and hold for 3s to save current camera view to
preset 1 or 2. Single press to switch the camera view
to either preset.**
Button
Description
Press to toggle between mute and unmute.
Press to adjust the volume.
Press and hold to adjust the volume continuously.
Press to toggle between Auto Framing, Presenter/
Speaker Tracking or turn off advanced functions.
Press to adjust the zoom.
Press and hold to adjust the zoom continuously.
Summary of Contents for APOLLO APO-VX20-UC
Page 4: ......


