11
20V Cordless Brushless Rotary
Hammer
EN
anti vibration accessories are used.
And the tool is being used as intended by its design
and these instructions.
This tool may cause hand-arm vibration
syndrome if its use is not adequately
managed.
WARNING:
To be accurate, an estimation of
exposure level in the actual conditions of use
should also take account of all parts of the operating
cycle such as the times when the tool is switched off
and when it is running idle but not actually doing
the job. This may significantly reduce the exposure
level over the total working period.
Helping to minimise your vibration and noise
exposure risk.
Always use sharp chisels, drills and blades.
Maintain this tool in accordance with these
instructions and keep well lubricated (where
appropriate).
If the tool is to be used regularly then invest in anti
vibration and noise accessories.
Plan your work schedule to spread any high
vibration tool use across a number of days.
OPERATING INSTRUCTIONS
NOTE:
Before using the tool, read the
instruction book carefully.
SECURE WORKPIECE
A workpiece clamped with clamping devices is held
more secure than by hand.
INTENDED USE
The machine is intended for hammer drilling and
chiseling in concrete, brick and stone. It can be used
for chiseling in concrete and tile in different required
angle, without other tool. It is also suitable for drilling
without impact in wood, metal, ceramic and plastic.
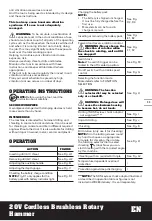
OPERATION
ACTION
FIGURE
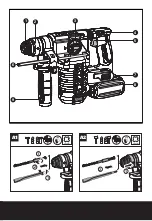
Inserting drill bit / chisel
See Fig. A1
Removing drill bit / chisel
See Fig. A2
Adjusting the auxiliary handle
See Fig. B
Adjusting the depth gauge
See Fig. C
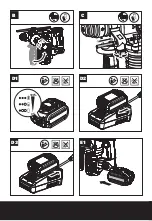
Checking the battery charge condition
NOTE:
Fig. D1 only applies for the
battery pack with battery indicator light.
See Fig. D1
Charging the battery pack
NOTE:
• The battery is shipped uncharged.
It must be fully charged before the
first use.
• More details can be found in
charger’s manual.
See Fig.
D2, D3
Inserting or removing the battery pack
See Fig.
E1, E2
Forward and reverse rotation control
WARNING: Never change the
direction of rotation when
the chuck is rotating, wait until it
has stopped!
See Fig.
F1, F2
Switch lock
Note:
The switch trigger can be
locked in the off (center) position.
See Fig. F3
On/off switch with variable speed
control
See Fig. G
Selecting the function mode
More details refer to FUNCTION
SELECTION
WARNING: The function
selector dial may be actuated
only at a standstill.
WARNING: Prolonged use will
cause the aluminum housing
to become hot, do not touch.
See Fig. H
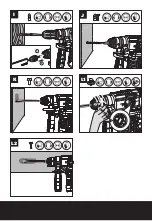
Drilling (SDS Keyless chuck adaptor
– not supplied)****
See Fig. I
Impact drilling
See Fig. J
Chiseling
See Fig. K
Bit rotation (only use it for chiseling)
NOTE:
Turn the locking sleeve round
by hand to choose an appropriate
bit angle for chiseling, then rotate
the function selector dial to select
chiseling symbol. Now you can
start chiseling with the required angle
by this machine.
See Fig. L1
Chiseling with an required bit angle
See Fig. L2
Temperature dependent overload
protection
/
Protection against deep discharging
/
****NOTE:
The SDS keyless chuck adaptor illustrated
or described in operation table or figures is not
included in WX380 delivery. It is sold separately.
Summary of Contents for WX380
Page 3: ...5 4 1 7 8 9 6 2 3 2 1 1 1 2 B A1 A2 C SDS plus SDS plus ...
Page 4: ...100 0 E1 B C D2 D1 D3 ...
Page 5: ...E2 F1 F3 G F2 2 1 H SDS plus ...
Page 6: ...L2 L1 I 1 2 1 2 K J ...
Page 133: ......
Page 134: ......
Page 135: ......
Page 136: ...Copyright 2020 Positec All Rights Reserved AR01503400 www worx com ...


