background image

14

Lithium-Ion Brushless drill driver

Lithium-Ion Brushless hammer drill

             EN

OPERATING THE ON/OFF SWITCH

WARNING:

 Do not operate for long periods at low speed 

because excess heat will be produced internally.

See Fig. G

LED LIGHT INDICATOR 

Before operation, the LED light will be activated when the On/Off switch is slightly depressed, and 
will automatically turn off 20 seconds after the On/Off switch is released.
The tool and battery are equipped with a protection system. When the LED Light is quickly flashing 
and turn off, the system will automatically cut off power to the tool to extend battery life. The tool 
will automatically stop during operation if the tool and/or battery are placed under one of the 
following conditions:
• 

Overloaded:

 The tool is operated in a manner that causes it to draw an abnormally high current. 

In this situation, release the Trigger Switch on the tool and stop the application that caused the tool 
to become overloaded. Then pull the Trigger Switch again to restart.
• 

Overheated: 

Under the condition above, if the tool does not start, the Tool and Battery are 

overheated. In this situation, let the Tool and Battery cool before pulling the Trigger Switch again.
• 

Low battery voltage: 

The remaining Battery capacity is too low and the tool will not operate. In 

this situation, remove and recharge the Battery.

WARNING: 

To turn on the light, press the On/Off switch and make sure the Forward/

Reverse Rotation Control is on right/left position.

PROBLEM SOLUTION

1. WHY DOES THE DRILL NOT TURN ON 

WHEN YOU PRESS THE SWITCH?

The Forward and Reverse Switch, which is 
on top of the trigger, is positioned in the lock 
function. Unlock the Forward and Reverse 
Switch putting it into the required rotation 
position. Push the trigger and the drill will 
start to rotate (See Fig. B).

2. THE DRILL STOPS BEFORE THE 

SCREW IS COMPLETELY TIGHTENED. 

WHY?

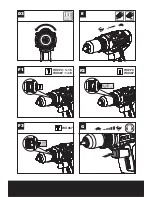
Verify the torque position of the Torque 
Adjustment Ring, you can find the Torque 
Adjustment Ring between the Chuck and 
the drill body. Position 1 is the lowest 
torque (screw driving force) and position 15 
(WX174)/position 18 (WX367) is the highest 
torque (screw driving force). Position 


is for 

drill operation. Position   is for hammer drill 
operation. Regulate the Torque Adjustment 
Ring to a higher position to reach the best 
result (See Fig. E).

3. I CAN NOT FIT THE BATTERY INTO 

THE BATTERY CHARGER. WHY?

The battery can be inserted into the charger 
only in one direction. Turn the battery around 
until it can be inserted into the slot, the red 
LED Light should turn on when the battery is 
charging.

4. REASONS FOR DIFFERENT BATTERY 

PACK WORKING TIMES

Charging time problems, as above, and 
having not used a Battery Pack for a 
prolonged time will reduce the Battery Pack 
working time. This can be corrected after 
several charge and discharge operations by 
charging & working with your drill. Heavy 
working conditions such as large screws 
into hard wood will use up the Battery Pack 
energy faster than lighter working conditions. 
Do not re-charge your Battery Pack below 
0

°

C and above 45

°

C as this will affect 

performance.

Summary of Contents for WX174

Page 1: ...SAFETY AND OPERATING MANUAL ORIGINAL INSTRUCTIONS Lithium Ion Brushless drill driver WX174 WX174 1 WX174 2 WX174 9 Lithium Ion Brushless hammer drill WX367 WX367 2 WX367 9 ...

Page 2: ......

Page 3: ...4 5 6 9 10 7 3 2 1 12 11 8 ...

Page 4: ...1 2 100 0 2 1 3 3 1 2 B2 B1 C2 C1 A4 A3 A2 A1 ...

Page 5: ...D2 E C2 C1 C3 C4 D1 D3 ...

Page 6: ...WX174 1 15 WX367 1 18 WX174 WX367 WX367 E F3 D3 F2 G F1 ...

Page 7: ...tch position 15 1 18 1 1 Max torque 40N m Chuck capacity 13mm Max drilling capacity Steel 13mm Wood 35mm Brickwork 16mm Concrete 13mm Machine weight 1 29kg 0 92kg 1 34kg 0 98kg Voltage measured without workload Initial battery voltage reaches maximum of 20 volts Nominal voltage is 18 volts 1 CHUCK 2 TORQUE ADJUSTMENT RING 3 TWO SPEED GEAR CONTROL 4 FORWARD REVERSE ROTATION CONTROL 5 SOFT GRIP HAND...

Page 8: ...ool is used and the materials being cut or drilled The tool being in good condition and well maintained The use the correct accessory for the tool and ensuring it is sharp and in good condition The tightness of the grip on the handles and if any anti vibration accessories are used And the tool is being used as intended by its design and these instructions This tool may cause hand arm vibration syn...

Page 9: ...anders away while operating a power tool Distractions can cause you to lose control 2 ELECTRICAL SAFETY a Power tool plugs must match the outlet Never modify the plug in any way Do not use any adapter plugs with earthed grounded power tools Unmodified plugs and matching outlets will reduce risk of electric shock b Avoid body contact with earthed or grounded surfaces such as pipes radiators ranges ...

Page 10: ...ttery pack from the power tool before making any adjustments changing accessories or storing power tools Such preventive safety measures reduce the risk of starting the power tool accidentally d Store idle power tools out of the reach of children and do not allow persons unfamiliar with the power tool or these instructions to operate the power tool Power tools are dangerous in the hands of untrain...

Page 11: ...not subject battery pack to mechanical shock e In the event of battery leaking do not allow the liquid to come into contact with the skin or eyes If contact has been made wash the affected area with copious amounts of water and seek medical advice f Seek medical advice immediately if a cell or battery pack has been swallowed g Keep battery pack clean and dry h Wipe the battery pack terminals with ...

Page 12: ...ries to your local collection or recycling point Waste electrical products must not be disposed of with household waste Please recycle where facili ties exist Check with your local authorities or retailer for recycling advice Hammer drilling Screwdriving Drilling Wood Metal Brick High speed Low speed xINR18 65 y Cylindrical lithium Ion battery cells with max diameter of 18mm and max height of 65mm...

Page 13: ...ndition See Fig A1 Removing the battery pack See Fig A2 Charging the battery See Fig A3 Installing the battery pack See Fig A4 ASSEMBLY CHUCK ADJUSTMENT WARNING Always lock off trigger switch and disconnect tool from power source when changing accessories Always ensure the bit is secure before starting the tool Damage to the Chuck or a loose bit may cause possible personal injury Removing the bits...

Page 14: ...n Control is on right left position PROBLEM SOLUTION 1 WHY DOES THE DRILL NOT TURN ON WHEN YOU PRESS THE SWITCH The Forward and Reverse Switch which is on top of the trigger is positioned in the lock function Unlock the Forward and Reverse Switch putting it into the required rotation position Push the trigger and the drill will start to rotate See Fig B 2 THE DRILL STOPS BEFORE THE SCREW IS COMPLE...

Page 15: ...e facilities exist Check with your local authorities or retailer for recycling advice DECLARATION OF CONFORMITY We Positec PowerTools Europe Ltd PO Box 6242 Newbury RG14 9LT UK Declare that the product Description Battery powered Drill Type WX174 WX174 1 WX174 2 WX174 9 1 designation of machinery representative of Cordless Drill WX367 WX367 2 WX367 9 3 designation of machinery representative of Ha...

Page 16: ...ht 2016 Positec All Rights Reserved AR01233201 www worx com Handle With Care Do Not Load or Transport Package If Damaged A Fire Hazard Could Exist For more information call 86 512 65152811 LITHIUM ION BATTERY ...

Reviews: