background image

9

8

9

8

3-in-1 Cordless Lawn Mower            

EN

SAFETY INSTRUCTIONS

warNiNG! 

Some dust created by 

power sanding, sawing, grinding, drilling 

and other construction activities contains 
chemicals known to the state of California 
to cause cancer, birth defects or other 
reproductive harm. Some examples of these 
chemicals are:
•   lead from lead-based paints,
•   Crystalline silica from bricks and cement 

and other masonry products, and

•   Arsenic and chromium from chemically-

treated lumber.

Your risk from these exposures varies, 
depending on how often you do this type 
of work. To reduce your exposure to these 
chemical:
•   Work in a well ventilated area,
•   Work with approved safety equipment, 

such as those dust masks that are specially 
designed to filter out microscopic particles.

READ ALL INSTRUCTIONS

warNiNG!

 When using electric lawn 

mowers, basic safety precautions should 

always be followed to reduce the risk of fire, 
electric shock, and personal injury, including 
the following:

warNiNG:

 Risk of injury could occur if 

the lawn mower is operated without the 

catcher assembly attached.

warNiNG: 

The use of any other 

accessory or attachment might increase 

the risk of injury

CaUTioN: 

For battery-operated lawn 

mowers, use only identical replacement 

batteries and specifying the battery type 
and manufacturer, and devices for retaining 
extension cords are available.

For aLL LawN MowErS

1)   Avoid Dangerous Environment - Don’t use 

lawn mowers in damp or wet locations.

2)  Don’t Use In Rain.
3)  Keep Children Away - All visitors should be 

kept a safe distance from work area.

4)  Dress Properly - Do not wear loose clothing 

or jewelry. They can be caught in moving 

parts. Use of rubber gloves and footwear is 
recommended when working outdoors.

5)  Use Safety Glasses - Always use face or 

dust mask if operation is dusty.

6)  Use Right Appliance - Do not use lawn 

mower for any job except that for which it 
is intended.

7)  Don’t Force Lawn Mower - It will do the job 

better and safer at the rate for which it was 
designed.

8)  Don’t Overreach - Keep proper footing and 

balance at all times.

9)  Stay Alert - Watch what you are doing. 

Use common sense. Do not operate lawn 
mower when you are tired.

10) Store Idle Lawn Mower Indoors - When not 

in use, lawn mower should be stored in 
an indoor dry and locked-up place - out of 
reach of children.

11) Maintain Lawn Mower With Care - Keep 

cutting edges sharp and clean for best and 
safest performance. Follow instructions 
for lubricating and changing accessories. 
Inspect lawn mower cord periodically and if 
damaged, have it repaired by an authorized 
service facility. Inspect extension cords 
periodically and replace if damaged. Keep 
handles dry, clean, and free from oil and 
grease.

12) Keep guards in place and in working order.
13) Keep blades sharp.
14) Keep hands and feet away from cutting 

area.

15) Objects struck by the lawn mower blade 

can cause severe injuries to persons. The 
lawn should always be carefully examined 
and cleared of all objects prior to each 
mowing.

16) If lawn mower strikes a foreign object, 

follow these steps:

  i)   Stop lawn mower. Release the switch.
  ii)  Inspect for damage.
  iii) Repair any damage before restarting 

and operating the lawn mower.

17) Use identical replacement blades only.

SUPPLEMENT Sa-BaTTEry-oPEraTED 

LawN MowErS

a)  Do not charge lawn mower in rain, or in 

wet locations.

Summary of Contents for WG787

Page 1: ...P07 P21 P36 3 in 1 Cordless Lawn Mower Tondeuse Gazon Sans Fil 3 En 1 Cortacesped De Bateria 3 En 1 WG787 hELPLiNE NUMBEr 1 866 354 worx 9679 hELPLiNE NUMBEr EN F ES...

Page 2: ......

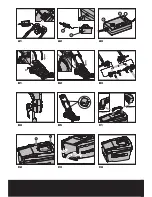
Page 3: ...2 3 4 5 6 7 9 10 11 18 8 1...

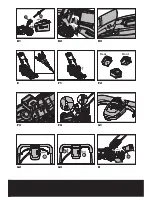
Page 4: ...12 10 17 a 16 Front Part Back Part I II III b b A1 A2 A3 B1 B2 B3 B4 B5 C1 C2 C3 C4...

Page 5: ...9 I I II Front Rear I II c 13 D1 D2 D3 E F1 F2 F3 F4 G1 G2 G3 H...

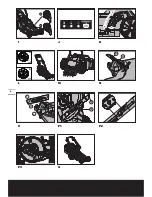
Page 6: ...6 a b N 1 N 2 N 3 O 1 O 2 O 3 1 2 15 14 I J K L M N O P1 P2 P3 Q...

Page 7: ...am lever 8 Lower handle 9 Safety flap 10 Battery pack 11 Motor cover 12 Charger See Fig A2 13 Mulch plug See Fig H 14 Blade bolt See Fig P1 15 Blade See Fig P1 16 CHARGED INDICATOR LIGHT GREEN See Fig...

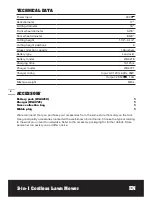
Page 8: ...12hrs Charger model WA3721 Charger rating Input AC 120V 60Hz 45W Output 29 5V 1 0A Machine weight 50lbs ACCESSORY Battery pack WA3218 1 Charger WA3721 1 Grass collection bag 1 Mulch plug 1 We recommen...

Page 9: ...Dress Properly Do not wear loose clothing or jewelry They can be caught in moving parts Use of rubber gloves and footwear is recommended when working outdoors 5 Use Safety Glasses Always use face or...

Page 10: ...ng procedures should be observed a Wear full eye protection and protective clothing b If electrolyte contacts the skin wash it off immediately with water c If electrolyte contacts the eyes flush thoro...

Page 11: ...t and turn mower off if a child enters the area 3 Never allow children to operate the machine 4 Use extra care when approaching blind corners shrubs trees or other objects that may block your view of...

Page 12: ...nclogging the chute g Mow across the face of slopes never up and down Exercise extreme caution when changing direction on slopes Do not mow excessively steep slopes h Never operate the mower without p...

Page 13: ...arger cord by keeping cord away from sharp edges CHARGING PROCEDURE See A1 A2 A3 1 Charging can be carried out either with the battery FITTED See A1 or REMOVED from the machine See A2 2 Plug the charg...

Page 14: ...u assemble the lawn mower check the accessories according to the information make sure the accessories are complete 1 FITTING THE HANDLE See Fig B1 B5 1 Remove the screws b on the both side of deck Fi...

Page 15: ...ig E The upper handle can be adjusted to 3 different height positions Release the locking cam lever set the upper handle to one of the three height positions and make sure to insert the pin into the h...

Page 16: ...is illuminated the battery charge is very low and should be recharged Before using your new mower for the first time it is recommended that the unit be charged overnight to ensure that the battery is...

Page 17: ...h interfere with the mulching action and reduce runtime The best time to mow grass is in the late afternoon when the grass is dry and the newly cut area will not be exposed to direct sunlight 2 For be...

Page 18: ...stone 6 Check balance of blade See instructions for blade balancing 7 Replace blade on mower and tighten securely Refer to instructions below BLADE BALANCING See O Check balance of blade by placing c...

Page 19: ...t Or both 3 Mower runs but cutting performance is unsatisfactory or does not cut entire lawn A Has battery been fully charged Plug in charger and wait for green light to come on B Release switch lever...

Page 20: ...safety key Clear chute of grass clippings C Too much cut grass Raise cutting height of wheels to shorten length of the cut D Bag full Empty bag more often 9 When mulching there are clippings visible...

Page 21: ...Poign e inf rieure 9 Bavette de s curit 10 Blocs 11 Couvercle du moteur 12 Chargeur voir A2 13 Dispositif de paillage voir H 14 Boulon de la lame voir O1 15 Lame voir O1 16 T moin Lumineux Vert pile c...

Page 22: ...e normal 10 12hrs Mod le de chargeur WA3721 Valeurs nominales du chargeur entr e AC 120V 60Hz 45W sortie 29 5V 1 0A Poids de la machine 22 7kg 50lbs ACCESSOIRES Blocs piles WA3218 1 Chargeur WA3721 1...

Page 23: ...ereux N utilisez pas les appareils dans des endroits tr s humides ou mouill s 2 N utilisez pas sous la pluie 3 Tenez les enfants loign s Tous les visiteurs devraient tre tenus loign s de l aire de tra...

Page 24: ...erie WA3218 WG787 a Ne jetez pas la batterie au feu Les cellules pourraient en effet exploser V rifiez les r glementations locales pour conna tre les instructions de recyclage b Ne tentez pas de d mon...

Page 25: ...me 17 Portez toujours une protection pour les yeux quand vous op rez la machine 18 Consultez les instructions du fabricant pour installer et op rer les accessoires de mani re appropri e N utilisez que...

Page 26: ...jamais la tondeuse pieds nus ou en ne portant que des sandales Portez toujours une paire de souliers qui vous prot gent suffisamment c D brayez le syst me d entra nement s il y a avant de d marrer le...

Page 27: ...Nettoyez ad quatement la lame et v rifiez qu elle est bien quilibr e en la posant l horizontale sur un clou plac dans son trou central Le clou doit galement tre plac l horizontale Si l une des extr mi...

Page 28: ...prise murale 4 Enfoncez le bouton du chargeur Le t moin rouge doit s allumer pour indiquer que le chargeur est aliment et que la charge de la batterie est en cours voir A3 Le t moin lumineux peut pren...

Page 29: ...e I Voir C2 c Fixez la partie avant du cadre en le poussant vers l avant II Voir C2 d Ins rez et fixez la partie arri re du cadre en la poussant vers le bas III jusqu entendre un clic qui indique que...

Page 30: ...D MARRAGE 1 Ins rez la clef de s curit dans son emplacement Voir G1 2 Poussez la cl vers la droite puis tenez la en place Voir G2 3 Tirez la poign e de d marrage vers le haut La tondeuse d marre 4 L c...

Page 31: ...ur le dessus du bac et qui indique la quantit d herbe contenue dans le bac Suivez les instructions ci dessous Bac vide battant flottant a Bac plein battant ferm b 8 VACUATION PAR L ARRI RE Voir M La t...

Page 32: ...objet comme un b ton pour enlever les accumulations de brins d herbe autour de la lame Prendre soin de ne pas se blesser sur les ar tes tranchantes de la lame La nettoyer souvent lorsque l herbe est m...

Page 33: ...un tau O 3 Lorsqu une extr mit de la lame s abaisse meuler ou limer cette extr mit La lame est bien quilibr e lorsqu aucun bout ne s abaisse MAINTENANCE DE LA LAME Voir P1 P2 P3 Aiguisez la lame apr...

Page 34: ...oupe pas toute la pelouse A Est ce que la pile est pleine charge Brancher le chargeur et attendre que le voyant vert s illumine B Relacher l anse pour teindre la tondeuse Retirer la cl de s ret et le...

Page 35: ...cl de s ret Vider la goulotte de l herbe coup e C Trop d herbe coup e Relever la hauteur de coupe des roues pour en couper moins D Le sac est plein Vider le sac plus souvent 9 Au d chiquetage l herbe...

Page 36: ...nca de bloqueo de leva 8 Mango Inferior 9 Tapa de Seguridad 10 Bater a 11 Cubierta del Motor 12 Cargador Ver A2 13 Inserto para Mantillo Ver H 14 Perno de la Hoja Ver P1 15 Hoja Ver P1 16 Luz Indicado...

Page 37: ...Tiempo normal de carga 10 12hrs Modelo del cargador WA3721 Clasificaci n de voltaje del cargador AC 120V 60Hz 45W Salida 29 5V 1 0A Peso de la m quina 50libras 22 7kg ACCESORIOS Bater as WA3218 1 Carg...

Page 38: ...ositivos de retenci n de cable de extensi n est n disponibles PARA TODOS LOS CORTAC SPEDES 1 Evite Ambientes Peligrosos No use artefactos en lugares h medos o mojados 2 No lo use bajo la lluvia 3 Mant...

Page 39: ...las bater as El electrolito liberado es corrosivo y podr a provocar da os en los ojos o la piel Podr a ser t xico si se ingiere d Tenga cuidado al manipular las bater as para no cortocircuitarlas con...

Page 40: ...nte II UTILIZACI N DE LA M QUINA EN PENDIENTES Las pendientes son un factor importante relacionado con accidentes de resbalones y ca das que pueden causar lesiones graves La utilizaci n de la m quina...

Page 41: ...os b No utilice la herramienta con los pies descalzos o en sandalias Utilice siempre calzado s lido c Desconecte el sistema de manejo si se encuentra colocado antes de arrancar el motor d Nunca intent...

Page 42: ...sobre un clavo delgado a trav s de su orificio central El clavo tambi n deber estar en posici n horizontal Si alguno de los extremos de la hoja gira hacia atr s extraiga algo de metal desde el extremo...

Page 43: ...para cargador a la toma de corriente de pared 4 Presione el bot n en el cargador y se deber encender la luz roja para indicar que posee alimentaci n y se est cargando la bater a Ver A3 Es posible que...

Page 44: ...ndose de que exista cable suficiente Fig B5 2 ENSAMBLAJE DE LA BOLSA PARA PASTO 1 Conecte el mango del dep sito de c sped en la caja como se muestra en la Fig C1 C4 a Identifique la parte delantera y...

Page 45: ...se encuentren limpios utilice un pa o seco para efectuar la limpieza Ver F4 NOTA Tenga cuidado de que la bater a no caiga sobre sus pies o al suelo al extraerla OPERACION 1 ENCENDIDO Y APAGADO Ver G1...

Page 46: ...argada es posible que exista una reducci n en la vida til y en el rendimiento de la bater a 6 Ajuste de la altura de corte Ver K Advertencia Det ngase suelte la palanca y espere a que el motor se dete...

Page 47: ...btener el mejor funcionamiento revise las siguientes recomendaciones para desbrozar 1 Evite podar el c sped cuando est mojado debido a la lluvia o al roc o El pasto h medo tiende a formar grupos que i...

Page 48: ...remos de la cuchilla rebaje la misma cantidad de material en ambos extremos PARA AFILAR LA CUCHILLA EN UNA PRENSA Ver N 1 Aseg rese de haber liberado la palanca del interruptor de que la cuchilla se h...

Page 49: ...pulidores Quite todo el pasto y desechos especialmente de las ranuras de ventilaci n Ponga la m quina de costado y limpie el rea de la hoja Si hay cortes de pasto compactados en la zona de la hoja qu...

Page 50: ...e la altura de corte Tambi n puede hacer ambas cosas 3 La podadora funciona pero el rendimiento de corte no es satisfactorio o no corta el c sped en su totalidad A Se ha cargado la bater a por complet...

Page 51: ...ar la podadora Retire la llave de seguridad Elimine los recortes de c sped del conducto C Demasiado c sped cortado Eleve la altura de corte de las ruedas para acortar la longitud del corte D La bolsa...

Page 52: ...Copyright 2011 Positec All Rights Reserved Designed in Italy Made in China Con u en Italie Fabriqu en Chine Dise ado en Italia Fabricado en China...

Reviews: