the blade .
Tighten down and please check that the blade
is firmly secured.
7. To store the spanner insert it into the rear of
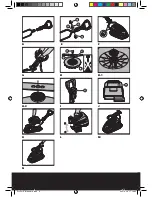
the switchbox (See I). Do not put it in grass.
Warning! Spacers must only be fitted be-
tween the blade and the fan and NEVER be-
tween the blade and the bolt.
HOW TO MOW
NOTE:
•
Cut grass when it is dry.
•
Keep the mower blade sharp and bal-
anced.
•
Do not set the cutting height too low,
especially at the beginning of the mowing
season.
•
For best grass collection always mow
in a straight line, do not swing the lawn-
mower from side to side.
1. Start mowing the edge of the lawn nearest to
the power point so the cable is laid out on the
lawn you have already cut.
2. Mow twice a week during the growing sea-
son, you lawn will suffer if more than a
third of its length is cut at one time and this
may also result in poor collection.
Warning: Do not overload your mow-
er. When mowing do not allow the
motor to labour particularly in heavy con-
ditions. When the motor labours the speed
of the motor drops and you will hear a
change in the motor sound, when this oc-
curs stop mowing, release the switch le-
ver and raise the height of cut. Failure to
do so could damage the machine.
REMOVING, EMPTYING AND REFITTING
THE GRASSBOX
Grassbox full
• As the grassbox fills up, grass will be clearly
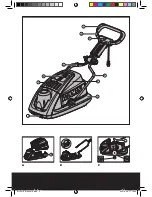
visible through the inspect window (20) (See
J).
• When the window is full, its time to empty the
grassbox.
Emptying the Grassbox
CAUTION: Stop the lawnmower and wait
until the blade has stopped rotating, be-
fore removing the grassbox.
1. Use one hand to hold the grassbox handle
(See K), lift and remove from the mower.
2.To open the grassbox first press the grassbox
release button (7) (See L).
3. Empty grassbox.
4. Lift the flap up until it is locked into place.
5. Put the grass box back and make sure it be
put in correct position on deck (9).
Note: Failure to fit the grassbox correctly
will cause poor collection of grass clip-
pings.
MAINTENANCE
Warning: Stop mower and remove
plug from the power supply before
removing the grass box.
Note: To ensure long and reliable service, carry
out the following maintenance procedures reg-
ularly. Check for obvious defects such as a loose,
dislodged or a damaged blade, loose fittings,
and worn or damaged components. Check that
the covers and guards are all undamaged and
are correctly attached to mower. Carry out any
necessary maintenance or repairs before oper-
ating mower. If the mower should happen to
fail despite regular maintenance, please call
our customer helpline for advice.
Blade Maintenance (See H)
Never carry out any assembly opera-
tions or adjustments with the power
connected to the mower. Always ensure
that the power button is in the off position
and that the power plug is disconnected
from the supply. Always handle the blade
with care-sharp edges could cause injury
use gloves.
Follow these procedures to remove and re-
place the blade. You will need garden gloves
(not provided) and a spanner (14) to remove the
blade. Hold the fan (18) and unscrew the blade
bolt (15)anti clockwise using spanner. Remove
blade and attach a new one to the blade bolt.
Ensure that the blade is properly positioned as
seen in Fig.H, then firmly tighten the bolt.
DO
NOT OVER TIGHTEN.
Renew your metal blade after 50hrs mowing or
2 years ,which ever is the sooner-regardless of
WG701E-M-060818.indd 10
2007-3-28 17:20:02
Summary of Contents for WG701E
Page 1: ...WG701E WG701E M 060818 indd 1 2007 3 28 17 19 20...
Page 2: ...WG701E M 060818 indd 2 2007 3 28 17 19 20...
Page 3: ...A B C WG701E M 060818 indd 3 2007 3 28 17 19 28...
Page 4: ...D E F G H H 1 H 2 I J K L M N WG701E M 060818 indd 4 2007 3 28 17 19 45...
Page 13: ...WG701E M 060818 indd 13 2007 3 28 17 20 03...
Page 14: ...WG701E M 060818 indd 14 2007 3 28 17 20 03...

