background image

13

 Grass Trimmer/Edger 

EN

12

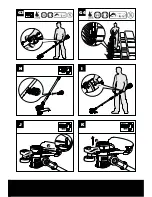
ASSEMBLY & OPERATION

Action Figure

Assembly

Assembling the Main Handle

See Fig. A

Assembling the Safety Guard

See Fig. B

Installing and Removing the 
Battery Park

See Fig. C1,& 
C2 

Checking the Battery Charge 
Condition

See Fig. C3

Charging the battery pack
• More details can be found 
in WA3859’s  manual

See Fig. C4

Operation 

Trimming 

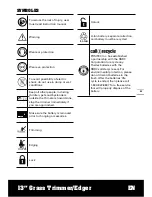
See Fig. D

Adjusting the Trimmer Head 

See Fig. E1 
& E2

Adjusting the Auxiliary Handle  See Fig. F

Edging

See Fig. 
G1~G4

Edger wheel storage

See Fig H

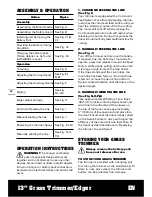
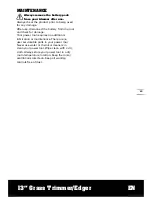
Command feeding the line 

See Fig.I

Manually feeding the line

See Fig. J

Replacing the trimmer Spool

See Fig.,K L M

Manually winding the line

See Fig. N ,O, 
P, Q

OPERATION INSTRUCTIONS

WARNING! 

The charger and battery 

pack are specially designed to work 

together so do not attempt to use any other 
devices. Never insert or allow metallic objects 
into your charger or battery pack connections 
because of an electrical failure and hazard will 
occur.

1. COMMAND FEEDING THE LINE 
(See Fig. I)

Your trimmer is equipped with a Command 
Feed System. For efficiently feeding the line, 
just press the command feed button until you 
hear the ‘clattering’ noise of the line cutting.
The motor will shut off when pressing the 
Command Feed button and will restart when 
releasing the button. During that process the 
line will automatically feed additional line for 
cutting.

2. MANUALLY FEEDING THE LINE 
(See Fig. J)

Turn off the trimmer and remove the battery. 
If required, line can be fed out manually. To 
operate, press and release manual Line Feed 
Button, while gently pulling out the line until 
it is long enough to reach the Line Cutter. 
If the line extends past the Line Cutter, too 
much line has been fed out. If too much line 
is fed out, remove the Spool Cap and turn 
Spool counter-clockwise until the line is at the 
desired length. 

3. MANUALLY WINDING THE LINE 
(See Fig. N,O,P,Q)

Take approximately 20ft (6m) of line. Insert 
.080”(2mm )of line into the Spool holes and 
wind line in the direction of the arrows on 
the top of the Spool. Leave approximately 
4” (100mm) of line unwound and place into 
the cleat. Ensure that the line is neatly coiled 
on the Spool. Failure to do so will impair the 
efficiency of the automatic line feed. Then fit 
the Spool as described above in “Replacing 
the trimmer line and Spool”

STORING YOUR GRASS 

TRIMMER

Always remove the battery pack 

from your trimmer after use.

TO STORE YOUR GRASS TRIMMER

The trimmer is provided with a hanging slot 
for storing the trimmer on the wall.(See Fig.R)
Store in a dry place where the trimmer and 
battery can be protected from damage.

Summary of Contents for WG191

Page 1: ...13 Grass Trimmer Edger EN Coupe gazon Taille bordure 13 F 13 Cortadora de cesped Ribeteadora ES P08 P15 P23 WG191...

Page 2: ...2 1 11 12 13 14 3 4 6 8 9 10 7 5...

Page 3: ...2 1 100 0 2 1 2 1 3 Click Cliquez Clic C3 C4 C2 A B C1...

Page 4: ...0o 1 3 2 2 F G1 G2 E1 E2 D...

Page 5: ...2 1 2 1 90o G3 H I J K G4...

Page 6: ...Q L M N O P...

Page 7: ...R...

Page 8: ...ing time 90min approx Machine weight 8 8lbs Voltage measured without workload Initial battery voltage reaches maximum of 56 volts Nominal voltage is 50 4 volts ACCESSORIES Battery pack WA3559 1 Replac...

Page 9: ...pliance With Care Keep line cutter sharp and clean for best performance and to reduce the risk of injury Follow instructions for lubricating and changing accessories Keep handles dry clean and free fr...

Page 10: ...teries in mouth If swallowed contact your physician or local poison control center 5 CAUTION The battery used in this device may present a risk of re or chemical burn if mistreated Replace battery wit...

Page 11: ...teries life cycle is ended then please call 1 800 822 8837 for a free service that will properly dispose of the battery To reduce the risk of injury user must read instruction manual Warning Wear ear...

Page 12: ...off when pressing the Command Feed button and will restart when releasing the button During that process the line will automatically feed additional line for cutting 2 MANUALLY FEEDING THE LINE See F...

Page 13: ...ry from the tool and check for damage Your power tool requires no additional lubrication or maintenance There are no user serviceable parts in your power tool Never use water or chemical cleaners to c...

Page 14: ...long period or only charged for short term Grass too high Battery defective Fully charge battery also see the content in charger manual Cut in stages Replace the battery Machine does not cut Line brok...

Page 15: ...coupe 330mm 13po Diam tre du l 2 0mm 080po Temps de chargement 90min approx Poids de la machine 4kg 8 8lbs Tension mesur e hors fonctionnement La tension initiale de la batterie atteint le maximum de...

Page 16: ...e normale Gardez votre quilibre et les pieds bien ancr s en tout temps 9 Restez alerte Faites attention ce que vous faites Utilisez le bon sens N utilisez pas l appareil lorsque vous tes fatigu 10 En...

Page 17: ...de ls plus pais que ceux recommand s dans ce manuel 5 N utilisez pas d autres types de mat riaux pour les ls par exemple l m tallique corde etc CONSERVEZ CES INSTRUCTIONS CONSIGNES G N RALES DE S CURI...

Page 18: ...tre recharg e avant l utilisation Les piles cellulaires et les batteries doivent toujours tre charg es avant l utilisation Utilisez toujours le chargeur adapt et reportez vous aux instructions du fab...

Page 19: ...s curit Voir Fig B Installation et remplacement du bloc de batterie Voir Fig C1 C2 V ri cation de l tat de charge de batterie Voir Fig C3 Chargement de la batterie Pour plus d informations se r f rer...

Page 20: ...les trous de la bobine et enroulez le cordon de coupe dans la direction des ches indiqu e sur le dessus de la bobine Laissez approximativement 4po 100 mm de cordon de coupe et placez le dans le serre...

Page 21: ...r un agent de soutien technique Recharger batterie Consulter un agent de soutien technique Vibrations bruits excessifs Appareil d fecteux Bobine du l coupant est mal enroul Consulter un agent de souti...

Page 22: ...incipale dans le socle verrouillage V ri er la tension des c bles d alimentation principale faites v ri er le chargeur de batterie par un agent autoris de soutien technique apr s vente La commande d a...

Page 23: ...corte 13pulg 330mm Di metro del hilo 080pulg 2 0mm Tiempo normal de carga 90min approx Peso de la m quina 8 8lbs 4kg Voltaje medido sin carga de trabajo El voltaje inicial de la bater a alcanza un m...

Page 24: ...n en lo que est haciendo Utilice el sentido com n No opere la herramienta cuando est cansado 10 Guarde las herramientas que no usa en lugares cerrados Cuando no se encuentran en uso las herramientas...

Page 25: ...5 No utilice materiales de l nea de otro tipo como cable de metal cuerda o elemento similar CONSERVE ESTAS INSTRUCCIONES ADVERTENCIAS DE SEGURIDAD GENERAL PARA EL PAQUETE DE BATER A 1 ADVERTENCIA Rie...

Page 26: ...del equipo para saber las instrucciones correctas de carga 15 Cuando sea posible quite la bater a del equipo cuando no est en uso CONSERVE ESTAS INSTRUCCIONES S MBOLOS Para reducir el riesgo de lesio...

Page 27: ...lte la Figura A Armado de la guarda de seguridad Consulte la Figura B Instalaci n y extracci n de la bater a Consulte la Figura C1 C2 Revisar la condici n de carga de la bater a Consulte la Figura C3...

Page 28: ...2mm dentro de uno de los ori cios de la parte superior de la bobina Enrolle el hilo en la direcci n de las echas sobre la parte superior de la bobina Siempre enrolle 4pulg 100mm el hilo comenzando po...

Page 29: ...r a no cargada totalmente Interruptor de encendido apagado da ado P ngase en contacto con un agente de servicio t cnico Vuelva a cargar la bater a P ngase en contacto con un agente de servicio t cnico...

Page 30: ...bater a 18 no se enciende Cargador de bater as no enchufado de forma correcta Tomacorriente cable de alimentaci n o cargador de bater as da ado Inserte el enchufe por completo en el tomacorriente Comp...

Page 31: ......

Page 32: ...Copyright 2014 Positec All Rights Reserved 2CGT13APK11000A0 www worx com...

Reviews: