


24V Cordless Li-ion Blower/Sweeper en
11
10
11
10
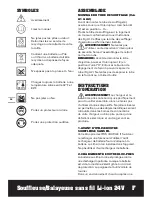
ASSeMBLY
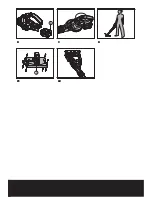
ASSEmBLiNG tHE BLOwER tuBE
(Fig A1 & Fig A2)
Before assembling the Blower Tube(4), be sure
the on/off switch (2) is in ‘’O’’ Off position.
Fit the Blower Tube to the motor housing as
shown in Fig A1. Check the Blower Tube is
firmly secured.
wARNiNG!
Do not attempt to operate
or disable the On/Off Switch by any
means other than the normal assembly or
removal of the tube.
NOtE:
Before disassembling the Blower
Tube, be sure the on/off switch (2) is in ‘’O’’ Off
position. Press the Release Button(3) , so that
you can separate the tube.(Fig A2)Do not try to
separate the tubes by force or by using tools.
OPeRATIOn
wARNiNG!
The charger and battery
pack are specially designed to work
together so do not attempt to use any other
devices. Never insert or allow metallic objects
into your charger or battery pack connections
because of an electrical failure and hazard will
occur.
1. BEFORE uSiNG yOuR CORDLESS
BLOwER
Your battery pack is UNCHARGED and you
must charge once before use.
The battery charger supplied is matched to the
Li-ion battery installed in the machine. Do not
use another battery charger.
2. CHARGiNG yOuR BAttERy PACk
The Li-ion battery is protected against deep
discharging. When the battery is empty,
the machine is switched off by means of a
protective circuit: The tool holder no longer
rotates.
In a warm environment or after heavy use, the
battery pack may become too hot to permit
charging. Allow time for the battery to cool
down before recharging.
3. tO REmOVE OR iNStALL BAttERy
PACk(See B)
Depress the battery release button (6) to
release battery pack from your tool. After
recharging, insert the battery pack into
tool’s battery port. A simple push and slight
pressure will be sufficient.
4. StARtiNG/StOPPiNG(See C)
Starting
Move the On/Off switch (2) to the “I” On
position.
Stopping
Move the On/Off switch (2) to the “O” Off
position.
wARNiNG!
The tool runs for a few
seconds after it has been switched off.
Let the motor come to a complete standstill
before setting the tool down.
5. uSiNG tHE BLOwER(See D)
The blower is intended for residential use
only. Use the blower outdoors to move
debris from hard surfaces. This blower is not
designed to clear leaves from large grassy
areas, or move wet, heavy debris.
uSER tiPS
- Hold the blow tube approx 7” above the
ground when operating the tool
Use a sweeping motion from side to side.
Advance slowly keeping the accumulated
debris/leaves in front of you.
- After blowing the debris/leaves into a pile, it
is easy to dispose of the pile.
CAutiON!
- Do not blow hard objects such as nails,
bolts, or rocks.
- Do not operate the blower near bystanders
or pets.
- Use extra care when cleaning debris from
stairs or other tight areas.
- Wear safety goggles or other suitable eye
protection, long pants, and shoes.
STORAGe
wARNiNG!
Store the blower indoors,
in a cool dry location, out of reach of
Summary of Contents for WG165
Page 2: ......
Page 3: ......
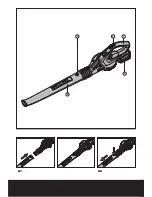
Page 4: ...8 9 6 7 4 3 2 10 5 1 b a B A C...
Page 5: ...c d 16 11 12 13 14 15 17 F1 F2 B E G A D C H1 H2 I J K1 K2 L M...
Page 6: ...6 K1 K2 L M...
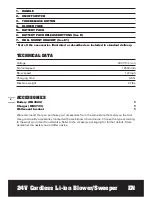
Page 29: ...29...
Page 30: ......
Page 31: ......
Page 34: ......
Page 35: ......
Page 36: ...6 A1 A2 4 3 2 1 5...
Page 37: ...6 7 B D E1 E2 C...