background image

12

3 in 1 Grass Trimmer/Edger

WG160E.5 

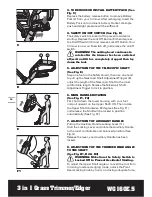
facing in the forward direction (See Fig. B3). The wheels 
should provide support when you are trimming in the 
forward or reverse direction. 

PoSITIoN 2: USING THe GUIDe WHeelS WHeN 

TRIMMING SIDe To SIDe

Position the Grass Trimmer in the trimming position. 
Underneath the Safety Guard there is a metal plate that 
the Edger/Trimming Support Wheels will attach to. Slide 
the Support Wheels vertically onto the metal plate until 
it locks into position (See Fig. B2). The wheels should 
provide support when you are trimming in a horizontal 
side to side direction (See Fig. J2). 

NoTe:

 you could also use the machine without the 

guide wheels on guard when trimming.

PoSITIoN 3:  USING THe GUIDe WHeelS WHeN 

eDGING (See fig. I2)

WARNING:

 Make Sure the Safety Switch is 

Locked Off to Prevent Accidental Starting.

Change the tool from trimming into the edging mode, 
the Edger /Trimming Support Wheels (12) will attach on 
the side the trimmer head as shown in Fig. B1, rotate 
the main handle as described in 

‘’MAIN HANDle 

RoTATIoN’’

, then unlock the Pivot head Locking Knob, 

and using adequate force, pull the trimmer head into 
the desired position. Make sure to adjust the trimmer 
head angle to be in the lowest horizontal setting. 
Finally, lock the Pivot head Locking Knob (See Fig. h3) 
and position the wheel on the ground for the edging 
mode. While edging, keep the Flower Guard/Edger 
Guide aligned with the sidewalk edge, this will assist 
to edge in a straight path. Only the tip of the line will 
make contact with area being worked on. Do not force 
the line. The edging wheels help protect the unit and 
keep the unit from contacting the ground. Take extra 
caution while edging, as objects can be thrown from 
the trimmer line.

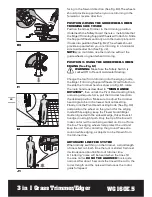
AUToMATIc lINe feeD SySTeM

When initially switching on the trimmer, a small length 
of line is fed out. Each time the tool is started from rest 
it will advance about 6.35mm of trimmer line.
A ‘clattering’ noise will be heard when the lines hit 
the Line Cutter. 

Do NoT Be AlARMeD

 this is quite 

normal. After about 5 seconds the line will be cut to the 
correct length and the noise will reduce as the motor 
gains full speed.

22

18

19

20

21

17

RIGHT

WRONG

H3

I1

I2

J1

J2

K1

K2

K3

L1

L2

L3

L4

Summary of Contents for WG160E.5

Page 1: ...3 in 1 Grass Trimmer Edger SAFETY AND OPERATING MANUAL WG160E 5...

Page 2: ...nplugging the power tool Keep cord away from heat oil sharp edges or moving parts Damaged or entangled cords increase the risk of electric shock 5 When operating a power tool outdoors use an extension...

Page 3: ...sed by poorly maintained power tools 6 Keep cutting tools sharp and clean Properly maintained cutting tools with sharp cutting edges are less likely to bind and are easier to control 7 Use the power t...

Page 4: ...or shields or without guards or shields in place 7 Switch on the motor only when the hands and feet are away from the cutting means 8 Never fit metal cutting elements 9 Use only the manufacturer s re...

Page 5: ...5 3 in 1 Grass Trimmer Edger WG160E 5 SYMBOLS Read instruction sheet Keep bystanders away Wear eye protection Do not expose to moisture C Tick approval mark...

Page 6: ...6 3 in 1 Grass Trimmer Edger WG160E 5 4 6 7 9 10 2 1 5 8 3 14 15 13 12 11...

Page 7: ...n 10 On Off Switch 11 Auxiliary Handle Locking Lever 12 Edger Trimming Support Wheels 13 Line Cutter 14 Lower Shaft Coupling 15 Upper Shaft 16 Motor Housing of Trimmer Head See Fig H2 17 Line Feed But...

Page 8: ...Nominal voltage is 18 volts Accessories Charger WA3843 1 Battery Pack WA3525 1 Edger Trimming Support Wheel 1 Spool WA0004 1 Safety Guard 1 We recommend that you purchase your accessories from the sa...

Page 9: ...on the wheels and pull the wheels outside OPERATION INSTRUCTIONS Warning The charger and Battery Pack are specially designed to work together so do not attempt to use any other devices Never insert or...

Page 10: ...c Shaft AdjustmentTrigger 8 adjust the length of theTelescopic Shaft to the most comfortable length Release theTelescopic Shaft AdjustmentTrigger to lock in position 6 MAIN HANDLE ROTATION See Fig F1...

Page 11: ...r and parallel to the ground perpendicular when edging and not crowded into material being cut Warning Make sure that line is fed out before operation Make sure motor is up to full speed before trimmi...

Page 12: ...main handle as described in MAIN HANDLE ROTATION then unlock the Pivot Head Locking Knob and using adequate force pull the trimmer head into the desired position Make sure to adjust the trimmer head...

Page 13: ...e desired length To remove the Spool Cap Cover See Fig K2 Press and hold in the two Cap Release Latches 19 See Fig K2 Pull the Spool Cap Cover 18 away from the Cutting Head 21 Keep the Spool Cap Cover...

Page 14: ...he efficiency of the automatic line feed Then fit the Spool as described above in Rep lace the trimmer line and Spool MAINTENANCE After use disconnect the battery from the tool and check for damage Yo...

Page 15: ...Grass is too high Battery defective Fully charge battery also see HOWTO CHARGEYOUR BATTERY Cut in stages Replace the battery Machine does not cut Line broken Battery not fully charged Motor is broken...

Page 16: ...Copyright 2012 Positec All Rights Reserved 2CGT09BPK11000A0...

Reviews: