background image

Lawn Mowing Robot 

EN

3

1.  Safety Instructions

1.1 General &additional safety instruction

WARNING: Read all safety warnings and all instructions. 

Failure to follow the warnings and instructions 

may result in electric shock, fire and/or serious injury.

Carefully read the instructions for the safe operation of the machine.

Save all warnings and instructions for future reference.

•  This appliance is not intended for use by persons (including children) with reduced physical, sensory or mental 

capabilities, or lack of experience and knowledge, unless they have been given supervision or instruction concerning 
use of the appliance by a person responsible for their safety. 

•  Children should be supervised to ensure that they do not play with the appliance.
•  The appliance is only to be used with the power supply unit provided with the appliance.

IMPORTANT

READ CAREFULLY BEFORE USE

KEEP FOR FUTURE REFERENCE

SAFE OPERATION PRACTICES

Training

a)   Read the instructions carefully. Make sure you understand the instructions and be familiar with the controls and the 

proper use of the appliance;

b)   Never allow people unfamiliar with these instructions or children to use the appliance. Local regulations can restrict the 

age of the operator;

c)   The operator or user is responsible for accidents or hazards occurring to other people or their property.

Preparation

a)  Ensure the correct installation of the boundary wire as instructed.
b)  Periodically inspect the area where the appliance is to be used and remove all stones, sticks, wires, bones, and other 

foreign objects.

c)  Periodically visually inspect to see that the blades, blade bolts and cutter assembly are not worn or damaged. Replace 

worn or damaged blades and bolts in sets to preserve balance.

d)  On multi-spindle appliances, take care as rotating one blade can cause other blades to rotate.
e)  WARNING! The lawnmower shall not be operated without the guard in place.

OPERATION

1.  GENERAL

a)  Never operate the appliance with defective guards, or without safety devices, for example deflectors, in place;
b)  Do not put hands or feet near or under rotating parts. Keep clear of the discharge opening at all times;
c)  Never pick up or carry an appliance while the motor is running;
d)  Operate the disabling device from the appliance
– Before clearing a blockage;
– Before checking, cleaning or working on the appliance;
e)   It is not permitted to modify the original design of robotic lawnmower. All modifications are made at your own risk.
f)   Start robotic lawnmower according to the instructions. When the power key is switched on, make sure you keep your 

hands and feet away from the rotating blades. Never put your hands and feet under the mower.

g)   Never lift up robotic lawnmower or carry it when the power key is switched on.
h)   Do not let persons who do not know how robotic lawnmower works and behaves use the mower.
i)   Do not put anything on top of robotic lawnmower or its charging station.
j)   Do not allow robotic lawnmower to be used with a defective blade disc or body. Neither should it be used with defective 

blades, screws, nuts or cables.

k)   Always switch off robotic lawnmower when you do not intend to use the mower. Robotic lawnmower can only start 

when the power key is switched on  and the correct PIN code has been entered.

2.  ADDITIONALLY WHEN THE APPLIANCE IS OPERATING AUTOMATICALLY

a)  Do not leave the machine to operate unattended if you know that there are pets, children or people in the vicinity.

MAINTENANCE AND STORAGE

WARNING! When turning the mower upside down, the power key must always be switched off.

The power key should be switched off during all work on the mower’s underframe, such as 

cleaning or replacing the blades.

a)  Keep all nuts, bolts and screws tight to be sure the appliance is in safe working condition;
b)  Inspect the robotic lawnmower each week and replace worn or damaged parts for safety;

Summary of Contents for Landroid WG797E

Page 1: ...myRobotcenter Der Spezialist f r Roboter in deinem Zuhause Mit einem Klick zum Online Shop myRobotcenter at myRobotcenter de myRobotcenter ch...

Page 2: ...P02 P16 P30 P44 Lawn Mowing Robot Roboter Rasenm her Robot de fauchage pelouse Robot tosaerba EN D F I WG797E...

Page 3: ...ndroid L mow 3 4 How efficiently will my Landroid L mow the grass 4 Smart phone control 5 Boundary Wire Basics 5 1 Pegging the Boundary Wire 5 2 Burying the Boundary Wire 5 3 Joining the Boundary Wire...

Page 4: ...rotate e WARNING The lawnmower shall not be operated without the guard in place OPERATION 1 GENERAL a Never operate the appliance with defective guards or without safety devices for example deflector...

Page 5: ...dly in a box or drawer where they may short circuit each other or be short circuited by conductive materials When battery pack is not in use keep it away from other metal objects like paper clips coin...

Page 6: ...hine WARNING Do not ride on the machine Do not burn Batteries may enter water cycle if disposed improperly which can be hazardous for ecosystem Do not dispose of waste batteries as unsorted municipal...

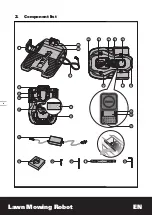
Page 7: ...Lawn Mowing Robot EN 6 2 Component list 9 8 7 6 5 10 12 11 13 15 16 22 25 26 27 24 23 18 14 20 21 19 2 3 4 1 17...

Page 8: ...T COVER 8 STOP BUTTON 9 KEYPAD WINDOW 10 LANDROID DECK 11 REAR DRIVING WHEEL 12 RAIN SENSOR 13 HANDLE 14 MAIN HOUSING CONTAINS MOTOR ELECTRONICS AND BATTERY 15 BATTERY PACK 16 BLADE TURNING DISC 17 CU...

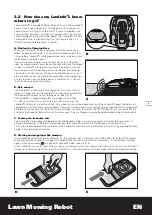
Page 9: ...ng into the care free life of automatic mowing In the following we would like to help you better understand how your Landroid L thinks 3 1 How does my Landroid L know what to mow The Landroid L choose...

Page 10: ...y Wire back to its Charging Base See Fig B The Landroid L is programmable to have a delay start function 0 180 mins when it rains When the rain sensors are wet the Landroid L returns to its docking st...

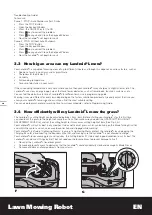
Page 11: ...llow your Landroid L to mow each day until you find the most suitable setting You can also program Landroid Lworking time to suit your schedule refer to Programming Guide 3 4 How efficiently will my L...

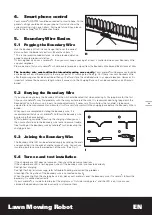
Page 12: ...id L may find problems with the way you have laid the wire It is recommended to first peg down the Boundary Wire to the lawn so it is easy to make adjustments if necessary This will allow the Landroid...

Page 13: ...ostic panel on your mower Firstly position the mower on a horizontal surface Press Key 2 to enter the diagnosis interface and press Key 5 for a few seconds until the three numbers 1 2 3 highlighted be...

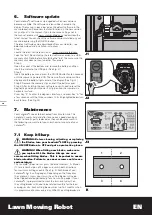
Page 14: ...rewing the Blade to the Blade Disc make sure the Blade is able to spin freely 7 2 Keep it Clean WARNING Before cleaning turn your Landroid L OFF by pressing the ON OFF Button to OFF Put on protective...

Page 15: ...the winter Before you prepare your Landroid L for winter hibernation we recommend you Thoroughly clean your Landroid L Fully charge the battery Turn the mower off The battery should be fully charged...

Page 16: ...may not correspond with the coloured markings identifying the terminals in your plug proceed as follows The wire which is coloured blue must be connected to the terminal which is marked with N The wi...

Page 17: ...m hen 3 4 Wie gut m ht der Landroid L das Gras 4 Smartphone Steuerung 5 Grundlegendes Zum Begrenzungskabel 5 1 Begrenzungskabel Abstecken 5 2 Begrenzungskabel eingraben 5 3 Begrenzungskabel verbinden...

Page 18: ...chneidbalken abgenutzt oder besch digt sind Abgenutzte Messer und Schrauben nur im ganzen Satz auswechseln um Unwuchten zu vermeiden d Achten Sie darauf dass bei Ger ten mit mehreren Klingen ein Kling...

Page 19: ...n unten tragen Halten Sie den Messerteller beimTragen des M hers vom K rper weg Sicherheit hinweise f r Akkupack a Zellen bzw Akkupack nicht zerlegen ffnen oder zerdr cken b Akkupack nicht kurzschlie...

Page 20: ...sorgung in den Wasserkreislauf gelangen und das kosystem bedrohen Entsorgen Sie alte Batterien nicht im unsortierten Haushaltsabfall Akkus sollten dem Recycling zugef hrt werden Akku nicht in den Haus...

Page 21: ...Roboter Rasenm her D 20 2 Lieferumfang 9 8 7 6 5 10 12 11 13 15 16 22 25 26 27 24 23 18 14 20 21 19 2 3 4 1 17...

Page 22: ...HENEINSTELLUNG 8 STOP TASTE 9 TASTATURFENSTER 10 LANDROID M HWERK 11 HINTERES ANTRIEBSRAD 12 REGENSENSOR 13 GRIFF 14 HAUPTGEH USE ENTH LT MOTOR ELEKTRONIK UND AKKU 15 AKKU 16 MESSERDREHSCHEIBE 17 SCHN...

Page 23: ...rtablen Welt des automatischen M hens Nun m chten wir Ihnen zeigen wie Ihr Landroid L funktioniert und denkt 3 1 Wie wei mein Landroid L wo er m hen soll Der Landroid L w hlt seine Richtung nach dem Z...

Page 24: ...y berpr fen B Regensensor Am Heck befindet sich ein Regensensor 12 mit dem der Landroid L Regentropfen erkennt In diesem Fall stellt er das M hen ein und folgt dem Begrenzungskabel zur ck zu seiner La...

Page 25: ...asen Bei sehr niedrigen Umgebungstemperaturen ben tigt Ihr Landroid L eventuell etwas mehr Zeit zum Aufladen Auf offenen Fl chen mit nur wenigen Hindernissen wie Blumenbeeten Springbrunnen Gehwegen un...

Page 26: ...n er auf zus tzliche Biegungen oder Windungen des Grenzkabels st t die nicht zur M hfl che geh ren siehe Abbildung H Wenn nach dem Umschlie en der M hfl che noch Begrenzungskabel brig sein sollte schn...

Page 27: ...FF berpr fen Die aktuellste Software kann auf unserer Website heruntergeladen werden siehe nachfolgende Anweisungen zum Download und zur Installation Schritt 1 Sie finden die aktuellste Software unter...

Page 28: ...keit Hin und wieder sollten Sie alle Messer drehen und umdrehen damit die Schnittleistung m glichst lange erhalten bleibt Beim Drehen und Umdrehen der Messer beachten Sie unbedingt dass Sie s mtliche...

Page 29: ...s mtliche Grasreste und sonstige R ckst nde rund um die Kontakte und Ladestreifen regelm ig damit sich der Landroid L stets problemlos aufladen kann 7 3 Akkulaufzeit und haltbarkeit Das Herzst ck des...

Page 30: ...en berzeugen Sie sich dann davon dass Datum und Uhrzeit stimmen anschlie end lassen Sie den Landroid L wieder das tun was er am liebsten mag M hen 7 5 Akku austauschen WARNUNG Schalten Sie das Ger t u...

Page 31: ...e maximale mon Landroid L est il capable de tondre 3 4 Quel sera le degr d efficacit du travail de mon Landroid L 4 Contr le par smartphone 5 Principe de fonctionnement du fil barri re 5 1 Pose du fil...

Page 32: ...machine changez toujours les lames et leurs boulons en m me temps d Sur les appareils comportant plusieurs arbres veuillez noter que la rotation d une lame peut entra ner la rotation des autres lames...

Page 33: ...dessous Tenez la tondeuse avec le disque de coupe du c t oppos vous Mises en garde concernant la batterie a La batterie et les piles secondaires ne doivent pas tre ouvertes d mont es ou broy es b La b...

Page 34: ...la machine Ne pas jeter au feu Les batteries peuvent entrer dans le cycle de l eau si elles sont limin es de fa on inappropri e ce qui peut tre dangereux pour l cosyst me Ne pas liminer les batteries...

Page 35: ...Robot de fauchage pelouse F 34 2 Liste des composants 9 8 7 6 5 10 12 11 13 15 16 22 25 26 27 24 23 18 14 20 21 19 2 3 4 1 17...

Page 36: ...COUVERCLE DU CLAVIER 10 PLATEAU LANDROID 11 ROUE MOTRICE ARRI RE 12 CAPTEUR PLUVIOM TRIQUE 13 POIGN E 14 BO TIER PRINCIPAL CONTIENT LE MOTOR LES COMPOSANTES LECTRONIQUES ET LA BATTERIE 15 BATTERIE 16...

Page 37: ...s laquelle votre pelouse se tondra toute seule Dans cette section nous vous aiderons mieux comprendre le mode de fonctionnement du Landroid L 3 1 Comment mon Landroid L peut il savoir quels endroits i...

Page 38: ...viom triques Le Landroid L est quip d un capteur pluviom trique 12 situ l arri re ce capteur d tecte les gouttes de pluie et ordonne au Landroid L d arr ter de tondre et de revenir sur le socle en sui...

Page 39: ...issance L aff tage des lames 17 L humidit La temp rature ambiante Le nombre d obstacles dans votre jardin Si la temp rature ambiante de votre r gion est tr s froide le Landroid L devrait mettre un peu...

Page 40: ...fil p riph rique et celui de vos voisins Veuillez garder l esprit que votre Landroid L ne sera pas en mesure de recevoir un signal provenant du fil p riph rique au del d une distance de 25m Le fil ba...

Page 41: ...ogiciel install e sur votre machine en appuyant sur le bouton MARCHE ARR T Le dernier logiciel peut tre t l charg partir de notre site Web Voir ci dessous les instructions de t l chargement et d insta...

Page 42: ...s faute de quoi le disque de coupe risquerait d tre d s quilibr Si votre Landroid L travaille en suivant un planning normal quotidien les lames doivent durer une saison enti re si elles sont retourn e...

Page 43: ...L travaille chaque jour L entretien de la batterie pendant le rangement Le Landroid L peut tre charg manuellement sans cable p riph rique Voir Fig N Pour charger manuellement la batterie sans brancher...

Page 44: ...de r paration Si vous devez changer la batterie proc dez de la mani re suivante 1 Retournez d licatement le Landroid L 2 Enlevez les six vis de fixation de la batterie Voir Fig P 3 Sortez la batterie...

Page 45: ...ndroid L 3 4 Con che efficienza Landroid L taglia l erba 4 Controllo tramite smartphone 5 Nozioni di base relative al filo perimetrale 5 1 Per fissare il filo perimetrale 5 2 Per interrare il filo per...

Page 46: ...iano usurati o danneggiati In tal caso sostituire le lame o i bulloni in blocco per mantenere l equilibrio d Su macchine con pi lame prestare attenzione perch ruotando una lama si provoca la rotazione...

Page 47: ...ella parte posteriore Trasportare il rasaerba con il disco a lame lontano dal corpo Istruzioni per la sicurezza del pacco batteria a Non smontare aprire o strappare le cellule secondarie o il pacco ba...

Page 48: ...gono smaltite in maniera scorretta le batterie potrebbero entrare nel ciclo idrico ed essere pericolose per l ecosistema Non smaltire le batterie nei rifiuti indifferenziati Le batterie vanno con la r...

Page 49: ...Robot tosaerba I 48 2 Elementi dell apparecchio 9 8 7 6 5 10 12 11 13 15 16 22 25 26 27 24 23 18 14 20 21 19 2 3 4 1 17...

Page 50: ...NESTRA TASTIERA 10 ELEMENTO TAGLIAERBA LANDROID 11 RUOTA DI GUIDA POSTERIORE 12 SENSORE PIOGGIA 13 MANIGLIA 14 ALLOGGIAMENTO PRINCIPALE CONTIENE MOTORE COMPONENTI ELETTRONICI E BATTERIA 15 PACCO BATTE...

Page 51: ...ta vita della tosatura automatica Di seguito vogliamo aiutarvi a capire meglio come pensa Landroid L 3 1 Come fa Landroid L a riconoscere ci che deve tagliare Il Landroid L sceglie la direzione a caso...

Page 52: ...di pioggia e indicano a Landroid L di arrestare il taglio e seguire il filo perimetrale fino alla base di ricarica Vedere le Fig B La funzione di partenza ritardata di Landroid L 0 180min pu essere pr...

Page 53: ...luogo di residenza Landroid L potrebbe caricarsi pi lentamente Landroid L utilizza meno energia in aree aperte con una quantit di ostacoli inferiore come aiuole fontane sentieri ecc possibile trovare...

Page 54: ...urve o bobine di filo perimetrale che non fanno parte della sua area di taglio Vedere la Fig H In caso di eccesso di filo perimetrale una volta delimitata l area di taglio tagliare e conservare il fil...

Page 55: ...del software disponibile su www worxLandroid com Copiare il file bin contenente l ultima versione del software in una chiavetta di memoria USB Nota prima di trasferire il file bin accertarsi che la c...

Page 56: ...lame Vedere le Fig L Dopo un certo periodo di tempo di solito dopo ogni stagione le lame di Landroid L devono essere sostituite Landroid L non gradisce eseguire la tosatura con lame di anni e qualit d...

Page 57: ...ganciarlo manualmente alla Base di Ricarica 3 L indicatore luminoso rosso della base di ricarica si illumina 4 Entro 3 secondi e prima che l indicatore luminoso della base di ricarica diventi verde pr...

Page 58: ...imuovere le sei viti sulla batteria Vedere le Fig P 3 Estrarre la vecchia batteria Vedere le Fig Q 4 Inserire la nuova batteria 5 Reinserire saldamente le 6 viti Tutela ambientale I prodotti elettrici...

Page 59: ...Copyright 2015 Positec All Rights Reserved 2CLM80DPK11001A2...

Reviews: