Page 6
Assembly Steps
STEP 3
:
Attaching Top Stretcher
STEP 4
:
Attaching Bench Top
C
B
H-1
H-2
Spring Washer (
∅
13xM8) x 2
Flat Washer (
∅
17x M8) x 2
H-7
Long Allen Bolt (M6 x 70) x 2
2X
B
D
T-1
H-7
H-1
H-2
H-1
H-2
Spring Washer (
∅
13xM8) x 11
Flat Washer (
∅
17x M8) x 11
H-5
Short Allen Bolt (M6 x 45) x 8
H-6
Medium Allen Bolt (M6 x 60) x 3
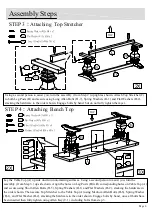
Using a second person to assist you, turn the assembly ( from Step 2 ) upright as shown. Attach Top Stretcher (C)
to both Leg Posts (B) and secure using Long Allen Bolts (H-7), Spring Washers (H-1) and Flat Washers (H-2),
stacking the hardware in the order shown. Engage bolts by hand but do not fully tighten them yet.
TOP
H-1
H-2
H-5
T-1
T-1
H-6
H-1
H-2
B
B
A
2X
3X
Lay the Table Top (A) up side down on non-marring surfaces. Using a second person to assist you, turn the
assembly ( from Step 3 ) up side down. Align the holes on Leg Posts (B) with corresponding holes on Table Top (A)
and secure using Short Allen Bolts (H-5), Spring Washers (H-1) and Flat Washers (H-2), stacking the hardware in
the order shown. Then secure Top Stretcher to the Table Top (A) using Medium Allen Bolts (H-6), Spring Washer
(H-1), and Flat Washer (H-2), stacking the hardware in the order shown. Engage bolts by hand , once all bolts have
been inserted then fully tighten using Allen Key (T-1). including bolts from step 3
TOP
Summary of Contents for Avila 602536
Page 8: ...Page 8 Care Maintenance ...

