24v Lithium-ion Cordless Drill with Hammer Action
AFTER SALES SUPPORT
e-mail: [email protected]
1800 909 909
MODEL: №. 51887 • 06/2016 • 51887
(toll free)
20
AFTER SALES SUPPORT
(toll free)
e-mail: [email protected]
1800 909 909
24v Lithium-ion Cordless Drill with Hammer Action
MODEL: №. 51887 • 06/2016 • 51887
Drill/driving plastics and plastic coated chipboard
• Use high speed drill/driver bits
• See drill/driving wood below
Drill/driving wood
• Clamp a piece of scrap wood to the back of your work to prevent
splintering.
Hammer drill operations.
• Where possible, use High speed.
• Select the hammer position on the torque collar.
• Use drill bits specifically for masonary applications.
• Ensure to wear safety glasses.
All drill/driving operations
• Mark off the centre of the hole using a centre punch or nail.
• Don’t force the drill/driver, let it work at its own pace
• Keep the drill/driver bit sharp.
• Reduce pressure, as the drill/driver is about to break through the item
being drill/drivered.
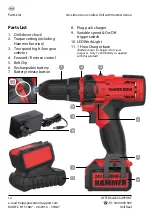
LED work light
When the unit is switched on, the LED work light (10) also comes on to
ensure better vision and to make working in dark areas more safe.
The working light goes out when the On/Off switch (9) is released.
CAUTION! LED is laser class 1!
Do not look directly into the laser as this may result in damage to the eyes.
Chuck replacement
The chucks of reversible drill/drivers are always fixed by a screw with a left-
hand thread. The screw, which is located in the centre of the chuck, must
be removed before the chuck can be removed. To remove the screw, turn it
in a clockwise direction. The chuck can now be removed by unscrewing it
anti-clockwise. If you have trouble removing the chuck take the drill/driver
to your nearest authorised service centre for chuck replacement.
CAUTION. Always ensure that the drill/driver is switched off and the battery
pack is removed before making any adjustments.
Operation


