6.
a. Connect short chain (41 links) with the supplied connecting link from the left-side coaster brake sprocket to the
rear axle sprocket.
b. Pull back slightly on the rear frame to tighten the chain. DO NOT
OVERTIGHTEN. Tighten the four bolt/nut/washer combinations
from the
frame assembly
.
7. On coaster brake models, align the left-side coaster brake sprocket
with the rear axle sprocket.
8. Slide axle through the rear frame and rear axle sprocket. Insert the
keyway into the sprocket along the axle slot. Install the set screw to
lock the sprocket onto the rear axle.
For three speed coaster brake models, refer to the
Shimano
or
Sturmey Archer
booklet provided for detailed
assembly instructions. Zip-tie shifter housing cables to underside of frame tubing leading up toward the handlebars.
Cut excess plastic and aim cut sections away from the frame.
Note: If you have a freewheel model, we recommend that you upgrade to a single- or three-speed coaster brake
model. To order, call the Worksman Cycles Customer Service Center at (718) 322-2000.
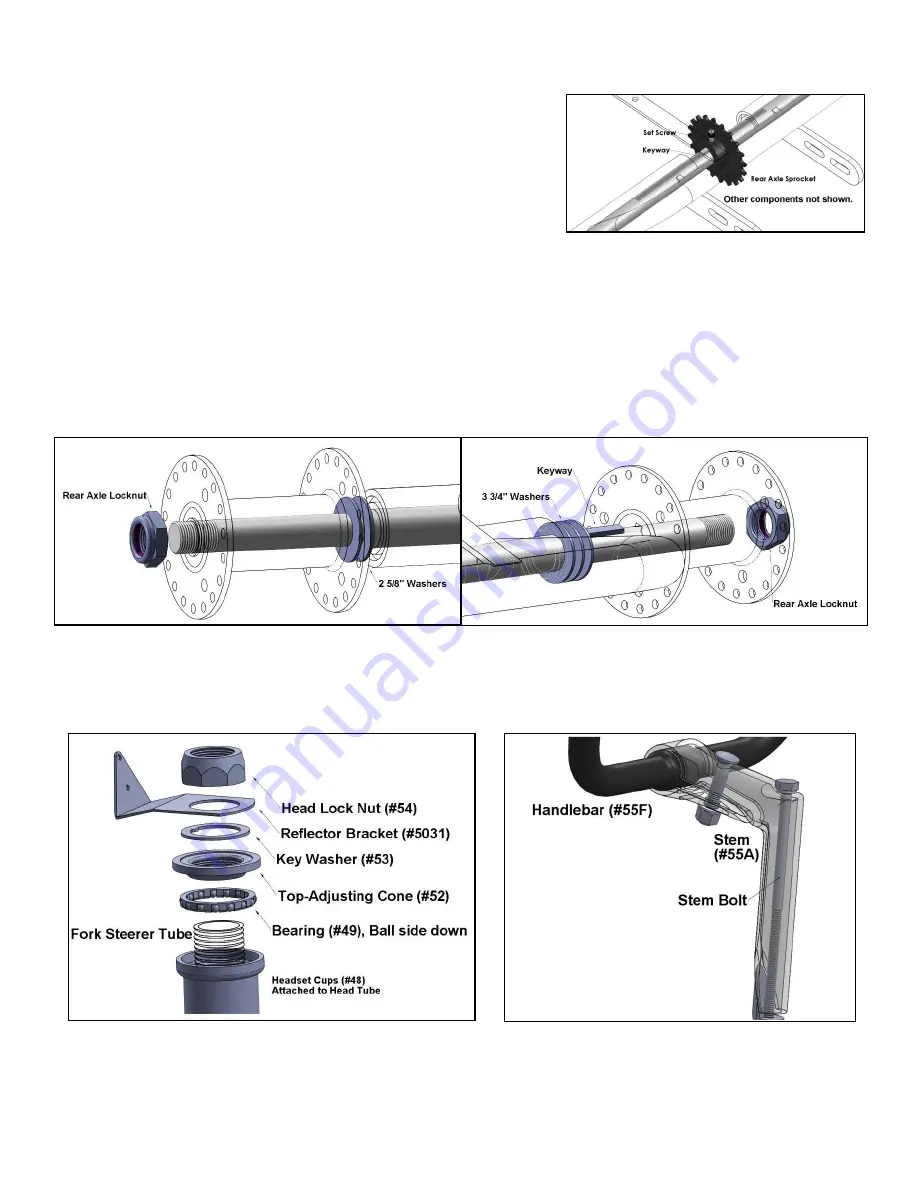
3) REAR WHEEL ASSEMBLY
(See illustrations)
The right-side drive wheel has one bearing and a keyed slot. The left side free wheel has two bearings. Install as
shown. Note that the wheels are assembled but spokes have been omitted for clarity.
FREE WHEEL
DRIVE WHEEL
4) FRONT ASSEMBLY
(See illustrations)
Bearing cups have been pressed into the headtube at the factory.
1. Grease bearing cups
(#48)
with
Rustolene 200
or equivalent lubricant. Bearings are pre-greased.
2. Place one bearing
(#49)
onto the fork steerer tube, balls facing up.
3. Slide the steerer tube through the headtube from the bottom.
4. Place the other bearing
(#49)
onto the steerer tube, balls facing down.
5. Install the top-adjusting cone
(#52)
onto the steerer tube. Hand-tighten until just before the bearings bind, then
turn back a quarter-turn.
6. Slide the key washer
(#53)
onto the steerer tube, then the reflector bracket
(#5031)
.
7. Install the head lock nut
(#54)
and securely tighten, again making sure the bearings do not bind. The fork should
rotate freely without excess play.


