Worksite 68125159 Operator'S Manual Download Page 21

21

ENGLISH

OPERATING PROCEDURES

CAUTION:

All air line components (including hoses, pipe, connectors, filters, & regulators, 

etc.) must be rated for a minimum working pressure of 150 PSI or 150% of the 

maximum system pressure, whichever is greater.

Disconnect the tool from the air supply before performing maintenance, clearing a 

jammed fastener, leaving the work area, moving the tool to another location, or 

handing it to another person.

CAUTION:

Keep the tool pointed away from yourself and others at all times.

Do not load fasteners with air connected, safety or trigger depressed.

Always wear approved safety glasses and hearing protection when preparing or 

operating this tool.

Never use a tool that leaks air or needs repair.

!

!

!

CAUTION:

Keep tool pointed in a safe direction at all times.

Never attempt to drive fasteners into materials too hard to penetrate, or at too 

steep an angle, or too near the edge of the workpiece. The fastener can ricochet 

and cause personal injury.

Disconnect tool from air supply before doing any disassembly, maintenance, 

clearing a jammmed fastener, leaving the work area, moving the tool to another 

location, or handing the tool to another person.

Clean and inspect the tool daily. Carefully check for proper operation of trigger 

and safety mechanism. Do not use the tool unless both the trigger and the safety 

mechanism are functional, or if the tool is leaking air or needs any other repair.

PREPARING THE TOOL

Turn the compressor on and set the regulator to proper pressure for the size and type 

of fasteners being used.

After reading and understanding this entire manual, connect tool to air supply.

LOADING THE FASTENERS

1.    Disconnect the tool to the air supply before loading fasteners to prevent fasteners 

from firing during connection. The fastener driving mechanism may cycle when 

the tool is connected to the air supply.

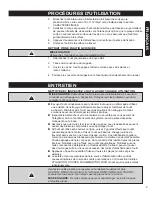
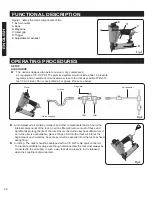
2.    Depress the safe cover to release the movable magazine unit and pull the 

magazine out fully as shown in Fig.4.

3.    Place a full stick of the desired type and size of fasteners on the fixed magazine 

unit. Up to 100 fasteners can be loaded in the magazine.

4.    Push the movable magazine unit forward until the fixed latch clicks and locks it.

5.    The tool is ready to operate.

NAIL FIRING DIRECTIONS

1.    The depth to which a fastener is driven is determined by  the supplied air 

pressure. Test fire a fastener into a sample of the material you will be working 

on and check depth. If a change is desired, adjust  the regulator to supply air 

at a higher or lower pressure. Test fire another fastener and check depth again. 

Adjust as necessary.

Fig.4

Summary of Contents for 68125159

Page 1: ...fety instructions operating procedures and warranty Put it and the original sales invoice in a safe dry place for future reference QUESTIONS 1 866 283 2239 Notre personnel du service la client le est...

Page 2: ...ur l audition Toujours porter une protection auditive lors de l utilisation de l outil Ne pas le faire peut entra ner la perte d audition Protection des yeux Toujours porter des lunettes de s curit de...

Page 3: ...z des v tements appropri s vitez de porter des v tements amples ou des bijoux Attachez les cheveux longs Gardez les cheveux Ies v tements et Ies gants l cart des pi ces mobiles Les v tements amples bi...

Page 4: ...outils propres Un outil bien entretenu r duit le risque de blocage et est plus facile cont ler Rangez l outil hors de la port e des enfants et de toute autre personne qui n en conna t pas Ie fonction...

Page 5: ...util inutilisable ou dangereux Si l outil a t chapp ou lanc examiner soigneusement les parties tordues fissur es ou bris es et les fuites d air Arr ter et r parer avant d utiliser l outil ou des bless...

Page 6: ...is raccord est utilis l outil pourrait demeurer charg d air apr s avoir t d branch et tre en mesure d enfoncer une fixation m me apr s le d branchement du tuyau d air pouvant ainsi entra ner des bless...

Page 7: ...re pour conduite d air enl vera la plupart de ces contaminants et prolongera consid rablement la dur e de vie de l outil Assurez vous que l huileur en ligne comporte suffisamment d huile Si un huileur...

Page 8: ...branchez l outil de la source d alimentation d air avant de proc der l entretien au d gagement d une fixation coinc e et avant de quitter le lieu de travail de d placer l outil d un endroit l autre o...

Page 9: ...outil avec des solutions de nettoyage De telles solutions peuvent endommager les pi ces internes Inspectez le d clencheur et le m canisme de s curit pour vous assurer de l int grit et du bon fonction...

Page 10: ...ass dans le chapeau de cylindre Remplacez le ressort cylindre est obstru Remplacez les pi ces internes endommag es L outil saute des pi ces de Butoir us ou ressort endommag Remplacez le butior ou le r...

Page 11: ...des normes de haute qualit tr s strictes et sont garantis pour usage domestique contre tout d faut de fabrication pour 24 mois suivant la date d achat Cette garantie n affecte pas vos droits l gaux C...

Page 12: ...35 NO DESCRIPTION 63 43 44 45 46 47 48 49 50 51 52 53 54 55 56 57 58 59 60 61 62 Veuillez consulter le sch ma la page suivante AVERTISSEMENT Toutes les r parations doivent tre ex cut es par le personn...

Page 13: ...13 SCH MA SCHEMATIC DRAWING FRAN AIS ENGLISH...

Page 14: ...eel strip Nail positioning strip C Nail positioning strip B Nail positioning strip A Nail pusher Spring holder B Spring holder A Spring pin 2 5x30 Mobile magazine Hex bolt M4x6 Stopper Magazine end st...

Page 15: ...injury Eye protection Always wear safety goggles safety glasses with side shields or a full face shield when operating this product Risk to hearing Always wear ear protection when using this tool Fai...

Page 16: ...y from moving parts Loose clothes jewelry or long hair can be caught in moving parts Stay alert watch what you are doing and use common sense when operating the tool while tried or under the influence...

Page 17: ...could cause a fastener to be directed toward anything other than the workpiece Never use gasoline or other flammable liquids to clean the tool Never use the tool in the presence of flammable liquids o...

Page 18: ...ricochet injuring you or people around Do not carry the tool from place to place holding the trigger Accidental discharge could result Choice of triggering method is important Check manual for trigger...

Page 19: ...ceed 110 PSI If the regulator fails the pressure delivered to the tool must not exceed 120 PSI The tool could explode which will cause death or serious personal injury Always disconnect air resource a...

Page 20: ...ale quick connector To prevent accidental cycling even though disconnected the tool must always be connected to the air supply in such a way that all air pressure in it is released when the coupling i...

Page 21: ...l daily Carefully check for proper operation of trigger and safety mechanism Do not use the tool unless both the trigger and the safety mechanism are functional or if the tool is leaking air or needs...

Page 22: ...ly if necessary Do not soak tool with cleaning flammable solutions Such solutions can damage internal parts Inspect trigger and safety mechanism to assure system is complete and functional no loose or...

Page 23: ...gh Adjust air pressure at regulator Tool runs slowly or has power loss Add oil as instructed Check air supply Broken spring in cylinder cap is blocked Replace spring Exhaust port in cylinder cap is bl...

Page 24: ...vice technicians at our toll free service line at 1 866 283 2239 from 8 AM to 6 PM Monday to Friday Eastern time RONA reserves the right to repair or replace the defective tool at its discretion The p...

Reviews: