6721814542 2019/09 UK/IE
Flue kit installation instructions
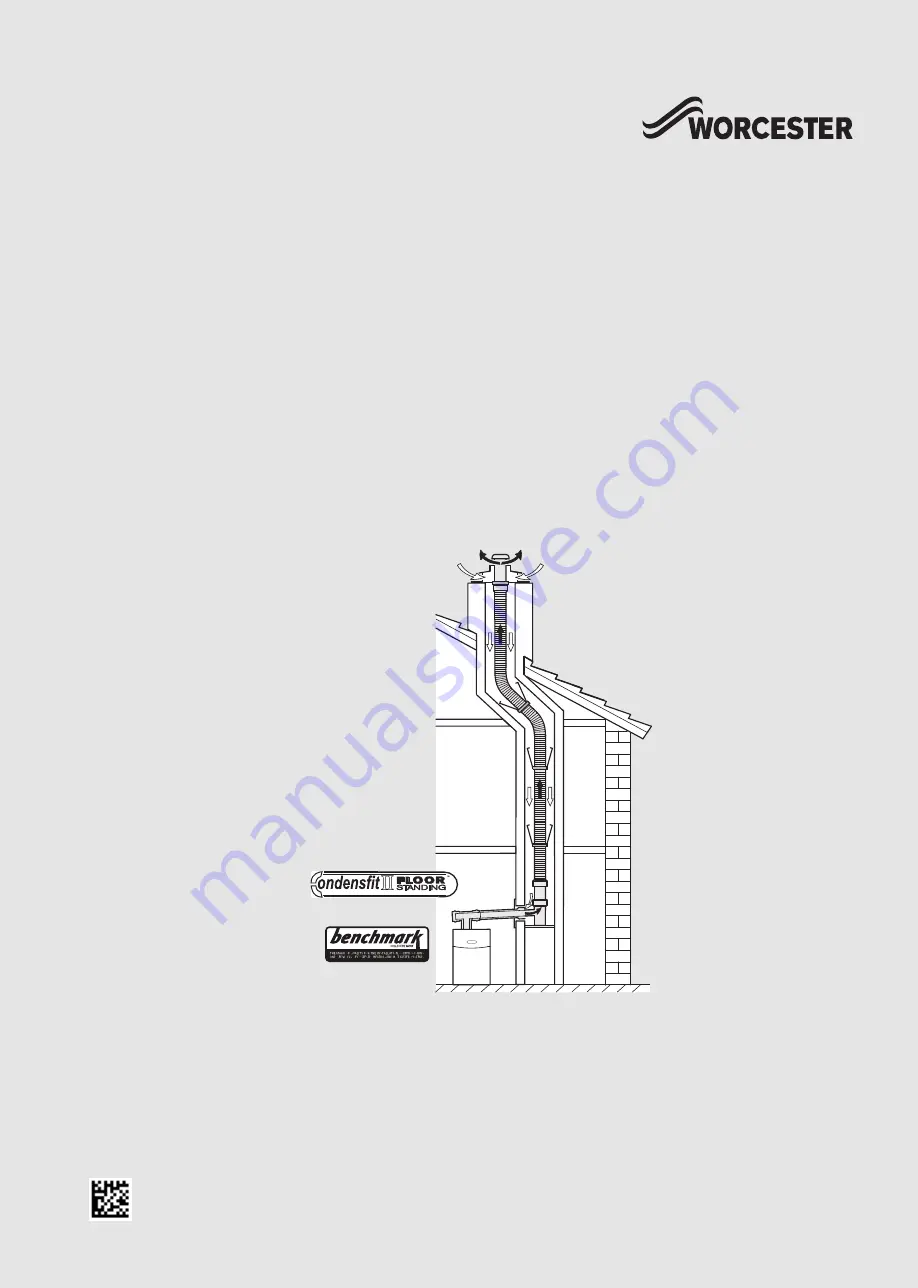
Floor standing gas-fired condensing appliance flue
Greenstar 80mm Flexi RF Flue
00100291
18-001
Flexible Flue Liner
Page 1: ...6721814542 2019 09 UK IE Flue kit installation instructions Floor standing gas fired condensing appliance flue Greenstar 80mm Flexi RF Flue 0010029118 001 Flexible Flue Liner...
Page 2: ...lation and maintenance instructions manual carefully before starting installation Observe all the safety precautions described in the Installation and maintenance instructions for the appliance this a...
Page 3: ...eceipt for completeness and possible transport damage In the event of transport damage the delivery should only be accepted conditionally Do not use damaged components for assembly Carefully unpack th...
Page 4: ...locate in two places into recesses at the top and bottom of the flexible flue liner 8 Refer to figures 12 and 17 No Description Quantity 1 Flue terminal 1 2 Chimney cowl 1 3 Self adhesive weather seal...
Page 5: ...evant appliance installation manual For information regarding installation clearances please refer to the appliance installation manual 3 1 Chimney requirements Chimney size Before starting with the f...
Page 6: ...e length Table 8 Maximum flue length To calculate the effective flue length Check the flue path and consider the following the number of 90 and 45 elbows required outside the chimney the number of ben...
Page 7: ...height must rise by at least 52mm The further away the appliance stands from the chimney wall the higher the lower edge of the chimney hole must be Fig 6 Positioning the chimney opening The chimney ho...
Page 8: ...shown in fig 11 Fig 11 Place the elbow assembly into the opening 4 3 Assembling the flexible flue 1 Apply silicon grease 3 to the seal 2 and fit the seal into the first recess on the flexible liner 1...
Page 9: ...ralising spacer around the flexible liner as shown in fig 14 Fig 13 Flue spacer Fig 14 Fitting spacers The centralising spacers must be fitted to the flexible liner in certain positionstoensuretheline...
Page 10: ...tor into the support elbow Fig 16 1 Slide the Chimney support bracket 2 over the flexible flue liner 1 2 Apply silicon grease 3 to the seal 4 and fit the seal into the first gap from the top of the fl...
Page 11: ...minal flue 1 Flexible flue liner 2 Chimney bracket 5 Flexible to rigid adaptor 6 Flue terminal end 7 Chimney cowl 1 Apply the lubricant supplied to the seal on the adaptor 5 and fit the flue terminal...
Page 12: ...t 4 7 Fitting the flue adaptor To ease the assembly of the flue components Grease all seals lightly with solvent free grease Ensure all seals are seated properly and are in good condition 1 Fit the fl...
Page 13: ...damage Only straight flue extensions may be cut Do not modify flue elbows or the tee piece Fig 26 Cutting the flue extension Thefluepipemustnotbecloserthan25mmtoanycombustiblematerial The tee piece h...
Page 14: ...0 Connecting tee piece and flue pipe to elbow 4 Connect the tee piece to the appliance flue outlet Secure the tee piece to the connector with the two screws provided Fig 31 Connecting tee piece to app...
Page 15: ...the inner flue end cover 3 Remove the screws that secure the inspection plate and slide the inspection plate away from the chimney Fig 34 Visual check Replace all end covers and the inspection plate a...
Page 16: ...Kingdom Tel 0330 123 9559 worcester bosch co uk TECHNICAL SUPPORT 0330 123 3366 RENEWABLE SUPPORT 0330 123 9229 CONTROLS AND CONNECTIVITY TEAM 0330 123 3641 APPOINTMENTS 0330 123 9339 SPARES 0330 123...